AdSense

Showing posts with label *baking. Show all posts

Sunday, May 10, 2015

Macaroni with Mushroom and Cheese


Recipe for Macaroni with Mushroom and Cheese

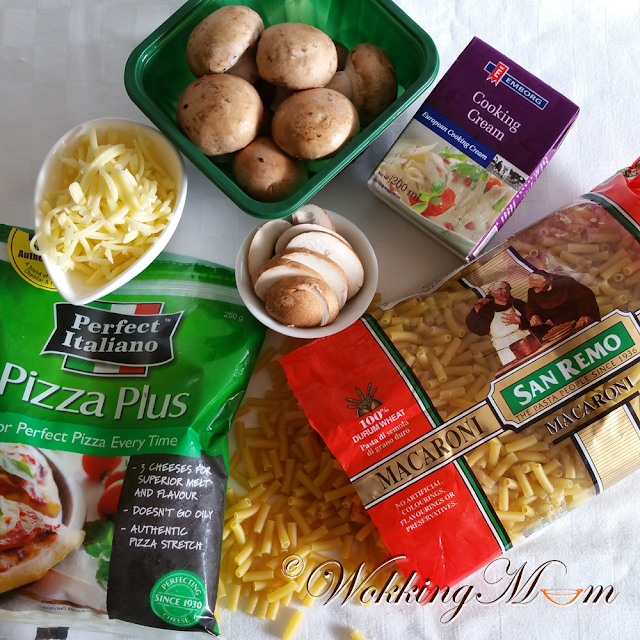
Ingredients:
  • 80g Pasta
  • 1 glove Garlic, minced
  • 1/2 tablespoon Butter
  • 8 Cremini Mushroom aka Brown Swiss Mushrooms, sliced
  • 180ml - 200ml Cooking Cream
  • 2 handful Mixed Shredded Cheese

How to do it:

  1. Cook pasta in lightly salted water and according to the package's instructions.
  2. Drain and set aside in baking dish.
  3. In a pan, add in butter.When butter started to melt, add in garlic.
  4. Saute till fragrant. Garlic should be soften but not brown.
  5. Add in mushroom and continue cooking for about a minute.
  6. Pour in cooking cream.
  7. Cooking till mushroom have absorb the liquid and the cream has thicken a little.
  8. Add a pinch of salt.
  9. Pour over the cooked pasta.
  10. Give it a gentle toss or just mix a little so the mushroom will get mixed around with the pasta.
  11. Top the pasta with cheese.
  12. Bake at preheat oven at 240c for 10mins or till cheese brown.
  13. Remove and serve immediately.

Note:
  • I'm using straight macaroni so the portion looks small but it is very compact.  Hence, although the portion seems little but is just nice for one person (but very filling for me).  Use your favourite pasta if you like. :)
  • You can add cooked (grilled/fried) chicken or fish with or without the mushroom.  Seafood would nice too.
as seen in https://instagram.com/p/2VTEEKgdKp/


Sunday, February 1, 2015

Mussels in Buttery Lemon Garlic Sauce


This is just one of the dishes that I loved and won't mind having it often. 

I wished that I had prepared some toasted bread to clean up the sauce.  The sauce was cleared up anyway, because I mixed my rice with it and ate it all up.  Burp!

Ingredients:
  • 8 to 10 frozen mussels, thawed and cleaned

Sauce:
  • 20g Butter
  • 3 - 4 Garlic, minced or grated (you can use a garlic press)
  • 200g Cooking Cream
  • 1/2 teaspoon Dried Thyme or a small handful Fresh Thyme
  • 1 to 2 teaspoon Lemon Juice or to your taste
  • Salt and Ground Black Pepper to taste
  • Zest of half a lemon (optional)

How to to it:
  1. Melt butter in a pan.
  2. Add garlic and saute till soften and fragrant but not browned.
  3. Add cream and Thyme.
  4. Cook in medium low heat till the sauce bubbles.
  5. Continue cooking till the sauce starts to thicken.
  6. Add in the remaining ingredients for the sauce.
  7. While the sauce is cooking, prepare the mussels. 
  8. Make sure the mussels are thawed, cleaned and dabbed dry.
  9. Arrange mussels in a oven proof dish.
  10. Once the  sauce is ready, pour it over the mussels.
  11. Bake in preheated oven at 230C for 7 mins.
  12. Serve immediately.

Notes:
  • If you do not have a oven, you can also cook.
  • Place the mussels down on the pot; shell facing up.
  • Simmer for about 10mins till mussels are completely heated thru.
  • I preferred oven baking as it will brown the surface a little and has a more even cooking for the mussel.


Saturday, July 5, 2014

[ Breakfast : Easy Peasy Chocolate Chips Cupcakes ]


People who knows me knows I don't really bake (cakes) b'cos I think I sucked at baking.  Yes, I know practise makes perfect but I hardly have cake fans at home.  (I only have one!)  What I really need is a lab rat cake fan which makes it even harder. 

I really hate to see food in the bin.  Hence, no cake baking for me.  Okay, lame excuse.

The truth is my oven is 99% used for cooking.  :P  Well, I do bake, maybe once in a thousand blue moons.  And after a few rejects to my daughter's requests for 12-Cupcakes.  :P

So, this is once of those occasions and I'm so grateful that my daughter cum lab rat cake fan didn't compare my cupcakes with the money making ones.  Maybe she waited too long to have cupcakes so she is happy just to get her hands on any cupcakes, with or without 'numbers'.

My recipe is a super simple and straight forward one, which I have been using for years, requires no prior baking knowledge or skills.  I dare say that b'cos even someone (me) who sucked at baking (cake) could get the cupcakes to be fluffy, I'm sure anyone else can too.

Ingredients:
  • 220g Butter, soften
  • 200g Caster Sugar
  • 4 Eggs
  • 220g Self Raising Flour
  • 200g Chocolate Chips, more if you like 
  • 1 teaspoon Vanilla Extract

How to do it:
  1. Cream butter and sugar till light and fluffy.
  2. Add one egg at a time and continue beating.
  3. Add in the vanilla extract and mix well.
  4. Add in flour and beat well till mixture is smooth and pale.
  5. Fold in the Chocolate Chips till combined.
  6. Spoon batter into muffin cup.
  7. Bake for 20 minutes in preheat oven at 180C.
  8. Cool on rack.

Note:
you can use berries,  nuts or Oreo cookies instead of chocolate chips too.


Tuesday, January 28, 2014

Peanut Cookies with Sesame Seeds


I had plans to baked some Chinese New Year goodies this year. But as usual, things never turn up as planned. I didn't get to baked any CNY goodies. :(  I did, however managed to fry a bottle of Arrowhead Chips for myself. :P

Just a couple of days before CNY, the kids asked why there isn't any Peanut Cookies which happened to be their favourite. Hence, I burned some mid-night oil to bake a few bottles of it. Of course, I got nagged for 'wasting time'. *roll eyes* Some people men just don't understand. :P


Friday, September 6, 2013

Shortbread Cookies
奶油酥餅


Last week I dropped my mobile phone and the screen cracked. Such luck! I was only able to send it for repairs 2 days ago after the Teachers-Parents Conference. After that, I rushed to get butter and flour to make cookies for Teachers' Day. I should have planned earlier but my mind was in a blank.

As I was rushing for time, I didn't get the kids to be involved. I just gave them so fancy papers to make cards for their teachers.

I made some plain shortbread cookies and some with sugar sprinkles. Personally, I preferred the ones with sugar sprinkles as they are sweeter. :P  If you would like a sweeter plain cookies, increase the amount of sugar used. I was lazy to make 2 dough and just make 1 dough with lesser sugar (as stated in my recipe below).


Ingredients:
  • 500g Butter, softened
  • 100g Brown Sugar
  • 170g Caster Sugar
  • 1 teaspoon Vanilla Essence
  • 675g Plain Flour
  • 75g Rice Flour
  • Demerara Sugar or Coloured Sugar Sprinkles

How to do it:
  1. Beat butter, sugar and vanilla till light and fluffy.
  2. Add flour and beat on low speed till just combined.
  3. Knead dough on a floured surface until smooth.
  4. Divide dough into 3-4 portions.
  5. Roll each portion of dough between two sheets of baking paper.
  6. Refrigerate for 30 minutes.
  7. Cut shapes out with cookie cutters.
  8. Sprinkle with Demerara or Coloured sugar.
  9. Prick with fork (optional).
  10. Place cut out dough apart as they will expand during baking.
  11. Baked in the preheated oven at 150C for 25 minutes or till they turn pale yellow.
  12. Stand the shortbread on tray for 2 minutes.
  13. Cool on wired rack and store in airtight container.

Saturday, August 24, 2013

Baked Cheesy Cauliflower Mash
烤芝士花椰菜泥


I haven't had time to update my recipes but I have been cooking! ;) Have a look at my Instagram if you are interested to know what we have been eating at home and what recipes I will be sharing soon. If only I have 48 hours a day ...


Anyway, I cooked Chicken Chop with Cauliflower Mash last Thursday for dinner and had some cauliflower mash left. It was cold after I left it out and it didn't taste nice. :P I didn't want to waste it and decided to baked it with some cheese. My daughter soon finished the whole dish of it after I offered her a spoon full of the baked mash. And she requested I make it again.

As requested, I made it again last night. I would suggest you use a shallow dish instead of a deep dish to bake this. It's a lot nicer with more cheese. The cheese topping will not be enough to go round for a deep dish of cauliflower mash. If you prefer a healthier choice with lesser cheese, go ahead and use a deep dish instead.

I recently received a Bosch ErgoMixx Hand Blender for review and it really makes preparing the cauliflower mash a whiz. I will share more on the product in another post.


Ingredients (3-4 servings):
  • 600g Cauliflower, cut into florets
  • 10g Butter
  • 3 tablespoon Shredded Parmesan Cheese or Mozzarella Cheese (for each serving)
  • 1 tablespoon Parmesan cheese powder (for each serving)
  • Parsley Flakes (optional)

How to do it:
  1. Boil cauliflower florets in a pot of salted water till tender.
  2. Drain and puree the cauliflower with butter.
  3. Divide cauliflower puree into 3 or 4 portions
  4. Mix a tablespoon Shredded Parmesan Cheese or Mozzarella Cheese in each portion.
  5. Sprinkle the remaining 2 tablespoon cheese over each portion cauliflower mash.
  6. Sprinkle 1 tablespoon Parmesan cheese powder and parsley flakes, if using, for each portion.
  7. Bake in preheat oven at 250C for 10min or till cheese melts and Parmesan cheese powder turns brown.
  8. Serve and eat with caution.

Note:
Instead of Shredded Parmesan Cheese or Mozzarella Cheese, you can try using other cheese.

Wednesday, July 17, 2013

Steamed Clams with Herb and Tomatoes
百里香和蕃茄蒸蛤蜊


My kids have recently learned how to enjoy clams. My son loves the spicy clams. My daughter can't take spicy food so she has been bugging me to steam some clams for her.

I bought a kilogram clams and saved some to steam them with egg (recipe coming up soon) and used the rest to prepare this for my dinner.

However, the kids ate this up as well. =_=|||


Ingredients:
  • 750kg Clams, washed and cleaned
  • 1 tablespoon Olive Oil
  • 1 1/2 tablespoons chopped garlic
  • 3 tablespoon Sake
  • 1/2 teaspoon Chicken Stock
  • 150ml Water
  • 2 sprig Thyme (I'm using Lemon Thyme from my Mini Garden)
  • a handful Cherry Tomatoes, half (I'm using my homegrown Cherry Tomatoes ^^)

How to do it:
  1. Prepare 2 layers of baking paper in an oven proof dish and set aside.
  2. Heat wok and add oil.
  3. Stir fry garlic till fragrant but not brown.
  4. Add in wine, water and chicken stock.
  5. Bring to a simmer.
  6. Turn off fire and set aside.
  7. Arrange clams in the baking paper.
  8. Scatter around thyme and cherry tomatoes.
  9. Pour the stock over the clams.
  10. Gather the edge of the baking paper and loosely tie it.
  11. Bake in a preheated oven at 240C for 12 mins or till clams are opened.
  12. Discard any clams that remain closed.
  13. If you want to cook it on stove top, wrap the piece of foil on the outer layer.
  14. Cook it on a pan till clams are opened.
  15. Season with salt if necessary.

Note:
  • Add chopped onion and celery for better taste.
  • Stir fry them after step 3 till they are softened and continue with the rest of the instructions.

I have cut down my Cherry Tomato Plant to grow new plants.
These were the last of my homegrown Cherry Tomatoes.

Wednesday, April 10, 2013

Mac and Cheese with Ham Gratin
芝士火腿烤意大利粉


Many years ago, my BFF Shirley and I frequent this Japanese Restaurant at Scotts Isetan very often after work. I always order their Macaroni with Teriyaki Chicken Gratin. (I'm a boring person).

It's different from the American's Mac & Cheese, which is basically Macaroni with Cheese Sauce, if I'm not mistaken. This Japanese Macaroni Gratin, is not as thick or over loaded Cheese Sauce. It's more like a cream sauce with Cheese in it and the top is baked with golden Parmesan Cheese. It could be other Cheese though but I'm sure it's not breadcrumbs that gives it the colour. ;) And it goes really well with the succulent Teriyaki Chicken, which I shall add on the next time I improve on this dish. :)

The restaurant has closed years ago and we haven't found any Macaroni and Cheese Gratin quite close to theirs. As much as I tried my best to replicate the dish, I too didn't come close to it.

Well, if you would like to try making your own Mac & Cheese Gratin instead of buying the instant ones from the supermarkets, you might like to try my recipe. At least, it helps clears out Cheese scraps for mommies who are into making bentos for their kids.


Ingredients (for 1 portion only):
  • 60g Macaroni or Assorted Pasta
  • 50g Chopped Ham
  • 1-2 tablespoon Parmesan Cheese
Sauce:
  • 15g Butter
  • 100ml Cooking Cream
  • 120ml Water
  • 1 tablespoon All Purpose Flour
  • 2 slices Cheddar Cheese
  • 1 slice Regular Cheese

How to do it:
  1. Cook macaroni in salted water according to the package or till just done.
  2. Pour them in a oven proof dish and set aside.
  3. Meanwhile, melt butter in a pan on low heat. Butter should not be burning.
  4. Gradually add in the flour and whisk till smooth.
  5. Turn up the heat to medium low and gradually add in the cooking cream while whisking.
  6. Repeat the same for the water.
  7. Add in the ham.
  8. Melt the cheese in the sauce till all has blend in.
  9. Pour the sauce over the cooked macaroni. Mix them if you like.
  10. Top it with Parmesan Cheese.
  11. Baked in a preheated oven at 220c for 10 mins.
  12. Serve hot.

Notes:
  • Do not cook the roux (butter with flour) in high heat as it will burn and the roux will turn dark.
  • The amount of water add depends on how thick you want the sauce to be. Hence, add gradually and stop adding if you think the sauce is thin enough for you.
  • I recommend you use 2 slices of cheddar cheese with 1 slice of regular or mozzarella. You can have any combination you like.
  • For those who do not have an oven, you may serve it after step 10, with salt and ground pepper to taste, if you like.


Saturday, January 26, 2013

Sesame and Peanut Cookie
芝麻花生酥


During last Chinese New Year, I get lots of request for Peanut Cookies. I can't recall how many times I have did it. Luckily it was one of the easiest Chinese New Year snacks to make. Hence, I didn't get tired of making it. :P

Closer to the festival, I tweaked my recipe a little and added toasted sesame to it and my family members commented that it was even better than the original.

I realised that the new recipe has been sleeping my draft folder, along with many other recipes :P. Anways, It's never too late to share, In fact, it's just in time. If you love Peanut Cookies, you may like this too. Try baking some for the coming Chinese New Year. :)

PS. This photo here is a year old. :P

Ingredients:
  • 300g Peanut Powder with sugar
  • 150g Toasted Sesame Seed, grind into powder
  • 50g Sesame Seed
  • 120g Extra Fine Sugar
  • 250g Top Flour or All Purpose Flour
  • 190ml Oil (I use Olive Oil)
  • 1/3 teaspoon Salt
  • 1 Egg Yolk, beaten for glazing
  • Additional Sesame Seeds as toppings

How to do it:
  1. Mix flour, salt, sugar, grind sesame and peanut powder together to combine.
  2. Pour half of the oil into the peanut mixture and mix together. I use hands to do it.
  3. Pour the remaining oil and continue mixing and kneading till the (icing) sugar has melted.
  4. Roll a ball of 10g paste and if it doesn’t crumble, your paste is ready. Otherwise, add a bit of oil till the peanut ball doesn't crumble when you roll it.
  5. Place peanut ball on baking tray.
  6. Brush with the egg yolk.
  7. Sprinkle on some sesame seed.
  8. Bake in a preheated oven for 13mins at 180C till lightly golden brown.
  9. Cool on rack and store in air tight container.

Thursday, January 10, 2013

Pan (Cup) Cake
杯子松饼


I was packing my pantry and found 2 packet of Morinaga Pancake Mix expiring this month. Not wanting to waste them, I decided to use 1 packet to make pancakes as my dinner :P

While making my 2nd pancake, the little one came into the kitchen asking for help with her homework. I decided to pour the reminding batter into muffin cups and baked them instead. :P


As I did some adjustment to the instruction on the packaging, the results of the baked pancake turned out not too bad. It's like a cross between cupcake and muffin.

I made 2 large pancakes and 4 cupcakes or about 7-8 cupcakes without making pancakes, with the batter. If you have the same pancake mix, you might want to give it a try.


Ingredients:
  • 1 packet Morinaga Pancake Mix (160g)
  • 2-3 tablespoon Icing Sugar
  • 140ml Fresh Milk
  • 1 Whole Egg
  • 1 Egg White
  • 1 teaspoon Vanilla Extract
  • 1 tablespoon Baking Powder

How to do it:
  1. Mix all ingredients together.
  2. Whisk till smooth with no lumps (I used a blender to do it).
  3. Let the batter rest for 5 mins.
  4. Pour batter into muffin cup till 2/3 full.
  5. Bake at preheat oven at 180C for 12 mins.
  6. Let it cool and add whipping cream or other toppings if you like.

Note:
You can make regular pancake using this recipe. The pancakes will rise higher and will be fluffier.


Tuesday, October 9, 2012

Coco Chocolate Chip Cookies


Just a quick post to let you know this blog hasn't closed. :P

Haven't been actively updating due to a few reasons. My PC is giving me lots of problems, though not as much as the amount of problems my son has given me, which caused me to nose bleed again. :/ I'm serious.

It happened last year and I had some parts of the blood vessels cauterised. This time, I'm 'smarter'. Shut my eyes and ears as much as I can, while I can, so as not to get too worked up. So, minimum bleeding this time. After a month, finally it shows no signs of continuation. So, I'm good for now.

Anyway, that made me 'gave up' updating for a while. I'm just not in the mood to do anything. Can't do much with one hand pinching the nose most of the time anyway. :P

So, while both my hands are free, here's one that I did for Teachers' Day.


Ingredients:
  • 200g Butter, soften
  • 200g Brown Sugar
  • 2 Eggs, beaten
  • 1 teaspoon Vanilla Essence
  • 200g Chocolate Chips
  • 30g Corn Flour
  • 220g Self Raising Flour
  • 25g Cocoa Powder

How to do it:
  1. Preheat oven to 180C.
  2. Cream butter and sugar till pale and creamy.
  3. Add in eggs and vanilla essence and beat well.
  4. Fold in shifted flour and cocoa powder.
  5. Fold in chocolate bits.
  6. Scoop spoonfuls of mixture ( on tray lined with baking paper or pipe on baking paper.
  7. Bake for 12 - 15 minutes, depending on size of cookie, until lightly golden.
  8. Cool completely on wire racks before storing in air-tight containers.


Monday, June 11, 2012

Open-face Otah Sandwich
乌打三明治


We just returned home a couple of days ago from a trip to Hong Kong. All of us turned at least 2 shades darker. :/  It was tiring! Worst than being a maid mum at home. And now I have triple loads of laundry to clear. I need another holiday!!

I'm not sure how soon I will get back to my usual food posting so here's a quick one. It's remake of a simple Otah Toast presented differently. I prefer the bread toasted as it makes it crunchier. I'm using hotdog buns here. You are free to use burger bun or just bread. They worked the same.

I toasted the buns in the oven, you can always use a toaster or frying pan.

Ingredients:
  • 3 pcs Otah, smashed
  • 1/2 - 1 teaspoon butter, depending on how dry the otah is
  • 1 Hotdog Bun, sliced half length-wise

How to do it:
  1. Mix butter sparing with smashed otah so they stick together.
  2. Spread on the hotdog buns.
  3. Toast in a preheated oven at 200C for 10 minutes.
  4. Serve immediately.

Monday, May 28, 2012

Mango Pavlova and Soda
芒果帕芙洛娃与苏打


I had cravings for something (real) sweet and decided to my favourite dessert, Pavlova. I don't bake much because I really bad at it. It takes lots of patience and I hate the washing up the most. In addition, my family doesn't eat much either, except for cookies.

I prefer Pavlova that's crunchy and not marshmallow-like inside, so I baked it a little longer at a lower temperature. I can store it longer this way too. I'm serving it with Mango. You can served it with other fruits for the Pavlova too.  I had enough mango so I blended some into puree and used it to make Mango Soda too.

To those with sweet-tooth, this is for you. ;)


Ingredients:
  • 4 Egg Whites (from 60g Eggs at room temperature)
  • 140g Extra Fine Sugar
  • 1 teaspoon Vanilla Extract or Essence
  • 1 teaspoon White Vinegar
  • 1/2 tablespoon Corn Flour, sifted

How to do it:
  1. Beat egg whites till soft peaks.
  2. Add in sugar gradually, in small amount (a tablespoon at a time) each time.
  3. Beat on high speed till sugar has dissolved and the meringue is stiff peaks and shiny.
  4. Beat in the vanilla extract.
  5. Add in the vinegar and sprinkle the cornstarch over the meringue
  6. Fold in to the meringue gently.
  7. Place in a piping bag or zip-loc bag with or without a noozle.
  8. Pipe meringue into a well like shape (see left photo at the bottom of this post)
  9. Bake in preheated oven at 110C for 1 1/2 hours.
  10. Leave the oven door ajar for 15mins to cool in the oven.
  11. Remove to to cool on the rack before storing in air-tight container.


To make Mango Pavlova:
  1. Pipe in some butter cream into the Pavlova 'well'.
  2. Top to diced mangoes.
  3. Serve.


To make Mango Soda:
  1. Scoop some Mango Puree to the bottom of the glass.
  2. Pour in Sprite or 7-up.
  3. Add in some ice cubes and mint leaves, if you like.
  4. Serve.


Pavlova Shells


I used the remaining meringue to make Meringue Cookies


Friday, April 20, 2012

Baked Portabello with Ham and Cheese
火腿芝士烘烤褐菇


Sometimes, I can be so busy at (house) work that I totally forgot to eat. :P It happened again last night. I was feeling hungry after mid-night and realised I had skipped dinner.

I didn't want to do too much cleaning and washing so I used the oven to bake myself these to go with some cabbage salad.  Incidentally, this is the first recipe that got me to start my food blog. It was a dish that I had at a cafe at Borders, which I was trying to replicate.

You can have a look the original 1st version of the recipe here and the 1st revision to the recipe here. This is my 2nd revision. ;) I can only say that I'm glad  it's looking better each time. :P  Maybe I should really consider doing a revision of all my older recipes here. :)

Ingredients:
  • 1 Portabello Mushroom (I'm using medium sized here)
  • 1 teaspoon Butter
  • Sprinkle of Garlic Powder
  • 2 tablespoon coarsely chopped Ham
  • 2 tablespoon Perfect Italiano's Pizza Plus or a mixed of Mozzarella, Cheddar and Parmesan 
  • Parsley Flakes (optional)

How to do it:
  1. Remove stalk from mushroom and clean it with a damp cloth.
  2. Spread a little butter on the cap of the mushroom and spread the the rest on the underside. If you have butter spray, use that instead.
  3. Sprinkle some garlic powder
  4. Bake in preheated oven at 200C for 5 minutes.
  5. Remove and sprinkle some cheese, place ham and cover with the remaining cheese.
  6. Bake at 220C for 15mins or till cheese melts and brown a little.
  7. Remove and top with parsley flakes if you like.
  8. Serve immediately.


Wednesday, March 28, 2012

{ Bread Cup }
面包杯


I used to make bread cups by pressing the bread into the muffin tray. The bread cup is then used to fill with ingredients you like.

The disadvantage of the 'simpler' way is that there will be 'bread crease' and where there are creases, the bread will be thicker. What you need is have a few cuts on the bread and it will solve the problem.


Basically, you will need just a baking cup or muffin tray. To make things easier, I use an additional tool, a circle cookie cutter (actually, it my kids' play dough cutter. I 'stole' it from them :P). I used it to leave an impression on the bread, for 2 purposes. First, as a guide on where I should cut the bread and second to make it easier to press the bread into the baking cup. The impression on the bread makes it easier to fold and fit into the baking cup.


Please take note that the circle cutter have to be smaller than the inside of the baking cup, in order for it to work. The bigger the circle cutter is, the wider the bread cup will be.

Once the bread is fitted into the baking cup, toast it for 5 to 8 mins at 180C and the bread cup is really to be filled with your favourite fillings! If you are not re-toasting the bread cup after adding the fillings, You might want to toast it longer to get it slightly more brown. It's your preference. 


I did two different bread cups with two different fillings here. The Egg Bread Cup is filled with chopped hard-boiled egg, topped with cheese and baked for 7mins. The bread cup has the corners trimmed-off. You can add mayonnaise to the chopped egg to turn it into egg mayo. My daughter doesn't want mayo. She wanted it to be toasted with cheese as the topping. Fussy kids, I have. :P

The Tuna Bread Cup has tuna in it (obviously). My son requested for it to be toasted, again, which resulted with the edges being more brown. I originally thought of just filling it with tuna without re-toasting. Hence, I had the bread cup toasted longer. But alas...  Another point for you to take note for. :) Oh! The corners for the Tuna Bread Cup were left as it was, just to let you have another option.

Please refer to the slide show below for the steps on how I did the bread cup to get a better picture. Click on the photo to expand it for a clearer view.


Tuesday, February 14, 2012

Seaweed Shaker Fries
紫菜摇摇薯条


I had some leftover fries I had from lunch. I didn't want to throw it away, so I reheated it in the oven and added my homemade Seaweed Seasoning. It resembles some seasonal fries from a certain fast food joint eh?

Try this if you have leftover fries that you don't want to toss out. You can pan fry it too if you don't have an oven.

Ingredients:
  • 8 pieces Japanese Seaweed Snack
  • 1/2 teaspoon Garlic Powder
  • 1/2 teaspoon Chicken Powder/Salt (Chicken Powder taste a lot better)
  • 1 portion of Large French Fries

How to do it:
  1. Grind the seaweed to almost powder like.
  2. Mix well with garlic powder and Chicken Powder.
  3. Add french fries into a paper bag with the seaweed seasoning.
  4. Shake till fries are well coated.
  5. Tear open paper bag and dig in.
Note:
You don't have to use a paper bag if you don't have one. Just toss in a deep dish.

Saturday, February 11, 2012

Tangy Oven Grilled Winglets with Herbs
香烤鸡翼


I usually use the same marinade for a whole chicken. For this case, I used it on winglets as I can grill them when we want to eat them. If I want to cook it faster, I pan grill them. Taste just as good except it's drier.

Ingredients:
  • 10 Winglets

Marinade:
  • 1/2 teaspoon Dried Thyme
  • 2 teaspoon Dried Rosemary
  • Rind of a Lemon
  • 1/2 teaspoon Salt
  • Juice of 1 Lemon (half if you want it less sour)
  • 1 tablespoon Olive Oil

How to do it:
  1. Mix Marinade.
  2. Add chicken to marinade and set aside for at least 1/2 hour.
  3. Drain winglets from marinade.
  4. Grill in preheated oven at 200C for 30mins, turning the winglets mid way.
  5. Remove and serve.

Note:
You can pan grill the winglet too. You just to brush your grill pan with oil to grill them.

Wednesday, February 8, 2012

Pandan Chicken
香兰炸鸡块

Deep Fried Pandan Chicken

This is one of dishes that I like so much that I kept modifying it. It's the 3rd revision on the blog. The first was in Year 2006, second in Year 2007 and a couple modifications after that which I did not post.

Deep Fried Version                      Oven Baked Version

For this latest recipe, I'm still sharing the usual deep-frying method (refer to top photo of this post). In addition, there will be an alternative, oven baked method (refer to the photo below). Those who wants a healthier choice will welcome it.

I'll be sharing how to wrap the chicken meat using pandan leaf without using any toothpick at the end of this post. 

Oven Baked Pandan Chicken

Ingredients:
  • 3 Chicken Drumstick, Deboned and cut into small pieces
  • 1 stalk Pandan Leaves (about 12 - 14 leaves)

Marinade:
  • 1 tablespoon Oyster Sauce
  • 2 tablespoon Maltose
  • 1 1/2 tablespoon Fish Sauce
  • 1 teaspoon Sugar
  • 1/4 teaspoon Salt
  • 1/3 teaspoon Dark Soy Sauce
  • 1/4 teaspoon Turmeric Powder
  • 1/2 teaspoon Garlic Powder
  • 1/2 teaspoon Onion Powder

How to do it:
  1. Mix ingredients for marinade well
  2. Marinate chicken for at least an hour.
  3. Drain chicken but do not need to pat dry.
  4. Wrap chicken with pandan leaves. Refer to video below on the instructions.
  5. Set aside to deep fry or oven bake.

To Deep Fry:
  1. Fill a small pot of oil to cover at least half the wrapped chicken.
  2. When the oil is hot but not smoking, add in the wrapped chicken.
  3. Remember to turn it if the oil doesn't cover the chicken.
  4. Remove and drain on paper towel when it's cooked. Takes about 10 minutes.

To Oven Bake:
  1. Drizzle wrapped chicken with some oil and toss.
  2. Place on baking tray and bake in preheated oven at 200C for 15minutes, turn once in-between baking.
  3. Increase temperature to 250C and continue baking for another 6 minutes.
  4. Remove and serve.


All wrapped and ready to be deep fried or oven baked