AdSense

Thursday, November 6, 2014

Roasted Button Mushroom with Garlic and Thyme


This is one easy recipe for mushroom lovers. 

You will need an oven or toaster to do this. If you don't have one, you can do it using the flying pan but it will very wet and you won't be able to get the brown top. 

However, the flavours will be there.


Ingredients:
  • 1 box Cremini Mushroom, cleaned with a damp cloth. Do not wash.

Seasoning Paste:
  • 2 tablespoon Butter, softened
  • 1 teaspoon Garlic Powder
  • 4 clove Garlic, minced
  • 1 1/2 teaspoon Balsamic Vinegar
  • 1/2 teaspoon Dried Thyme or 2 tablespoon Fresh Thyme
  • Ground Black Pepper and Salt to taste
  • 1 small cup Panko or Breadcrumbs
  • Parmesan Cheese (optional)

How to do it:
  1. Brush dirt from mushrooms and clean with damp cloth or paper towel.
  2. Trim the stalks to level them with the caps.
  3. Set aside.
  4. Mix  ingredients for the seasoning paste together, except for panko and Parmesan Cheese.
  5. Spread paste on the underside of the mushrooms.
  6. Set aside.
  7. Mix panko with 2 tablespoon of Parmesan cheese, if using.
  8. Press the mushrooms with paste on the panko.
  9. Arrange on an oven proof dish.
  10. Roast in preheated oven at 220c for 12 mins.
  11. Increase temperature to 250c and continue to roast for 2 mins to brown the top further.
  12. Serve.

Note:
  • If you cut the mushroom, you will get a wetter result. So, if you prefer to have more 'sauce', cut mushroom to 2 to 3 pieces.  However, the paste slips off easily after roasting as there's nothing to hold it.
  • You can make this in advance and store in the fridge to roast when you are ready.
  • If you do not have Balsamic Vinegar, you can replace it with regular black vinegar or lemon juice

Tuesday, September 30, 2014

{ Little Lunch Box #78 }
小饭盒


The little one requested for fried rice for her lunch box today.  I added an omelette to the fried rice. 

Little piggy tried so hard to climb out of it and accidentally tore the beautiful smooth omelette I made. *cried a single tear*

Ok. I was just trying to make a simple meal a tiny bit more interesting with little piggy. ;)


Curry Chicken Satay


I haven't been updating this food blog for awhile.  If you would like to know what I have been up to, you can always check out my Instagram.

This was done in August.  I was craving for curry chicken then but not the kids.  Hence I came up with this idea of serving the curry and chicken separately.

The curry is served as a dipping sauce for the chicken.  You can also soak up your french loaf with curry to eat it too.  You can eat the chicken satay as it is like my kids too.  Or eat them all together!  It's a 2 in 1 dish.


You can use premix for the curry.  If you want to try making your own curry, you might like to try the following recipe, which I'm reposting it here for your convenience. 

However, for this dish I have shared, I did not use chicken. Hence I used chicken stock instead of water to cook it.  I added carrots too. 

Ingredients:
  • 1 Chicken, chopped into parts
  • 400g Potatoes, skinned and cut into smaller pieces
  • 30g Curry Powder for meat (cos there is curry powder for fish too)
  • 750ml Chicken Broth or Water
  • 500ml Coconut Milk
  • 200ml Coconut Cream
  • 2 tablespoon Oil
  • Salt and Sugar to taste

Spices to be grind into paste:
  • 10 Shallots, skinned
  • 3 clove Garlic, skinned
  • 10g Turmeric
  • 20g Galangal
  • 6 Red Chilli (more if you can handle it)
  • 1/2 stalk Lemon Grass

How to do it:
  1. Add 2 tablespoon of broth or water to the curry powder and mix well.
  2. Set aside.
  3. Heat wok with oil.
  4. Add in the Spice paste and fry till fragrant.
  5. Add the curry powder paste to the spice paste and mix well.
  6. Add in the Chicken and stir fry for 2 to 3 minutes.
  7. Add in the potatoes and the rest of the broth or water and coconut milk.
  8. Bring to a boil.
  9. Reduce to a simmer and continue cooking for 30 - 60 mins or till both chicken and potatoes are tender ( I simmer for almost 2 hours).
  10. Stir in the coconut cream.
  11. Add sugar and salt to taste.
  12. Bring to a boil.
  13. Serve with toasted French loaf or rice.


As for the chicken satay, if you can use your own favourite recipe or if you like, you can try this,

Ingredients:
  • 3 Chicken Drumstick, deboned and cut into small pieces

Marinade:
  • 1/2 tablespoon Oyster Sauce
  • 2 tablespoon Maltose
  • 1 1/2 tablespoon Fish Sauce
  • 1/2 tablespoon Light Soy Sauce
  • 1/4 teaspoon Salt
  • 1/3 teaspoon Dark Soy Sauce
  • 1/4 teaspoon Turmeric Powder
  • 1/2 teaspoon Garlic Powder
  • 1 tablespoon Potato Flour

How to do it:
  1. Mix ingredients for marinade well
  2. Marinate chicken for at least an hour.
  3. Drain chicken but do not need to pat dry.
  4. Thread chicken pieces in skewers.
  5. Heat oil in pan and shallow fry till done.

Note:
You can oven grill it too. Just spray a little oil on the chicken and grill in preheated oven at 200C for 15minutes, turn once in-between baking.  Increase temperature to 240C and continue grilling for a couple of  minutes to char it a little if you like.


Friday, September 26, 2014

{ Little Lunch Box #77 }
小饭盒


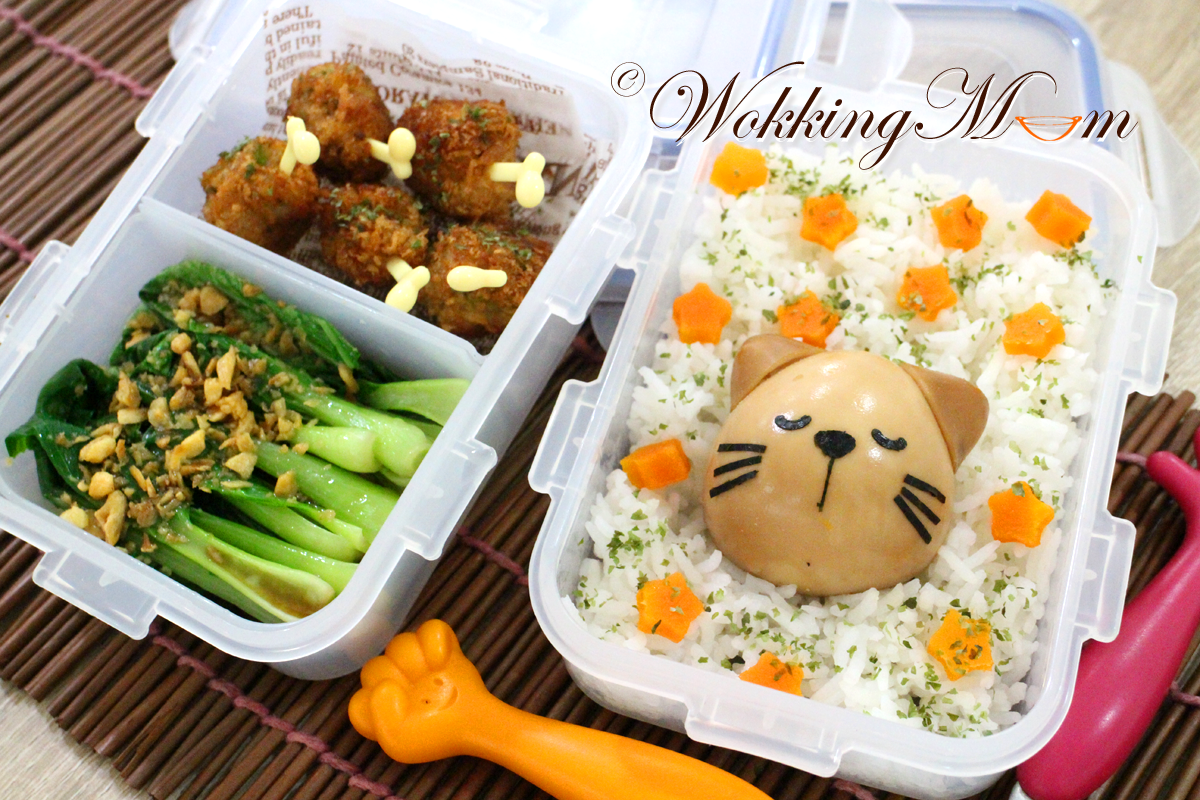
For today's lunch box, I had wanted to make a brown bear.  But as you can see, it's nothing like a bear.  I was able to shape the regular chicken egg to the shape I wanted but not the quail eggs. So, I ended up making a cat instead.  The eggs were coloured with a mixture of dark and light soy sauce.

The sides were baby boy choy, drizzled lightly with light soy sauce mixed with water I used to blanched the veggies and sprinkled with fried garlic.  The meat balls were a mixture of pork, fishpaste and chopped broccoli (green part only) without seasoning, coated with panko and shallow fried.

Tuesday, September 23, 2014

{ Little Lunch Box #76 }
小饭盒


A simple lunch box for the little one with all her favourite food.

There's small prawn & pork patties, blanched broccoli & sweet peas and her all time favourite, egg; done here as egg roll.

Tuesday, September 16, 2014

{ Little Lunch Box #75 }
小饭盒


The little one's lunch.

Bought the tiffin carrier from a shop in Haji Lane.  It looks cute and was decorative purpose.  It didn't seems to be able to pack much food in them.

The little one won't have finish her lunch if I filled up all the 3 layers.  Hence they looked all half filled only.

She had meatball soup, sweet peas, sweet corn, saute button mushroom and scrambled eggs with rice.

Wednesday, August 13, 2014

{ Little Lunch Box #74 }
小饭盒


My daughter was to stay back in school for an extra 45 mins on Tuesday and I thought why not she just get food from the school canteen.  She agreed and I thought that way end of the story.

She told me that morning before going to school that she didn't want to eat in school after all and asked if I could her sandwiches instead.

I said it's fine as long as she doesn't make requests on for the sandwiches since I didn't go the the supermarket or wet market during the weekends and there isn't really much ingredients to work with.  ( eg, I used luncheon meat instead of the usual ham for the ears and 'cheeks'.)

She ended up with one of her favourite, Egg Mayo Sandwiches.   Lazy mum ... doesn't really want to squeeze my brain juice.  Not really not very good with last minute requests either.  So, never can go wrong with Egg Mayo where making my daughter's sandwich is concerned. Hahaha ....

This is probably the last lunch box of this school term, which means, no more after school programmes 'cos examinations are coming. :P  This also means, I will have to find time to post the recipes that I meant to share but didn't have the time to do it.   Got to wake up those lazy bones. :P


Monday, August 11, 2014

{ Little Lunch Box #73 }
小饭盒


I did this lunchboxes for both my kids last week.

They are always at loggerheads, always fighting and arguing with each other.  Even the food they like to eat are opposite of each other. 

One love the tuna sandwich and the other love the egg mayo sandwich but they both hated the other.  This is just one of the many food they hated and loved.  =_=||

Since I had to prepared both their lunchboxes in a short time (cos I wasted time day dreaming :P), I decided to just prepared simple sandwiches.  One for the "cat" and one for the "dog", cos they are just like them. :P  But they there are times that they do get along.  Some of the 'times".


The Kitty

The Doggy

Friday, August 8, 2014

{ Little Lunch Box #72 }
小饭盒


This was the lunchbox I prepared for my daughter last Wednesday.  A simple National Day lunchbox since National Day was just a few days later (then).

I prepare Pan Grilled Chicken which I cut into smaller pieces, with mushroom sauce, Steamed Veggies as sides and Asparagus Soup.

And of course, the Singapore National Flag rice with is from crabstick and egg white.


Friday, August 1, 2014

{ Little Lunch Box #71 }
小饭盒


Today's lunchbox for the little one consist of her favourite Saute Button Mushrooms and Eggroll with Fishpaste.  I want her to try eating Broccoli hence I packed only 2 florets (so she has no excuse not to finish them) instead of her usual favourite veggies.

As usual, mum want to have a little fun packing lunchbox, so I steamed a little rice with blue pea flowers to make a simple Doraemon's head.  The eyes are made from egg white, which I saved a little from the eggroll.  The pupils and whiskers are seaweed.  The nose is crabstick, also taken from the eggroll. 

Hmm ... I think I might have packed too much rice for her. :P


Tuesday, July 29, 2014

{ Little Lunch Box #70 }
小饭盒


Last Sunday, we happened to have a drink at Coffee Club.  My daughter saw their mini Egg Mayo Sandwiches and couldn't resist it.  I told her it totally not worth ordering but her doting father give in to her.  And true to my words, the sandwiches came looking miserable.  Tough bread, burnt veg and pitiful fillings.  It was a total rip-off. 

Needless to say, she struggled to finished the bread (cos they were like rocks). She only managed to eat one of the stone bread and finished the egg mayo with a lick (it's was that little).  That was not before pulling the blackish leaves out, which were half wilted and half burned that turned into 'ashes' the moment you touched them.

After that torturous meal, she asked if I could make her nice-nice Egg Mayo Sandwiches for her lunchbox today.  Hahaha ... Next time better listen to mum. :)


Monday, July 28, 2014

{ Lunch: Fried Rice with Cauliflower and Squid }


My lunch on Friday ...

I bought a squid with roe on Thursday and marinated it for over night.  I had some leftover small shrimps that I have to clear for the week and also some cauliflower from my daughter's lunchbox.  All these assembled and became my lunch.

Simple Fried Rice with Egg, Peas and Shrimps

Baked Cauliflower tossed in Curry, Paprika and Parmesan Cheese

Oven Grilled Squid with roe in Miso

Lunch: Fried Rice with Cauliflower and Squid

Friday, July 25, 2014

{ Little Lunch Box #69 }
小饭盒


I don't usually play with my son's lunchbox.  But since I have some bits and pieces of food left from my daughter's lunchbox, I decided to just have a little fun with it. 

I bet my son will have the same expression as the Japanese curry rice girl when he opens his lunch box. :P

{ Little Lunch Box #68 }
小饭盒


The little one wants omu(fried)rice for her lunch box.

I also prepared baked cheesy cauliflower mash and a lightly seasoned kailan stems for her sides. 

I still had some time on hand and since the omurice was kinda plain, just just cut some strips of seaweed and did an outline of my favourite bird and Snoopy's pal, Woodstock, on it.  Just for the fun of it. ;P

Monday, July 21, 2014

{ Little Lunch Box #67 }
小饭盒

I made Egg Mayo Buns for my daughter last Thursday.  Okay, they are sandwiches shaped like buns.  They make eating egg mayo sandwiches a lot less messier as the fillings won't fall over over the place.  Works well with tuna fillings too.

I did it with the help of a tool - my daughter's toy cookie cutter, which I have 'stolen' from her a few years back. :P  You can use any round shape items, like bowl, cup, takeaway plastic container, etc., preferably with a thicker edge to help press on the breads and stick more securely.

Here are the steps to make the sandwich buns:

Place a heap of fillings in the middle of the bread.  You can make an impression of the ring that you will be using on the bread as a guide so the filling will not exceed the circle.


Place another piece of bread over it. DO NOT PRESS on it.  Instead, squeeze on the sides on the bread a little. 


Place the circle cutter or cup on the bump and continue pressing the sides to push more bread into the ring.  This is to help create a dome and to prevent the bread from stretching out and tearing when you press the ring later.


Press the ring down hard so the 2 pieces of bread will stick together.  Use a knife to cut away the excess bread outside the ring.


Remove the ring and you will see the end product, the bun sandwich.  You may serve it as it is or toast it in the oven for a crunchy bite.


It is best to use fresh bread or (store bought) bread not longer than 2 days old as the bread begins to dry a little and is not so stretchable.  The top bread will tends to tear.

Please do not throw away the excess bread.  You can use that to make breadcrumbs.