

Sunday, March 31, 2013
Friday, March 29, 2013
Steamed Spare Ribs with Fermented Black Bean
豆豉蒸排骨
Labels:
*steaming,
dried-goods,
pork

This dish is one of my husband's favourite dim sum 点心 dish.
I do not know what restaurants do to make the spare rib so tender that it can almost slip off the bone but what I'm going to share with you is my unauthentic method of doing it. I'm sure the experts have their own brillant ways.
I know some people swear that corn flour will do the trick, ie; to get it soft and tender. I can tell you corn flour only helps make it velvety. It doesn't make the meat tender. In order to make the meat tender, I use baking powder as a meat tenderiser. If you only have baking soda, you can use that too.
So, with the baking powder or soda, you can make tender meat even when cooking time is just only 10 to 15 minutes. This is a trick I learned from an uncle who runs a mix vegetable stall in a Kopitiam many years ago.
So get your baking powder/soda ready to make the tender and velvety Steamed Pork Ribs. :)
Ingredients:
- 200g Spare Ribs, ask the butcher to chop into smaller pieces for you
Tenderiser:
- 1 tablespoon Chinese Cooking Wine
- 2 teaspoon Baking Powder or Soda
Marinade:
- 1 teaspoon Fermented Black Bean (abt 7g), rinse and gently press to bruise them
- 1 1/2 teaspoon Oyster Sauce
- 1/4 teaspoon Sugar
- 1 to 1/2 teaspoon White Vinegar
- 1 clove Garlic, grated
- 1 tablespoon Water
- 1 tablespoon Cornflour
- 1 Red Chilli, de-seeded and cut
- 2 drops Dark Soy Sauce (for colour)
- a drizzle of Sesame Oil
- a pinch of Gourmet Chicken Powder
How to do it:
- Pat dry spare ribs.
- Add in tenderiser and coat well. You will see frizzing which is normal.
- Set aside for 2 hours.
- Rinse spare ribs and pat dry.
- Add in marinade and mix well with spare ribs.
- Marinate it for at least an hour.
- Drain the spare ribs from the marinade
- Place them onto a steaming dish. I separate them into 2 portion for steaming.
- Steam for 12 mins or till done.
- Serve immediately.

Thursday, March 28, 2013
Little Lunch Box #47
小饭盒
Labels:
**happy-box

Easter is on Sunday, so I thought I'll make an Easter Lunch Box for my daughter.
This time she didn't complain about me turning her sandwich into an animal. All because I let her mix the food colourings and dye the quail eggs herself and she did 6 different colours. Otherwise, she will say, but I only want triangle sandwiches. =_=|||
Okay, now she has colour fingers. :P
Happy Easter in advance!

Wednesday, March 27, 2013
Milo Pudding with Oreo Crumbs
美祿布丁
Labels:
**dessert,
*chilling,
dairy,
spices-herbs

Does this look like a pot of plant to you? The plant is mint but its not sitting in a pot of soil. Take a closer look and don't be fooled. ;)
I had this idea for the longest time but never get to excute it because it's not easy for me to get Mint Leave or any herbs.
This idea actually came from my daughter when I did Chocolate Milk Pudding. She said the pudding looked yucky :P and adding oreo on it will make it look like a pot of soil.
Since I now grow my own mint (please see photo at the end), I decided to put my plan into action. ;) Adding the Oreo crumbs adds texture to the pudding. Crunch on every bite. :)

Ingredients (for 2 cups):
- 250ml Milo or Chocolate Milk
- 7g Gelatin
- 6 (single) pieces Oreo, crushed into crumbs
- 2 stalks Mint
How to do it:
- Mix Milo with gelatin.
- Heat mixture but do not boil, stir till gelatin melts.
- Pour mixture into cups.
- Chill in fridge till set.
- Pour Oreo crumbs on pudding and stick in a stalk of Mint in the centre and serve.
Note:
- You can use jelly powder instead of gelatin if you like.
- Using 3in1 Milo will be easier. However, you are free to make the Milo to your taste.
- Do not include the cream in the Oreo for the crumbs.

This is my pot of homegrown Mint. You can try growing your own.
Get some stalks of Mint. Cut about 6 to 7 cm from the top. Remove all leaves except the top 2 - 4 leaves and stick them in the soil. Water regularly.
You are successful if they do not look wilted after a few days of constant watering. After that you can cut down on the watering and reduce to once a day or more on a hot day.

Tuesday, March 12, 2013
Grilled Sambal Winglets
烤参巴鸡翼
Labels:
*grilling,
chicken,
spices-herbs

Chicken wings or winglets are the family's all time favourite. You can do it in all sort of ways. One of my favourite is in sambal chilli.
I can't take spicy food (although I love it) so it's always good to be able to make it on my own so I can adjust how hot I want the sambal to be. Add dried chilli and more chilli padi if you want it more spicy. I can't do that cos if I do, I'll be full drinking water. :P
Ingredients:
- 8 Chicken Mid-joint
- Additional 1 Calamansi to be squeezed over grilled winglets (optional)
Sambal:
- 10 Fresh Red Chilli, de-seed
- 3 Chilli Padi, more if you like it spicy, de-deed
- 3 Shallot
- 1 teaspoon brown sugar
- Juice of 1 Calamansi
- Salt to taste
How to do it:
- Blend, all ingredients for sambal into paste and set aside.
- Pat dry winglet and marinate with half the sambal for at least an hour.
- Lay winglets on oiled rack for grilling.
- Spread half of the remaining sambal on the winglets.
- Spray on a bit of cooking oil if possible.
- Grill in preheated oven at 200C for 30mins, turning the winglets mid way.
- Spread the remaining sambal on the winglet when you turn the winglets for further grilling.
- Serve with a additional squeeze of calamansi if you like.

Monday, March 11, 2013
Caramelised Onions
焦糖洋蔥
Labels:
**condiments,
**happy-meal,
**slow-cook,
asst-veg
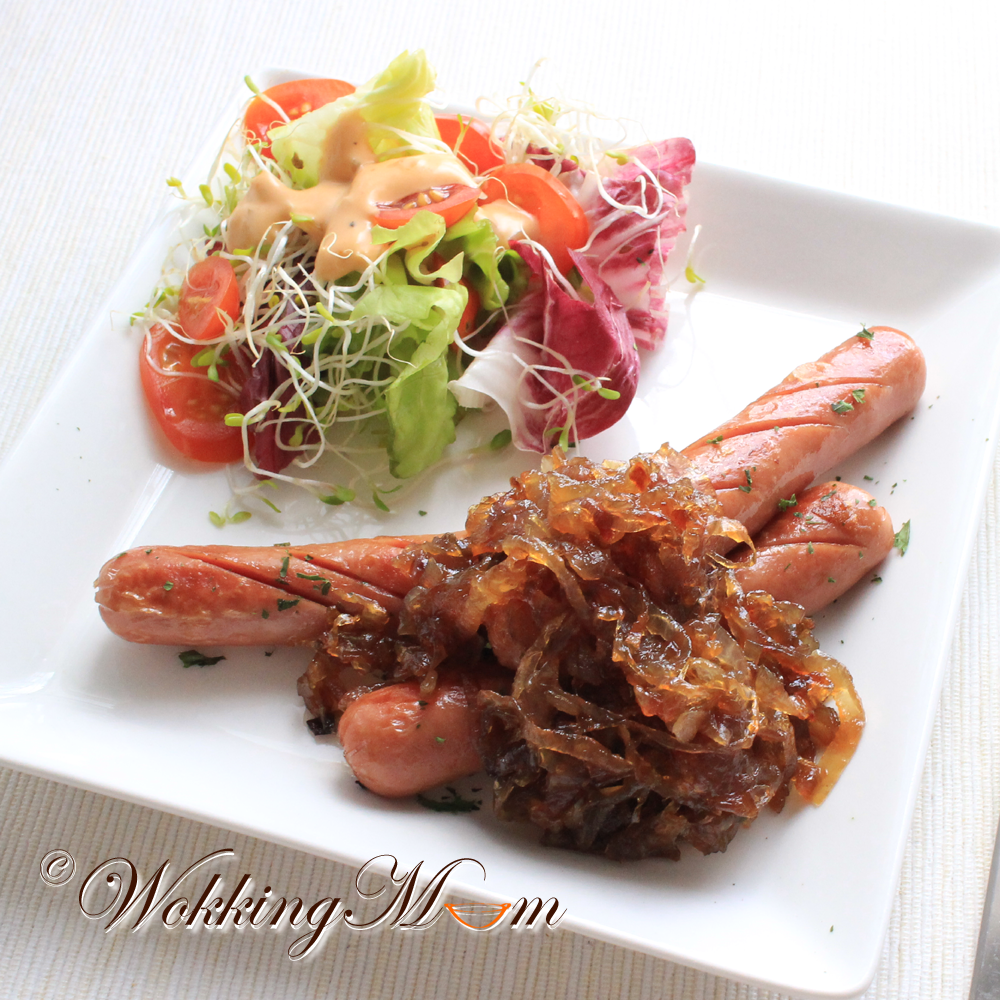
This is one of my favourites. I can eat this with anything. It is very easy to make but take a lot of patience cos cooking it may takes up to an hour with the amount of onions before cooking reduced to less than half at the end of cooking.
Ingredients:
- 6 Red Onion, sliced
- 2 tablespoon Olive Oil
- 1/2 teaspoon Sugar or Maple syrup
- a pinch of salt
- Water, broth or wine (optional)
How to do it:
- Heat pan with oil.
- Add in all the onion and stir-fry till onions are well coated with oil.
- Continue cooking till onion has softened.
- Add in salt and sugar or maple if using and stir well.
- Spread out the onion and let it cook on medium low heat.
- Stir once a while (abt every few minute) only to prevent it from sticking and burning. If you keep stirring, it will not brown and caramelised.
- If the onions are sticking, add a little water to deglaze it. You can use wine or broth instead if you like.
- Continue cooking till onions turned darker and darker and to a texture to your desire.
- Dish and serve, here with sausages.

Friday, March 8, 2013
Little Lunch Box #46
小饭盒
Labels:
**happy-box

My daughter has school swimming lesson today in the morning. She asked for onigiri or rice ball with Furikake for lunch after her swimming lesson.
I'm using regular rice (mixed with brown rice) to make the rice ball. I just added more water when cooking the rice so it will be sticky enough to make the rice balls.
I stuffed a cocktail sausage in the rice balls for her as a surprise before I roll them in furikake. I know she will like it.

Wednesday, March 6, 2013
Kanimi Surimi with Koebi Omelette
帝王蟹肉棒与小虾子干煎蛋
Labels:
*pan-frying,
egg,
prawn,
surimi

I bought a packet of Kanimi Surimi (imitation snow crab leg) to add for making Fried Rice and Steamed Egg Custard. The kids love this particular type (note: expensive type =_=|||)
All the pieces were stuck together frozen. I have to thaw the whole packet and finish it within days because I do not want to refreeze it. I also have half a pack of Japanese Koebi close to expiry. :P
My auntie used to make egg omelette with similar type of Koebi. She bought it from the grocer selling dried food stuff. It adds texture to the omelette and also fragrance too.

Ingredients:
- 2 Eggs, beaten
- 4 - 5 Kanimi Surimi (Imitation Snow Crab Leg) 帝王蟹肉棒, cut into pieces
- 10g Kobei (Dried Baby Shrimps) 小虾子干
- 1 tablespoon chopped Coriander (optional)
- a pinch of Salt
- 1/2 tablespoon Cooking Oil
How to do it:
- Heat oil and add in the koebi.
- Stir fry quickly for a few seconds.
- Add in the the surimi and continue to stir-fry for half a minute.
- Add in beaten egg seasoned with salt.
- Sprinkle on coriander if using.
- Stir quickly to mix well with ingredients.
- Spread out and let the omelette fry on both side till done.
- Dish and serve.

Tuesday, March 5, 2013
Steamed Pomfret
蒸鲳鱼

I don't cook often Pomfret as it's high in cholesterol. Same for ikan bilis, especially the heads, so go easy with it if you have family with high cholesterol. My husband has high cholesterol hence we only have this once a while.
I didn't want to get a new bottle of sour plum or salted vegetable to make the Teochew-style as I have no use of those for my other dishes at the moment. I'm doing it another way that the kids like too.

Ingredients:
- 1 Ponfret, cleaned
- 1 teaspoon Chinese Cooking Wine
- 5 slices Ginger, julienned
- 1 Tomato, half sliced and half diced
- 1 Fresh Shitake Mushroom, diced
- 2 tablespoon Light Soy Sauce
- 1 tablespoon Cooking Oil
How to do it:
- Rub pomfret with a pinch of salt
- Place sliced tomato on the dish followed by the pomfret and both the diced tomato and shitake mushroom.
- Drizzle Chinese cooking wine.
- Steam for 8 minutes or till totally cooked.
- Remove and drain away the liquid.
- Heat cooking oil and stir-fry ginger shred till golden brown.
- Drain and set aside.
- Using the same oil, heat it with light soy sauce.
- Top steamed fish with fried ginger shreds and spring onion shreds if you like.
- Pour the hot soy sauce and oil over the fish.
- Serve immediately.
Note:
I prefer to pour away the liquid obtain after steam. It makes the dish clearer and cut down on the fishy taste as some kids don't like it. You can retain that if you like.

{ Pizza Bread }
面包比萨
Labels:
**happy-meal

I had this as my afternoon tea few days ago. I was trying to clear the last 2 slices of bread as well as some Mozzarella cheese and Kanimi Surimi. I decided to do a Pizza Bread with whatever ingredients I have.
It's quick and easy and you may end up wanting more! The is great for kids who are sick of having the usual sandwiches and it's a good finger food for parties too.
The good thing about it is you can add whatever ingredients you like. Mine has green peppers, onions, Kanimi Surimi and my homegrown Cherry Tomatoes (more about that later).
Get your kids involve in making this. They will definitely enjoy it.

For this Pizza Bread, it is advisable to use old bread as they are drier. Alternatively, you can toast the bread for a few minutes before using. Leave the skin on for that extra crunch and it helps hold the "pizza sauce" too. I'm using tomato base pasta sauce. Spread the sauce on the bread; about 1 to 2 tablespoon of it. Add just enough as the bread will keep soaking up whatever amount you spread on. It will always seems dry. Don't add till the sauce sipped thru' the bread, then it will be too soggy.
Add the ingredients, all thinly sliced, to the bread and top with Cheese. As mentioned earlier, I'm using shredded Mozzarella cheese. You can use a mixture or regular sliced cheese too.
Toast or bake the bread at 240C for 10 minutes or till you see the cheese starting to melt or bubble and your Pizza Bread is done!
Hope you enjoy this!

I did mention earlier, I'm using homegrown Cherry Tomatoes for my Pizza Bread. I'm not kidding you. I have a few Cherry Tomato Plants growing at home. Well, outside our home to be exact. I'm staying in HDB flat, not landed property with a garden, my plants are outside our unit.
These cherry tomato plants are my daughter's. She started growing them in her Hydroponic Kit late last year. The plants grew too big to continue growing in the kit and I transferred them to continue growing in soil. We have had a few harvest already. Check out the photo above, it's me (my hand actually) harvesting one of the clusters of cherry tomatoes. ;)
I have other herbs and plants growing in my mini HDB garden too. Mostly what I use often for my cooking. It's great to grow your own herbs (especially). You can just cut and use it anytime you need it.
If you would like to see more of what I'm growing, you can have a look here.

Subscribe to:
Posts (Atom)