AdSense

Saturday, July 27, 2013

{ Marshmallow Pops }
棉花棒棒糖


I haven't being feeling well for the past week. Suspected case of inner ears imbalance and/or some infection somewhere. =_=||  The doctor couldn't confirm.  (not my regular GP as his clinic was closed for a few days)

Whatever it is, it gives me giddy spells which keep making me puke. Terrible feeling. Medication didn't make it better but worst.

And so everyone told me to rest, rest, rest. Well, if you didn't know, SAHM are not entitled to MC. *Darn. Took up the wrong job* I did cut down lots of housework but I can imagine or I rather not imagine the state of the house when I'm better. And not to mention, the amount of backlog (of housework) to clear.  It doesn't help that the man my personal massager is leaving for his business trip after the weekend. I guess I'm back to using the cold, robotic massage chair which won't be able to listen to instructions. :P


Anyway, the little one and I were having a conversation yesterday morning. She mentioned that the trainee teacher who has been teaching her class will be leaving on that day and asked if there's anything I can help prepared as farewell gifts in "my condition" or perhaps I could guide her.

I couldn't reject her plus I wasn't that sick (I could still log on to Facebook and Instagram :P). Due to the time constrain, I decided to try making marshmallow pops with whatever I have. Bad idea!

It's a very simple treat. Just stick a lollipop stick in a marshmallow. Dip in melted chocolate then in rainbow sprinkles and voila. BUT! I didn't have the correct chocolate (I used couventure chocolate which compound chocolate should be used instead) Hence, we had a hard time trying to dry them.

So I popped them in the fridge for a couple of minutes to dry them a little (the longer you put them in, the higher chance the chocolate will sweat due to the temperate change). They still look decent enough after wrapping. And guess what my daughter told me last evening when she finish school? No, not that the teacher love it.  She said, the trainee teacher's last day is NEXT Friday! *slap forehead*

Well, that's how we ended our week. :) I'm hoping for a better week, starting with a good weekend. I hope you too have a great one!


Wednesday, July 24, 2013

Braised Chicken with Chestnut
栗子焖鸡


This is one of the earlier dishes that I shared in this blog, which the pictures had gone missing.  I never had a problem having this with just a bowl of rice. My family enjoy this too!

I'm updating the pictures (and hope that they will not go missing in years to come) and a new recipe.


Ingredients:
  • 3 Chicken Drumstick, debone and cut into 3
  • 8 Fresh Shitake Mushroom, stalk removed and cut into half
  • 120g Fresh Chestnut
  • 4 clove Garlic
  • 2 slice Ginger
  • 2 tablespoon Cooking Oil
  • 1 tablespoon Sugar
  • 1 tablespoon Light Soy Sauce
  • 1/2 tablespoon Cooking Wine
  • 250ml Chicken Stock
  • 1 tablespoon Oyster Sauce
  • 1/2 tablespoon Sugar (additional)
  • 1/2 tablespoon Sesame Oil

How to do it:
  1. Marinate chicken with light soy sauce and cooking wine for 30 mins.
  2. Heat wok with oil.
  3. Add chestnut, ginger and garlic.
  4. Stir fry till garlic and ginger are fragrant.
  5. Dish out and set aside.
  6. Add in 1 tablespoon sugar to existing oil used to stir fry chestnut.
  7. Melt sugar to caramelise it.
  8. Add in chicken without marinade.
  9. Stir fry till chicken are evenly brown.
  10. Add in mushroom and stir fry well for another minute to let the mushroom absorb some sauce.
  11. Return the chestnut, garlic and ginger.
  12. Add the chicken stock and bring to a boil.
  13. Reduce heat to a simmer.
  14. Add oyster sauce and sugar.
  15. Continue to simmer for 25 mins till chestnuts are tender and sauce almost dried up.
  16. Add in sesame oil and stir well before serving.

Note:
  • I'm using fresh shitake mushroom as it's more acceptable for the kids and also easier for the kids to eat. Choose dry and firm fresh shitake mushroom so it will still have a firm bite after the braising. You can replace fresh mushroom with dried ones. Just soak them them till they are soften.
  • I'm using debone chicken drumstick as it's more tender and easier for the kids to eat. You don't have to debone the chicken and also use chicken parts instead of just chicken drums.
  • If you do not have chicken stock, you can use water with a teaspoon of chicken powder and add salt to taste at the end of cooking.
  • You can add a few dried chilli in step 3, if you prefer a little spicy.


Grilled Squid in Miso Sauce
味噌酱烤鱿鱼


This is one of my cooking trials that end up being my favourite. ^^

I'm not sure if anyone would like this (because my husband always say I have 'funny' taste in food) but I rather share food that I like than food that I don't. I'm sure I will find people with the same taste as I do to like this. :P

Don't worry, I won't start sharing all kinds of weird tasting food that I like here. I will reserve that for torturing my family. :P


Ingredients:
  • 3 Squid, innards and 'skin' remove
  • 1 tablespoon Miso Paste
  • 1 1/2 tablespoon Mirin
  • 1 tablespoon Sake or Cooking Wine
  • a pinch of Sugar
  • 1 Calamansi (optional)

How to do it:
  1. Slice open the squid so it will be flat.
  2. Score  on the on inside of the squid. Do not cut thru.
  3. If using head, remove the eyes.
  4. Pat squid dry and thread squid with skewers on both sides.
  5. Mix miso paste, mirin, sake and sugar well.
  6. Spread the miso sauce sparingly on the side with cuts.
  7. Grill squid in preheat oven at 250C for 12 mins
  8. Bast squid with miso sauce sparingly once to twice in between grilling.
  9. Grill the head and side fins separately.
  10. Once done, remove skewers and cut squid into pieces.
  11. Served with a squeeze of calamansi if you like a little tang .

Note:
  • The more sauce you bast the squid with, the more salty it will be. So use sparingly.
  • Treading the squid with skewer is a must otherwise they will curl up during cooking which will makes grilling very difficult.
  • When you tread the squid with skewers, they will form the letter 'V' with 1 end of the skewer meeting. You may want to wrap the meeting ends of the skewers with foil so it will be easier to hold (with gloves) to remove the squid.
  • If you want to have a grossy look like the first pic here, spray or spread a little oil toward the end of the grilling and let it grill a while before removing.


Tuesday, July 23, 2013

{ Hotcakes, Sausage and Eggs Brekkie }
松饼香肠煎蛋早餐


Last Saturday, I overslept and my son had to start tuition first without breakfast. :P

In order to make breakfast fast, I had my oven working on the peas and sausages (I used it to steam both of them). I had the peas lightly seasoned with salt and sausages sear to get the cut lines opened up.

I had 2 pans working on the pancakes. One to make pancakes and the other to keep the pancakes warm. I'm using premixed pancake mix but I added a little vanilla essence, icing sugar and baking powder to it too.

I had the egg cooked in another pan. :P  By the way, the egg shown here was a single egg with double yolk. I bought a tray of eggs with most of the eggs (that I have cracked) with double yolk. They have an average of 79g and the heaviest was 84g! The best of it was 10 eggs cost only $2.40!

I added deliciously sweet golden Kiwi to the breakfast too.

Maybe I should have ask him to just fill himself up with milk. :P


Monday, July 22, 2013

Hokkien Prawn Noodles
福建虾面


This is not to be confused with any other Hokkien Mee. It is THE Singapore Hokkien Prawn Noodle.  It's my son's favourite hawker food. Even my daughter likes it too.

Those we have in hawker center are always cooked in pork lard which make it very fragrant and tasty. I'm not a fan hence I'm not adding it. If you like that, fry about 2 tablespoon of pork lard and use the oil for the cooking. Add the fry pork lard for extra crunch.


Ingredients (for 1 serving):
  • 100g Thick Rice Vermicelli 粗米粉
  • 80g Yellow Noodle
  • 1 Squid, head, innards and 'skin' removed
  • 4-5 Prawn
  • 1 thin strip about 30g Pork Belly
  • a handful Bean Spout (I had the head and tail removed)
  • Some Chinese Chive 韭菜
  • 1 Egg
  • 1 1/2 tablespoon Fish Sauce
  • 250ml Chicken Stock

How to do it:
  1. Blanch squid (tube), prawn and pork belly in stock till almost cooked.
  2. Remove and cut squid into rings, shell the prawns and cut pork belly into smaller pieces.
  3. Set them aside.
  4. Heat 1 tablespoon oil and stir-fry garlic till fragrant.
  5. Push the garlic aside in the wok.
  6. Crack egg and scramble it.
  7. Add in both the rice and yellow noodles.
  8. Add in 1 tablespoon fish sauce.
  9. Stir-fry in middle high heat for a few minutes.
  10. Add stock to the noodles.
  11. Cover and cook for about 3 minutes.
  12. Add the blanched prawns, squid rings and pork belly.
  13. Add in bean sprout and Chinese chive.
  14. Continue stir-frying till sauce has reduced and thickened.
  15. Add the remaining 1/2 tablespoon fish sauce or according to taste.
  16. Stir fry well.
  17. Dish and serve with Sambal Chilli and Calamansi.


Friday, July 19, 2013

{ Blanched Cockles with Garlic }
蒜香伴氽烫血蚶


Cockles!!  Like what I said previously when I shared this recipe, you either love this or hate it.

I love it but hate the scrubbing part, especially when you get small cockles. I happened to see cockles bigger than what I usually see in the supermarket and couldn't resist them. I bought some home and made this. Missed it so much.

If you too like eating cockles, hop over HERE for the recipe. :)


Thursday, July 18, 2013

Steamed Egg Custard with Clams
蛤蜊蒸蛋


In my previous post, I mentioned that my kids have beginning to enjoy eating clams.

I bought some clams and saved some to add to their favourite steamed egg custard.  Apparently, the clams weren't enough for them. Hence they ate the Steamed Clams with Herbs and Tomatoes too.


Ingredients:
  • 2 eggs
  • a pinch of salt
  • 160ml Chicken Stock
  • 250g Clams (more if you like)
  • 1-2 Dried Scallop
  • 1 teaspoon Cornflour
  • 1/2 teaspoon Oyster Sauce

How to do it:
  1. Clean clams and steam for 2 mins or till clams have slightly opened. 
  2. Open up the clams and remove the clam meat. Strain and reserve the clam juice.
  3. Soak the dried scallop in 5 tablespoon of hot water before hand.
  4. Beat egg lightly in a bowl
  5. Add broth, clam juice and salt.
  6. Mix well.
  7. Sieve the egg mixture if you want a smoother result.
  8. Pour into a shallow flat dish.
  9. Add clams.
  10. Cover the bowl with foil.
  11. Heat a pot of water for steaming.
  12. When the water starts to boil, put in the dish.
  13. Remove when egg is set.
  14. While the egg is cooking, tear the scallop into strands.
  15. Return the dried scallop strands to the water.
  16. Add in oyster sauce and corn flour.
  17. Mix well.
  18. Bring the sauce to a boil while gently stirring it.
  19. Remove and pour over the steamed egg and tofu.
  20. Drizzle with sesame seed oil if you like.
  21. Serve.

Note:
  • If you would like to have stuffed clams in the egg custard like what I did, mix 50g minced pork with 50g finely chopped prawn with 1 egg white and 1/2 tablespoon Cornflour till paste-like. 
  • Stuff some paste in the clams from step 1.  
  • Place the clams (shells) in the egg mixture in step 8 before adding the clams in step 9.


Wednesday, July 17, 2013

Steamed Clams with Herb and Tomatoes
百里香和蕃茄蒸蛤蜊


My kids have recently learned how to enjoy clams. My son loves the spicy clams. My daughter can't take spicy food so she has been bugging me to steam some clams for her.

I bought a kilogram clams and saved some to steam them with egg (recipe coming up soon) and used the rest to prepare this for my dinner.

However, the kids ate this up as well. =_=|||


Ingredients:
  • 750kg Clams, washed and cleaned
  • 1 tablespoon Olive Oil
  • 1 1/2 tablespoons chopped garlic
  • 3 tablespoon Sake
  • 1/2 teaspoon Chicken Stock
  • 150ml Water
  • 2 sprig Thyme (I'm using Lemon Thyme from my Mini Garden)
  • a handful Cherry Tomatoes, half (I'm using my homegrown Cherry Tomatoes ^^)

How to do it:
  1. Prepare 2 layers of baking paper in an oven proof dish and set aside.
  2. Heat wok and add oil.
  3. Stir fry garlic till fragrant but not brown.
  4. Add in wine, water and chicken stock.
  5. Bring to a simmer.
  6. Turn off fire and set aside.
  7. Arrange clams in the baking paper.
  8. Scatter around thyme and cherry tomatoes.
  9. Pour the stock over the clams.
  10. Gather the edge of the baking paper and loosely tie it.
  11. Bake in a preheated oven at 240C for 12 mins or till clams are opened.
  12. Discard any clams that remain closed.
  13. If you want to cook it on stove top, wrap the piece of foil on the outer layer.
  14. Cook it on a pan till clams are opened.
  15. Season with salt if necessary.

Note:
  • Add chopped onion and celery for better taste.
  • Stir fry them after step 3 till they are softened and continue with the rest of the instructions.

I have cut down my Cherry Tomato Plant to grow new plants.
These were the last of my homegrown Cherry Tomatoes.

Tuesday, July 16, 2013

Grilled Chicken Wings
烧烤鸡翅膀


Chicken wing is one of our favourite food. The kids love it fried. I love it grilled. If I have a portable BBQ grill, I will use that. BBQ-ing chicken wings over charcoal is the best. ;)  For now, using the oven will do.


Ingredients:
  • 8 Chicken Wings
  • additional Calamansi for serving

Marinade:
  • 2 teaspoon Garlic Powder or 5 Garlic clove, grated
  • 1/2 teaspoon Ginger Juice
  • 1 tablespoon Cooking Wine
  • 1 tablespoon Light Soy Sauce
  • 1/2 teaspoon Dark Soy Sauce
  • 2 teaspoon Sugar
  • 1/2 teaspoon Chicken Powder or Salt
  • Juice from 2 Calamansi

How to do it:
  1. Pat dry cleaned chicken wings.
  2. Twist to break the joints of chicken wing so you can grill it flat.
  3. Mix ingredients for marinade.
  4. Add chicken wing.
  5. Marinate for at least 2 hours, turning occasional so the chicken wings is evenly marinated.
  6. Grill chicken wing in reheat oven at 200C for 20 to 25 minutes.
  7. Flip over for grilling every 5 minutes.
  8. During the last flip, spread some oil if you like to get the chicken wings slight charred.
  9. Serve with a squeeze of calamansi.


Thursday, July 11, 2013

Flower Crab with Glass Noodles
花蟹冬粉


I had always wanted to try Crab with Tang Hoon aka Glass Noodles. I never had the chance; mainly because of the kids. Hence, to date I do not know how it tasted like. :P

I decided to do a trail on error for this dish and it turn out to become my son's favourite. He skipped his usual dinner and finished this whole lot, excepting the crab.

My food reviewer (husband :P) said my version is more like what he had in China which is a bit saucey. Those in Singapore are drier and the tang hoon is more fragrant. However, he thought it was pretty tasty. ^^  It will be better if dark soy sauce was added though to give the tang hoon more colour. I didn't notice that I had run out of it.  Next time, it will be better. :)


Ingredients:
  • 1 Crab Crab, cleaned and chopped into 4 parts
  • 100g Glass Noodles aka Tang Hoon
  • 4 slices Ginger
  • 3 clove Garlic, chopped

Seasonings:
  • 1/2 teaspoon White Pepper1 tsp chicken seasoning powder
  • 1 1/2 tablespoon oyster sauce
  • 1 tablespoon Light Soy Sauce
  • 1/2 tsp dark soya sauce
  • 1 tsp fish sauce
  • 1/2 tsp Sugar
  • 500ml Chicken Stock (reduce if you prefer it drier)
  • Salt to taste.

How to do it:
  1. Soak tang hoon till it's soften.
  2. Drain and set aside.
  3. Heat wok with a tablespoon oil.
  4. Stir fry ginger and garlic till fragrant.
  5. Add in the crabs.
  6. Stir-fry till crab turns red.
  7. Add in the seasonings except for salt.
  8. Bring to a boil.
  9. Add in the tang hoon.
  10. Simmer for about 10-15 mins to let the tang hoon absorb the sauce and flavour.
  11. Stir fry to evenly cook the tang hoon.
  12. Add salt to taste if necessary.
  13. Serve immediately.


Wednesday, July 10, 2013

5-spice Pork Chop
五香猪排


If you think this dish here looked familiar, you are right. I was trying to do a replica of Din Tai Fung's Pork Chop (Fried Rice).

The end results weren't exactly what I'm looking for but my family gave me 2 thumbs up. They think it's close enough and they liked my version.

I'm using lean pork loin. If you like it with some fats, you can use other parts to make this too.


Ingredients
  • 4 pieces Lean Pork

Marinade:
  • 1/2 - 1 teaspoon 5-spice Powder
  • 1 tablespoon Cooking Wine
  • 1 1/2 tablespoon Light Soy Sauce
  • 1 teaspoon Oyster Sauce
  • 1/4 teaspoon Sugar
  • 1/2 teaspoon Garlic Powder
  • a sprinkle of Pepper
  • 1 or 2 drop Dark Soy Sauce for colour (optional)

How to do it:
  1. Use a mallet to tenderise the meat.
  2. Add in the ingredients for the marinade to the meat.
  3. Coat the meat well with the marinade and set aside for an hour.
  4. Heat pan with 1-2 tablespoon oil, depending on how many pieces you are frying at the same time.
  5. Pan fry one side for 1 to 2 minutes before turning over to cook on the the other side.
  6. Turn and cook on the other side till just done.
  7. Dish and serve.

Note:
  • Oil splatter alert! ;) You might want to use Happy Call Pan or any pan with a lid when pan frying the meat.
  • Do not over cook the meat as it will lose the moisture and turn tough.


Porridge with (Prawn and Pork) Meatballs
虾与肉圆粥


My daughter wasn't well in school yesterday and returned home earlier.

I changed the dinner menu and made some meatballs to go with porridge instead. The meatballs were springy and the kids like it so much, they kept asking for more.

I told them I will make meatball soup for them today.


Ingredients:
  • 100g Minced Pork
  • 130g Prawns Meat
  • 1 Egg White
  • 1/2 tablespoon Cooking Wine
  • 1/2 teaspoon Garlic Powder
  • 1 teaspoon Corn Flour
  • 1 tablespoon Light Soy Sauce
  • a pinch of salt
  • a dash of pepper

How to do it:
  1. Smash prawn and mince with knife till fine.
  2. Mix minced prawn with minced pork.
  3. Add in the rest of the ingredients.
  4. Mix well with hands till mixture is sticky and paste-like.
  5. Scoop some paste and drop into porridge or soup.
  6. Cook till the float up to the surface.
  7. Cook for another minute and they are done.

Note:
  • Adjust the proportion of the meat on your preference.
  • I prefer to just smash and mince the prawn so it's not too paste like. Then you will still be able to bite into bits of the prawns. Use a blender instead if you like.


Saturday, July 6, 2013

{ Chicken Mayonnaise with Croissant }
美乃滋鸡肉牛角包


Last Tuesday, my husband had to work late and will not be having dinner at home. I decided to prepared some snack for him just in case he skipped dinner at work and was hungry when he return home.

I prepared the Chicken Mayo filling earlier and let it chill till it was ready to eat. I shared this recipe many years ago but I thought I'll just report it here again for new diners who didn't want to go thru old posts.

Ingredients:
  • 1 Chicken Breast
  • 1/4 teaspoon Salt or Chicken Powder (for more flavour)
  • 500ml Water
  • 5 tablespoon Mayonnaise
  • Salt and Pepper to taste
  • Bread of your choice
  • Lettuce, Tomato and/or other vegetables

How to do it
  1. Cook chicken breast in water seasoned with salt or chicken powder.
  2. Remove when chicken is thoroughly cooked.
  3. Set the chicken aside to cool and return water used to cook chicken.
  4. Shred or cut chicken into pieces.
  5. Mix well with mayonnaise and 4 tablespoon of the water used to cooked chicken earlier.
  6. Season with salt and pepper.
  7. Chill till ready to eat


Friday, July 5, 2013

{ Little Lunch Box #57 }
小饭盒


Today is the last day of my daughter's school swimming programme and it's also her swimming assessment.
After more than a month break from swimming, she forgotten all the techniques that her coach taught her. (=_=)||  Whether the kids pass the assessment or not, I bet they had lots of fun. Too bad the school stopped having swimming as ECA as they are shorthanded. Oh well ...

Anyway, my daughter loves her best friend's little doggie, called Miu Miu (branded dog ... hehehe), a lot. She kept asking her friend's grandma to bring Miu Miu to school so she could play with her for a while after school. 

On Monday, Miu Miu went to school to wait for the girls to finish school and my daughter played with her for while. She was a bit disappointed that Miu Miu wasn't there yesterday. So I decided to make her doggie sandwiches today. :)


Wednesday, July 3, 2013

Little Lunch Box #56
小饭盒


My husband had to work late last night so I made kiddy meals for the kids for dinner instead.

The meatballs are the same as what I packed for my daughter's lunch box yesterday, which has peas inside. My son hates peas but ate them anyway. :)

The rice ball has furikake salmon as fillings. The vegetables here are blanched Kailan drizzled with sesame oil with light soy sauce and crispy enoki mushroom.


Tuesday, July 2, 2013

Little Lunch Box #55
小饭盒


The first lunch box for the new school term after a month's break.

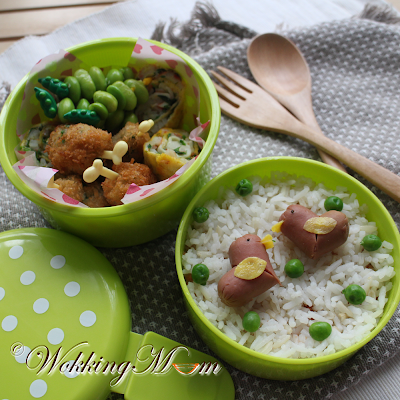
Items for the lunch box is repetitive cos my daughter requested for them. I added something new for her to try out, Furikake Salmon, which was bought in Meidi-ya.


Furikake Salmon is sprinkle in-between 2 layers of rice and decorated with 2 sausage ducks. The ducks' bills and wings are made from eggs and eyes are from black sesame seeds.

My daughter requested for egg rolls, which has kani surimi, chopped spring onion and coriander, meatballs, which has petite peas in them and edamame for the sides.