AdSense

Showing posts with label **bread. Show all posts

Monday, July 21, 2014

{ Little Lunch Box #67 }
小饭盒

I made Egg Mayo Buns for my daughter last Thursday.  Okay, they are sandwiches shaped like buns.  They make eating egg mayo sandwiches a lot less messier as the fillings won't fall over over the place.  Works well with tuna fillings too.

I did it with the help of a tool - my daughter's toy cookie cutter, which I have 'stolen' from her a few years back. :P  You can use any round shape items, like bowl, cup, takeaway plastic container, etc., preferably with a thicker edge to help press on the breads and stick more securely.

Here are the steps to make the sandwich buns:

Place a heap of fillings in the middle of the bread.  You can make an impression of the ring that you will be using on the bread as a guide so the filling will not exceed the circle.


Place another piece of bread over it. DO NOT PRESS on it.  Instead, squeeze on the sides on the bread a little. 


Place the circle cutter or cup on the bump and continue pressing the sides to push more bread into the ring.  This is to help create a dome and to prevent the bread from stretching out and tearing when you press the ring later.


Press the ring down hard so the 2 pieces of bread will stick together.  Use a knife to cut away the excess bread outside the ring.


Remove the ring and you will see the end product, the bun sandwich.  You may serve it as it is or toast it in the oven for a crunchy bite.


It is best to use fresh bread or (store bought) bread not longer than 2 days old as the bread begins to dry a little and is not so stretchable.  The top bread will tends to tear.

Please do not throw away the excess bread.  You can use that to make breadcrumbs.

Saturday, July 12, 2014

{ Breakfast: Grilled Portobello Mushroom Burger }


I'm clearing mushrooms that I bought earlier this week that I ended up not cooking.  I had a tray of medium sized portobello mushrooms so I thought I will just grill them for breakfast today.

The kids want theirs with ham and cheese; without bread. :/  I haven't been well and lost my appetite. So I'm going to force myself to have a heavier breakfast.  I had cravings for caramelised onions, so adding that to my mushrooms should help whet my appetite.


I oven grilled the portobello mushroom for 10mins at 240c, with butter, garlic powder and and a splash of balsamic vinegar, basting the mushroom with the sauce from it.

The burger bun was halved and toasted. I had the burger with lettuce, tomatoes, cheese, the juicy portobello mushroom; topped with yummy caramelised onions.

Did this whet your appetite like it did for me?


Saturday, June 7, 2014

{ Breakfast: Creamy Ham & Cheese on Thick Toast }


I used to order a similar Toast from a certain Tea Room (茶餐厅).  I haven't have this for a long time as I find it too expensive.

I have already forgotten how it tasted like since it has been a few years since I had this.  Making my own version for breakfast today.


Ingredients:
  • 2 slices Thick Bread
  • 2 slices Ham
  • 2 tablespoon Japanese Mayonnaise
  • 1 1/2 teaspoon Worcestershire Sauce
  • 2 tablespoon Mozzarella Cheese
  • 1 tablespoon Parmesan Cheese
  • Paprika
  • Dried Parsley 

How to do it:

  1. Dice ham and mix them with Worcestershire Sauce and Mayonnaise.
  2. Spread the mixture on bread.
  3. Top with both Cheese.
  4. Sprinkle on Paprika and Dried Parsley.
  5. Toast in preheated oven at 240c for 5 mins or till the cheese melts and starts to brown.
  6. Serve immediately.


Saturday, December 14, 2013

{ Breakfast : Ham and Cheese Sandwich }


The kids made their own breakfast today.  They had Pizza Bread and had some ingredients left.

I stir-fried the leftover button mushroom with a little butter and seasoned it with a pinch of salt.  In the same pan, I did some Caramelised Onion.  I added those two items to my ham and cheese sandwich while it's hot so they could melt the cheese a little. ^_^

I did a Crabstick and Corn Salad with the remaining kanimi surimi and corn to go with my sandwich.  I topped the salad with the tobiko left from dinner two days ago.

This got to be one of my favourite breakfasts 'cos it has got everything that I love; even though they were made from leftovers.


Friday, May 31, 2013

Little Lunch Box #54
小饭盒


It's swimming day and the last day of school. "Yay" for the kids and "Nay" for me. :P It's going to be a noisy and chaotic June for me. :P

I'm trying to finish the pack of buns I bought, so it's burger for my daughter again.

To make this, I carefully slitted and removed part of the 'skin' on the bun. I reused that for the eyes, nose and the markings on the tummy. I dabbed some chocolate spread on the markings so it can stick on.

I used stick biscuits for the ears and angel hair spaghetti for the whiskers. The white part of the eyes are made out of cheese.

This time, I didn't get complains from my daughter for turning her food into some animals as Totoro is one of her favourite cartoon characters. I'm just glad that it was convincing enough for her and she didn't say it was an owl. ;P

So, I hoped you have everything planned for the kids for this school holidays. Have fun (not so fun for the parents :P) and don't tire yourself out!

Happy school holidays everyone! ;)

Friday, April 12, 2013

Homemade Breadcrumbs
自制面包糠


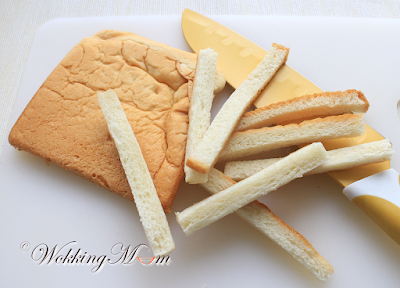
What do you usually do with the bread crust from the loaf of bread you buy? When you make sandwiches for your kids, do you throw away the bread trimmings? There is bound to be a lot of bread wastage if you are into making bento, right?

Next time, keep all of those to make breadcrumbs you can use for your cooking. No wastage. You can keep the breadcrumbs in air-tight container in the freezer for months.

I'm going to share how to do this using oven and pan over stove top.


For Oven Owners:
  1. All all bread crust into strips.
  2. Place all the bread crusts on a tray flat.Toast in a preheat oven at 120c for 15 mins till the bread crusts are dry. We do not want to brown them.
  3. Place them in a blender and grind them into your desire texture.
  4. If you do not have a blender, place them in a Ziploc bag and roll them with a rolling pin or similar object to crush them into bits.
  5. When they are completely cooled, store them in air-tight container till you are ready to use.

For Non-Oven Owners:
  1. Cut bread crust into strips.
  2. Place all bread crusts into a blender and grind them into your desire texture. I do not recommend you grind them too finely because it turns brown easily when toasting on pan.
  3. Heat a pan till hot then lower the heat.
  4. Place all bread crumbs into the pan and toast them till they are dry. Keep stirring and tossing to avoid burning the crumbs.
  5. When they are completely cooled, store them in air-tight container till you are ready to use.

Note:
You can do the same for stale bread too.


Tuesday, December 4, 2012

{ Egg in Toast }
土司蛋


Last month was examination month. Then we went for a short holiday when school closed for holidays. Hence the lack of post (I just realised that there isn't any post last month). That and the fact that I'm using my husband's (work) laptop now instead of our desktop. However, photos are all still being loaded in the desktop. Lots of work just to get a post out and I grew lazy to update :P

I will still try to not to be lazy and post more often :P  Here's a quick one for a start.

I'm sure many have try making this before. I used to do this on a frying pan but I didn't like the results. The bottom sometimes get burn and worst, the egg's not even cooked well on the top.

Quite sometime back I decided to do this using the oven instead and we all loved the results. The bread tasted better as you can spread it with butter or for my case, Garlic Spread. The egg is cooked just right and the best of all, the bottom of the bread is not burned either.

Try this if you have an oven. This is how I did it:

Ingredients:
  • 1 slice Thick Bread
  • 1 cold 60g Egg
  • Butter or Garlic Spread

How to do it:
  1. Use a cookie cutter to cut out a hole in the middle of the bread.
  2. Spread butter or garlic spread on the top and the inside of the cut out hole.
  3. Place on a piece of baking paper. I'm using Glad baking paper hence no greasing is required, You might have to grease light if you are using the normal baking paper.
  4. Crack egg into the hole.
  5. Toast in preheated oven at 200c for 3mins.
  6. Reduce temperate to 180c and continue to toast for 4mins.
  7. Remove from baking paper and serve.

Note:
  • The first toasting using higher temperature is to set the egg a little so the bread at the bottom doesn't absorb too much of the egg.
  • The second toasting using a lower temperature is to cook the egg further to desire doneness.
  • Every oven work differently. If you find your bread getting too brown after the first toasting, you can shield the bread using a foil tent.
  • Alternatively, you can lower the temperature and toast it longer.
  • If you can't get thick bread, use regular thickness bread with a smaller egg. This is to prevent the egg from over-flowing from the hole.

Wednesday, October 10, 2012

Minestrone Soup with Garlic Toast
蒜茸土司配意大利杂菜


Minestrone is one of my favourite western soup. Usually I will add macaroni in it for my second meal and that makes a very filling meal. I'm using french loaf here to make the garlic toast as it will soften when it's dipped into the soup and it soak up the soup better then  bread or bun.

I have shared both the recipes for Minestrone and the Garlic Bread here before. For easy reference, I'm re-posting the recipes with minor tweaks for both recipes.


Minestrone Soup

Ingredients:

  • 1.2 litre Chicken Broth
  • 2-3 tablespoon Tomato Paste
  • 1 stick Celery, diced
  • 1 Potato, skinned and diced
  • 1 Carrot, skinned and diced
  • 1 Onion, skinned and diced
  • 5 French Bean, diced
  • 4-5 leaf Cabbage, chopped
  • 2 teaspoon Dried Oregano
  • 1 Bay Leaf
  • Pepper and salt to taste

How to do it:
  1. Heat a little oil and saute onion and celery till slightly soften.
  2. Add in potato, carrot, french bean and cabbage.
  3. Cook for a minute.
  4. Add in the rest of the ingredients except for pepper and salt.
  5. Bring to a boil and reduce to a simmer.
  6. Simmer for 30 to 45 minutes till vegetables are tender.
  7. Season with salt and pepper.

Note:
  • Size of the veggies used, ie, potato, carrot and onion, depends on your preference. If you not going to eat much of the veggies, get smaller size veggies.
  • Add more tomato paste if you prefer the soup to be to be thicker.


Garlic Toast

Ingredients:
  • French Loaf, sliced
  • 4 tablespoon Butter, Soften
  • 16 clove Garlic
  • 1 teaspoon Garlic Powder (optional)
  • 1 teaspoon Dried Parsley (optional)

How to do it:
  1. Preheat oven at 180C.
  2. Cut the base (hard part) of garlic, leave the skin on.
  3. Toast slice french loft and garlic for 12 mins.
  4. Remove and set aside to cool.
  5. Squeeze the garlic out from the skin and smash into paste like.
  6. Add the garlic to the rest of the ingredients and mix well.
  7. Spread on toasted sliced french loaf.
  8. Toast for 10 to 15 mins.

Note:
  • Pre-toast the french loaf to make it dry so it will stay crunchy.
  • Time required depends on how thick the slices are.
  • Toast it again if you feel that it's still soft in the middle.
  • Store un-used french loaf in air-tight container till stated expiry date.
  • You can grate fresh garlic into paste like instead of toasting it if you like.
  • You can also mix some Parmesan Cheese to the Garlic Mixture.

Wednesday, August 8, 2012

Cooking a perfect looking egg
煎一粒漂亮的荷包蛋


Last week I shared my dinner shots (below) on Facebook, some of my friends asked how I manage to cook it this way.

The egg white is soft, has no hard and brown bits, not rubbery and not oily. The egg yolk is runny like soft-boiled egg. ;)


My kids hate eating sunny side up (fried egg) that is hard at the bottom and the egg yolk dry. You won't get that with the eggs I do. ;)

I got to admit that I learned this little trick from a tv program many years ago and have since never fry an egg the usual way. What you need is just an extra tablespoon of water!

Interested to do it too? You don't have to wait further. Today, I'm going to share with you what I have learned; and with a video too!


The video is at the end of this post but first, here are the details and instructions:

Items needed:
  • a non-stick pan with cover or lid
  • 1/2 tablespoon (or lesser) Cooking Oil
  • a piece Paper Towel
  • 1 Egg (I'm using 60g refrigerated egg)
  • 1 tablespoon Water

How to do it:
  1. Use low heat. The pan should not be smoking at any time. *1
  2. Add the cooking oil and swirl to coat pan.
  3. Use a paper towel to remove excess oil and at the same time coat pan well with oil. *2
  4. Crack egg onto the middle of the pan.
  5. Let the egg cook for 40 seconds, still on low heat. *3
  6. Tilt the pan a little. If more egg white spread out, let it cook a few seconds more. The thicker part of the egg white around the egg yolk will still remain raw. *4
  7. Add water and cover the pan.
  8. Let it cook for 45 seconds. *5
  9. Remove cover.
  10. Dish out and serve.

Note:
  1. I'm using the highest heat on the inner small ring on my stove.
  2. The idea is to coat the pan well with oil so the egg doesn't stick. We are not using the oil to fry the egg.
  3. The timing used is according to the egg used. If you are using smaller or unrefrigerated egg, please shorten the time.
  4. This is a little test to check if you are ready to add water. If the outer egg white (not the thick part near the egg yolk) is half cooked, it will spread when water in added and it will look ugly. Imagine egg drop soup :P
  5. If you want the egg yolk more cooked, cook a few seconds longer.

And here's the video ...


Saturday, June 6, 2009

Cheesy Garlic Bread


My husband decided to go drinking with his pals today. *roll eyes* I get nagged for staying up late to blog but somebody can go drinking when that same somebody just worked past midnight yesterday and had to wake up early as usual to get to work this morning. *shrug* I'm not complaining.

At least I get to blog in peace. LOL. Okay, for this recipe, which is one of my kid's favourite, is really easy to do. It's is actually this recipe plus cheese. But because cheese is added here, I cut down the garlic to 2 clove garlic with 1 tablespoon butter.

For this particular one you see in the photo, 1 tablespoon of Mozzarella Cheese is added into the garlic spread. You can use any cheese you like. Sometimes I use Cheddar with Parmesan Cheese too. It's basically whatever leftover bits of Cheese I have. I have not tried Cream Cheese though.

What you do is to mix the soften butter, garlic, cheese and the optional parsley and garlic powder together. Use that to spread on your bread before you toast it. The bread I use here is hotdog bun. I like it that it's still a bit soft on the inside but cruchy on the thin outer crust. So it won't hurt the kids' gums when they eat it.

Another great idea for pinic. ;) Do remember to wrap the garlic bun/bread with a 2 to 3 pieces of kitchen towels before to wrap it with foil so it will not be too soggy later.

Friday, August 31, 2007

Ham and Cheese Omelette Sandwich


If you want to have a heavy breakfast this is what you should eat.

My kids hates baked beans and the creamy oozing cheese. hmmm ... In the end, I finished it all by myself. Since I'm a small eater but had to be a glutton, I had to skip lunch as I was so bloated. Hopefully they will grow up to like this. They don't know what they are missing.

Ingredients:
  • 1 Egg, beaten
  • 1 slice Ham of your choice, chopped into bits
  • 1 slice Cheese of your choice, chopped into bits
  • 1 - 2 slice Bread of your choice, toasted
  • 1 tablespoon Baked Beans, steamed if preferred
  • 2 Lettuce Leaves
  • 1/3 teaspoon Oil
How to do it:
  1. Heat pan with oil.
  2. Pour egg mixture and swirl it around to coat the pan.
  3. When the egg is set at the base but still not thoroughly cooked, sprinkle ham and cheese to one half of the egg.
  4. Fold the egg over to cover it.
  5. Gently press the edge of the egg to let it seal.
  6. Flip is over to fry for another 13 seconds.
  7. Dish out.
  8. On a plate, place the lettuce on the bread.
  9. Scoop the baked beans on the lettuce.
  10. Plate the ham and cheese omelette on top.
  11. Squeeze some tomato sauce on top if preferred.
  12. Add another slice of bread if this is not filling enough for you.
Note:
  • Try using luncheon meat in place of ham too. Taste great too.
  • I cut the omelette in halves and have it like a sandwich. A bit messy but I prefer to eat with hands. *wink*
☆ Click HERE for printer-friendly version of an original recipe.

* Ham and Cheese Omelette with Baked Bean at the bottom *

Wednesday, July 18, 2007

Salami/Ham and Cheese Toast


I have a Guest Chef today, WokkingBoy. LOL I know he would love to make tea for both of us, so I 'invited' him to do it. I became his assistant and prepared all the ingredients for him.

Ingredients:
  • 2 slices of bread of your choice
  • 3 slices of cheese of your choice, cut into 6 strips each
  • Toppings of your choice (we had shaved Breakfast Ham and Salami)
  • Parmesan Cheese
How to do it, in the Chef own words:
  1. Wash your hands and dry them first.
  2. Take a piece of bread and put on a plate.
  3. Put 3 pieces of cheese (he meant the cut strips) over the bread.
  4. Put the ham over the cheese; put A LOT. (we did ham first)
  5. Put some more cheese. Must put nicely. Don't anyhow put. Won't be nice later.
  6. Put the breads in the toaster and wait for a while.
  7. See the cheese are all melted. (8 minutes, the assistant took note of the time)
  8. Can take them out. Must wear glove - long ones.
  9. Put some Parmesan Cheese.
  10. Okay, can eat now but too hot for me.
Note:
The assistant cut the Salami in quarters and chopped the shaved ham in smaller pieces because it was a bit difficult to cut them nicely.


* Guest Chef, WokkingBoy, in action *

Monday, February 12, 2007

Cheese Sandwich


Have this as breakfast or tea. I think it's great! It's REALLY easy! No cooking required. Just an extra dose of love and a bit more effort is all it needs. ^_-

Ingredients:
  • Bread of your choice
  • Cheese of your choice
How to do it:
  1. Trim the skin of the bread off and cut bread into half.
  2. Use a cookie cutter to press out the shape of one half.
  3. Place cheese on the bread without cut shapes and the one with the shape on the cheese.
  4. That's it! Eat!
Note:
Get your child to help. He will enjoy it! Try using ham or egg for variations!