AdSense

Showing posts with label **sauce. Show all posts

Thursday, July 10, 2014

Pan Grilled Chicken with Mushroom Sauce


Chicken and mushroom are both my kids' all time favourite food.  When I'm feeling lazy, I'll grill chicken with mushroom.  It can never go wrong. 

It's always better than cooking the typical 3 dish 1 soup meal.  So much lesser things to prepare and cook.  And most importantly so much less washing and cleaning up to do.

Ingredients:
  • 2 Chicken Thigh, deboned
  • 1 box Cremini Mushroom, cleaned and sliced
  • 1 tablespoon Butter
  • 100ml Chicken Stock
  • Salt to taste
  • Cornflour Mixture (thickener)

Marinade:
  • 1/2 tablespoon Light Soy Sauce
  • 1/3 tablespoon Sake or Chinese Cooking Wine
  • 1/3 teaspoon Garlic Powder or 2 clove Garlic, grated

How to do it:
  1. Marinate chicken thigh in marinade for an hour.
  2. Drain and grilled on lightly greased pan, skin side down on medium low heat for 15mins.
  3. Turn chicken thighs over and grill for another 10mins or till chicken thighs are completely cooked.
  4. Meanwhile, melt butter in a pan.
  5. Stir in mushroom and a pinch of salt.
  6. Saute till the juice from the cooking starts to dry up a little.
  7. Add in the chicken stock and bring it to a boil.
  8. Season with salt.
  9. Thicken the sauce with corn flour mixture.
  10. Drizzle over the chicken thighs and serve.

Note:
  • Cremini Mushroom are similar to White (Button) Mushroom.  It is the one with a light brown cap.
  • You can use white mushroom too but I prefer Cremini Mushroom as it has firmer texture and a more earthy flavor compared to the white mushroom.


Wednesday, July 9, 2014

Pork Belly with Double Dipping Sauce


This is one of the many recipes that is waiting in line to be shared.  Sometimes, I just wished that there are 72 hours a day or I could clone a few me!

Anyway, this is one of those that you can prepare ahead. You can serve it hot or as part of the steamboat. Or, you can eat it when it's cooled (room temperature).  I have not tried eating it cold or chilled though.


It is very easy to prepare, for both the meat and the dipping sauces.  I have shared this recipe a few years back but I'm reposting it here again with an additional dipping sauce. You can use store bought sauce if you want to.  However, if you do not want to keep so many bottles of sauces, then try making  just enough for one serving.  You can also use the dipping sauce for salads too.


Ingredients:
  • 10 Thinly sliced (Shabu Shabu) Pork Belly
  • 1/2 tablespoon Corn Flour
  • 1/2 tablespoon Sake or another cooking wine
  • 1 teaspoon Light Soy Sauce
  • 500ml Water
  • 1 teaspoon Salt
  • Lettuce or others salad leaves

Ingredients for Sesame Dressing/Dip:
  • 3 tablespoon Toasted white sesame seeds, grounded
  • 2 tablespoon Mayonnaise
  • 1 teaspoon White Vinegar
  • 1 teaspoon Light Soy Sauce
  • 1 teaspoon  Sesame Oil
  • 1 tablespoon Dashi Stock (liquid type)
  • 1 teaspoon Sugar

Ingredients for Plum Dressing/Dip:
  • 5 Pickled Plum, rinsed, pitted and finely chopped
  • 1/2 tablespoon Sake or other Cooking Wine
  • 1/2 teaspoon Light Soy Sauce
  • 1 teaspoon Sesame Oil
  • 1 1/2 tablespoon Stock (Pork, Chicken or Vegetable)
  • 1/2 tablespoon Sugar

How to do it:
  1. Marinate pork with sake, light soy sauce and corn flour.
  2. Boil water and season with salt.
  3. Blanch pork piece by piece in the water. It just takes a few seconds for the pork to cook.
  4. Place the pork slices to a previously boiled cool water to stop cooking.
  5. Drain and set aside.
  6. Mix all the ingredients together for individual dips till sugar melts and set aside.
  7. Serve the pork slices with lettuce or your preferred salad leaves and both dipping sauce.

Note:
  • The corn flour is used to make the pork velvety.  You can omit it if you wish.
  • The dipping sauce can be make in advance and chill in the fridge.
  • If you do not have dashi stock, you can use pork, chicken or vegetable stock instead.
  • You can use lean pork instead of pork belly too.


Wednesday, February 22, 2012

Threadfin with Ginger Sauce
香煎姜汁马鲅


I have been trying very hard to make my kids eat fish other than Cod and had only been successful with this dish using Threadfin.

Threadfin, commonly know as 午鱼 in Hokkien and 马友 in Cantonese, is very often use when I made fish porridge for my kids when they were toddlers.


As this is done with ginger sauce, it has a very nice aroma and reminds me of a friend who is doing her confinement. I bet she will enjoys this dish.


There are ready-made (Japanese) Ginger sauce but I prefer to make my own as I don't have to free-up space in my fridge or kitchen cabinet to keep it. I don't have to worry about wastage towards the expiry date too. My major frustration with ready-made sauce is some times I can't find it anymore when I want to get it.

My ginger sauce may not be better than ready-made ones but ingredients are easily found, easy to made and you can adjust the flavour according to your taste too. You can make it anytime you need it too. Do try it out. :)

Ingredients:
  • 1 slice of Threadfin
  • 1 tablespoon Olive Oil

Ginger Sauce for Marinade:
  • 1 tablespoon Light Soy Sauce
  • 1 teaspoon Ginger Juice (done by grating the ginger using a grater)
  • 1 teaspoon Chinese Cooking Wine
  • 1/2 teaspoon Sugar

Ginger Sauce for Seasoning:
  • 1 tablespoon Light Soy Sauce
  • 1 teaspoon Ginger Juice (done by grating the ginger using a grater)
  • 1 teaspoon Mirin
  • 1/2 tablespoon Water
  • 1/2 teaspoon Sugar (optional)

How to do it:
  1. Marinate threadfin in ginger sauce marinade for half an hour.
  2. Heat pan with oil.
  3. Drain threadfin and place in pan.
  4. Pan fry on all sides on medium high heat till just cooked, about 10-12 mins.
  5. Dish and set aside.
  6. Using the same pan pour in ginger sauce for seasoning.
  7. Bring to a gentle simmer.
  8. Drizzle over threadfin or use it as a dipping sauce.

Note:
You can dust the threadfin with corn flour before pan frying it to prevent it from breaking.


Saturday, February 11, 2012

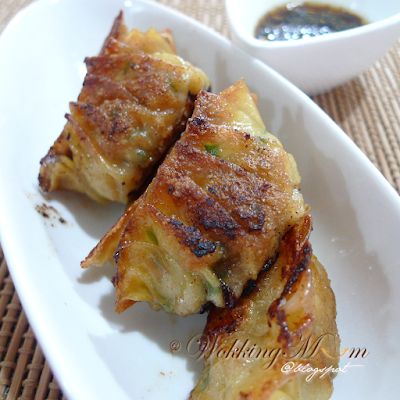
Pot Stickers
锅贴


I have been craving for Pot Stickers for a while and decided to make some myself. I could find the usual dumpling skin I used to make Pot Stickers. I bought normal round wanton skin instead.


My son likes it so much he requested I made it again; 3 days in a row! My husband wants soup so I cooked the dumplings with Chicken Broth and Pot Stickers become Dumpling Soup.


Ingredients:
  • 250g Minced Pork or Chicken
  • 300g Prawns, shelled, devein and diced
  • 3 Waterchestnut, skinned and diced
  • 50g Chive, chopped
  • Wanton Skin or Gyoza Skin

Seasonings:
  • 1/2 tablespoon Fish Sauce
  • 1/2 tablespoon Chinese Cooking Wine
  • 1 teaspoon Light Soy Sauce
  • 1 teaspoon Sesame Seed Oil
  • 1/2 teaspoon Ginger Juice (grate ginger and squeeze for juice)
  • 1/2 teaspoon Garlic Powder or 2 clove Garlic, grated till paste like
  • 1/2 teaspoon Chicken Powder (optional)
  • a dash of Pepper

Dipping Sauce:
  • 2 tablespoon Black Vinegar
  • 1 teaspoon Light Soy Sauce
  • 1/2 teaspoon Sesame Seed Oil
  • 1/2 teaspoon Ginger Juice


How to do it:
  1. Mix all ingredients, except Wanton Skin, with seasonings well.
  2. Preferably to set aside for half an hour before you start making the dumplings.
  3. Prepare dumpling as shown in the instruction video at the end of this post.
  4. Heat pan with a teaspoon of oil.
  5. Place pot stickers in pan and close.
  6. Pan fry 2 side for 30 seconds each. You can skip this step if you like.
  7. (On the 3rd side) Add 3-4 tablespoon chicken stock or water, cover pan to let cook for 5 minutes or till stock is dry.
  8. Dish and serve with dipping sauce.

For Dumpling in Soup:
  1. Have 2 pots ready, 1 filled with water and 1 teaspoon salt and the other with Chicken Stock.
  2. Bring the pot with water to a boil and the pot with chicken stock to a simmer.
  3. Place dumpling in the pot of water and cook for a minute.
  4. Remove and place the dumplings into the pot with Chicken Stock.
  5. Bring the pot of dumplings to a boil.
  6. Add salt to salt.
  7. Pour into a bowl, drizzle with sesame seed oil and serve with spring onion.

Note:
  • If you are using a regular flying pan, you will just need to have a cover and cook a minute or 2 longer.
  • Traditional Pot Sticker are fried only on one side, I like it slightly brown on the other 2 sides, hence I did Step 6. You can skip that if you like.


All ready to be cooked.


Tuesday, December 13, 2011

Ika Teriyaki
日式照烧烏賊


Another easy recipe using the Happy Call Pan. ;)

I did my own teriyaki sauce here but you can always get ready-made ones from the supermarket for less hassle. I like to make my own sauce, though it may not be authentic, as I can adjust the taste. Furthermore, I don't use teriyaki sauce that often. So making it when I need it makes more sense to me.

You may do this using a regular non-stick pan if you don't have a Happy Call Pan. Just add in 2 - 3 tablespoon of water when you are cooking it as the regular pan (covered) doesn't not generate as much liquid as the HCP.

Ingredients:
  • 2 medium Squid, innards removed and cleaned
  • 1 tablespoon Sake
  • 3 tablespoon Mirin
  • 3 tablespoon Light Soy Sauce
  • 2/3 tablespoon Brown Sugar
  • 1 tablespoon Oil

How to do it:
  1. Marinate for half an hour.
  2. Place squid in the pan and pour the marinade into pan too.
  3. Grill with pan covered for 4 minutes in medium low fire.
  4. Grill on the other side for another 4 minutes.
  5. Open cover and slit the squid by using a scissor.
  6. Continue to grill on medium low for 1-2 minutes with cover opened, to thicken sauce.
  7. Turn the squid in-between grilling to get the colour even.
  8. Remove from pan and spoon some thicken teriyaki sauce over.
  9. Serve.


Sake                                            Mirin

Friday, October 2, 2009

Braised Abalone

I made this dish during Chinese New Year this year. Yeah, it's that long ago.

My husband's friend gave him a few cans of abalone but unfortunately they were rather tough and bland. It's not nice to give them to our parents since we already know how it taste like. We can't throw them away too. I'll be send to Hell if I do that. So the best them to do it to try making them tastier. Well, braising the abalone did helps a lot. I have since kept the rest of the abalone for next year's Chinese New Year's dinner.


However I hesitated putting up this recipe. My husband commented that it's too costly and risky for anyone to try out this just with a recipe found on the Net. He is worried people who do try it will try to hunt me down and ask me to pay them a can of abalone. :P

Why did I put up this recipe now? Celine, a diner wrote on my chatbox yesterday asking for it as she wanted to make it for her mother-in-law's birthday. How sweet! How can I reject her? But please don't hunt me asking me for a refund, okay? All I can offer you is a can of tough and bland abalone. :P


Ingredients:
  • 4 Dried Scallop, soak for at least an hour
  • 4 Fresh Scallop (optional)
  • 1 handful Broccoli florets or other veggies
  • 6 Dried Mushroom, soak to soften
  • 1 canned Abalone (mine contains 1 1/2 abalone)
  • 1/2 tablespoon Oyster Sauce
  • 1/2 tablespoon Chinese Cooking Wine
  • Chicken Stock
  • Cornflour mixture (thickener)

Additional to taste:
  • 1-2 teaspoon Oyster Sauce
  • 1/2 - 1 teaspoon Dark Soy Sauce
  • Rock sugar

How to do it:
  1. Place  mushroom with stalk removed, dried scallop and abalone in pot, preferably a claypot.
  2. Add in the water used to soak the dried scallop, oyster sauce, Chinese cooking wine and enough stock to cover all ingredients.
  3. Bring abalone pot to a boil and then reduce to a simmer.
  4. Simmer for 45 minutes.
  5. While braising the abalone, blanch vegetable with a pot of water with a teaspoon of salt.
  6. Lay on a dish.
  7. If you are using fresh scallop, blanch it just before the abalone is ready.
  8. Before removing the braised ingredients, season with additional oyster sauce if necessary, dark Soy Sauce for colour and rock sugar to taste.
  9. Braise for another 15 minutes.
  10. Remove the braised abalone, mushroom and dried scallop, taking care not to break the dried scallop (like I did).
  11. Lay them on the dish with the vegetable.
  12. Drain the sauce remaining from the pot and reheat the sauce.
  13. When sauce begin to bubbles, gradually stir in the cornflour mixture to thicken the sauce.
  14. Pour sauce over abalone.
  15. Serve immediately.

Note:
  • You can also add in the liquid from the canned abalone. I didn't use mine as it didn't make a difference.
  • You can cut down cooking time by slicing the abalone instead braising it in whole.
  • I took much longer to braise the bland abalone. In my opinion, braising 1 hour for a regular mushroom is more than enough.
  • I use fresh chicken stock prepared a day before, by simmer a whole chicken in 2 litre of water for 4 hours.
  • If you are using chicken stock cube, you might want to omit adding the oyster sauce in the initial cooking as stock cube is seasoned.
There you have it, Celine. I hope your mother-in-law will like it. I would like to wish her a very Happy Birthday. And may happiness, health and good fortune be with her always.

Happy Wokking!

一品锅

Tuesday, August 4, 2009

French Beans with Sesame Seed Sauce

Urgh! For weeks, I haven't been able to first access my blog and when I finally do, I can't post. It was so frustrating. The problems have been resolved, I hope. I still get error message now and then but so it looks fine to me. I'm keeping my fingers crossed. Hopefully, my posts won't suddenly just disappear one day. I'll be posting the newer recipes one as I had forgotten the exactly measurements for the older ones :P Lazy me don't have a habit of writing them down. :P I shall not waste time ranting. If you like sesame seed, you have to try this. I know sesame seed is hard to digest. So, I have grind it into powder form. We just love the aroma and the taste of this dish.  


Ingredients:
  • 100g French Beans, ends removed
  • 3 tablespoon Ground Toasted Sesame Seed
  • 1 teaspoon Sugar
  • 1/2 tablespoon Light Soy Sauce
  • 3 tablespoon Water
  • Salt to taste 

How to do it:
  1. Heat oil in wok.
  2. Stir fry french bean till 80% cooked.
  3. Add in the rest of the ingredients except salt.
  4. Continue stir frying till sauce is almost dry.
  5. Add salt to taste, if need.
  6. Give the french beans a finally toss.
  7. Dish and serve.

Monday, September 10, 2007

King Oyster Mushroom with Dried Scallop Sauce
杏鲍菇伴干贝汁


It's another mushroom dish. Told you we love mushrooms! What I like about this King Oyster Mushroom is how it looks like and the texture when it's cooked. I always pass it off as braised sliced abalone. My husband got tricked the first time I did this. *giggle*

I prefer to add an additional green with the mushroom. In this case, I added Kai Lan (芥兰) aka Chinese Broccoli. You can always use other veggies. Try this if you are expecting guests for dinner. It's cheap and easy yet presentable.

Does the picture looks like a lotus flower? Have a petal!


Ingredients:
  • 150g King Oyster Mushroom, sliced
  • a few stalk of Baby Kai Lan (芥兰) aka Chinese Broccoli
  • 4 pieces Dried Scallop
  • 200ml Water
  • 1 teaspoon Oyster Sauce
  • a pinch of Sugar to taste
  • Cornflour Mixture (Thickener)
  • 1/2 tablespoon Oil

How to do it:
  1. Soak dried scallop in the water till soften.
  2. Shred the dried scallop with your finger and set aside.
  3. Retain the water.
  4. Separate the leaves of the Kai Lan.
  5. Blanch the vegetables and arrange on the plate.
  6. Heat wok with oil.
  7. Stir fried mushroom till cooked.
  8. Pour in the water used to soak the dried scallop.
  9. Add in the oyster sauce and sugar.
  10. Let it simmer for 1 minute.
  11. Remove the mushroom and lay on top of the vegetable.
  12. Add in the the dried scallop.
  13. Bring to a boil.
  14. Thicken with cornflour mixture.
  15. Pour over the mushroom.
  16. Serve.

Note:
Instead of Kai Lan, you can use any other vegetable you like.


* King Oyster Mushroom *

Friday, January 5, 2007

Kung Po Chicken
宫堡鸡丁


One of my favourite dished is Kung Po Chicken 宫堡鸡丁. I have been practicing for some time and I have yet to master it. I still think some thing is missing. My hubby said I have improved a lot on my latest version. It’s the best so far. What an encouragement!

Ingredients:
  • 2 chicken drumstick; deboned and cut into cubes
  • 20 dried chilli; soaked and cut into sections
  • 1 onion, cut into small pieces
  • Oil for frying
Marinade:
  • 1 tablespoon Chinese cooking wine
  • 1 tablespoon light soy sauce
  • 2 tablespoon corn flour
Seasoning:
  • 3 tablespoon Black Vinegar
  • 2 tablespoon sugar
  • 2 tablespoon water
  • Corn flour mixture (thickener)
How to do it:
  1. Marinade chicken for at least an hour.
  2. Dust chicken with corn flour.
  3. Deep-fry till they turned golden brown and set aside.
  4. Heat oil and fry onions for 1 minute.
  5. Add dried chilli and fry till fragrant (about 30 seconds).
  6. Add all seasoning except corn flour mixture.
  7. When the sauce boils, gradually add in the corn flour mixture till the sauce thickens.
  8. Add in the chicken and coat evenly.
  9. Dish and serve.
Note:I use ChinKiang Vinegar 镇江香醋. I think this vinegar taste the best for this dish.

Friday, November 24, 2006

Deep Fried Tofu Cubes
酥炸豆腐块


This is a quick and simple dish. I’m surprise my son likes it too!

Ingredients:
  • 1 box silken tofu for frying
  • Cornflour for dusting
  • Oil for frying
  • 1/2 teaspoon salt
  • Water
Dipping sauce:
  • Few sprigs of Coriander, chopped finely
  • 1 tablespoon light soy sauce
  • ½ tablespoon sesame seed oil
  • ½ tablespoon apple cider or white vinegar
  • ½ tablespoon sugar
  • Red chilli, diced (optional)
How to do it:
  1. Cut tofu into bit size cubes.
  2. Add salt to the water.
  3. Sit tofu in the salted water for 5 minutes
  4. Drain the tofu.
  5. Pat dry by gently pressing the tofu in between 2 pieces of paper kitchen towels.
  6. Coat tofu cubes with cornflour.
  7. Heat oil and deep fry the cubes.
  8. Remove when tofu turns golden brown.
  9. To make dipping sauce, mix all ingredients together.
  10. Serve hot.
Note:
I like to poke a hole in the tofu cubes then pour some sauce in it. Then eat the whole piece. Nice! If you are eating my way, you need more sauce!!

Wednesday, July 26, 2006

Fried Fritters with Squid Paste
沙拉鱿鱼糊油条


I cook this once in a blue moon when we are all sick of eating the usual vegetable and meat dishes. It’s like a snack to go with beer…


Ingredients:
  • 2 pair of fried fritters, cubed
  • 1/2 bowl of squid paste

Salad Sauce:
  • 1/2 bowl of salad cream
  • 1 tablespoon sugar
  • 1 tablespoon condensed milk
  • 1 teaspoon lemon juice

How to do it:
  1. Mix all the ingredients of the salad sauce and set aside.
  2. Spread some squid paste on 1 side of the fried fritters.
  3. Deep fry the fried fritters with the squid paste till golden brown.
  4. Pour the salad cream on the fried fritters and mix well.
  5. Serve.

Note:
  1. If you can’t get squid paste, you can make your own.
  2. Remove the skin, head and the soft bone from the squid. Leaving only the main part.
  3. Mince it and mix with some cornflour.
  4. There you have it. And it taste better then the ready made one.

Monday, July 24, 2006

Baby Bok Choy with Shitake Mushroom
小白菜绘鲜菇


This is a relatively easy dish to prepare. If you are home late and have not prepared your dinner, why not try this ….

Ingredients:
  • 4 stalks Baby Bok Choy 小白菜
  • 5 Shitake Mushroom, sliced
  • ½ tablespoon Garlic
Seasoning:
  • ½ tablespoon Oyster Sauce
  • ½ teaspoon sugar
  • 2 tablespoon water
How to do it:
  1. Cut the end of Xiao Bai Cai and wash.
  2. Blanch Xiao Bai Cai in a pot of boiling water with the stems first for30 seconds then whole for another 30 seconds.
  3. Remove and set aside.
  4. In a wok or fry pan, heat ½ tablespoon oil and add in garlic and stir-fry. Add in the shitake mushroom and stir-fry till fragrant.
  5. Now add it the seasoning and bring to boil.
  6. If you want to thicken your sauce, you can stir-in some cornflour mixture. Pour the sauce over the Xiao Bai Cai and serve.

Saturday, July 22, 2006

Broccoli with Dried Scallops
瑤柱芥兰花


I love to eat Broccoli! So does my girl. I add broccoli in her porridge and she loves it.

Ingredients:
  • Broccoli, cut into florets
  • 4-5 Dried scallops, soaked in hot water for ½ hour
  • ½ pack Enokitake
  • 200ml stock or water
  • 1 tablespoon oyster sauce
  • ½ tablespoon Chinese wine
  • ½ tablespoon light soy sauce
  • 1 egg white
  • Cornflour mixture (2 teaspoon cornflour with 2 teaspoon water)

How it’s done:
  1. Blanch broccoli florets.
  2. Remove accordingly to how cooked you want the broccoli to be. For me, 8 mins.
  3. Place broccoli in a dish.
  4. In a saucepan, combine dried scallop, enokitake, oyster sauce, Chinese wine, soy sauce and stock.
  5. When it starts to boil, reduce heat and simmer for 10 mins.
  6. Thicken the sauce with the cornflour mixture.
  7. Turn off the fire and slowly stir in the egg white.
  8. Pour the sauce over the broccoli and serve.


Note:
Don’t throw away the water you use to soak the dried scallop.You can add in to your stock or water to be use to simmer the enokitake and dried scallop.

Monday, July 10, 2006

Beef Rolls in Tomato Sauce
鲜番茄酱牛肉卷


I trying my hands on a beef dish for my son. He needs to put on more weight. I found this recipe that uses beef when I was sorting the recipes I tore from magazines. I have adjusted some of the ingredients with some of my son’s favourites. Hope it will catch his attention.

Ingredients:
  • 8 slices of thinly sliced beef
  • 4 baby corn, cut into 4 ‘sticks’ each
  • Carrot thinly sliced or shredded.
  • 8 cherry tomatoes, diced
Seasoning:
  • 1 tablespoon Tomato sauce
  • 2 teaspoon Soy sauce (1 each for marinating & sauce)
  • 1 teaspoon Sugar
  • 200ml Stock or water
  • Cornflour mixture (mix 1 teaspoon cornflour with 1 tablespoon water)
How to do it:
  1. Marinate the beef with a teaspoon of soy sauce for 10 minutes.
  2. In a small pot of hot water, add 1 teaspoon of salt & oil.
  3. Blanch the baby corn. Remove & put it in a bowl of room temperature) water to stop it from further cooking.
  4. When this is done, roll the beef with a slice of carrot and 2 sticks of baby corn.
  5. Hold the beef with toothpick
  6. Dust the beef rolls with cornflour.
  7. Heat 1 teaspoon of oil and pan-fry the beef roll till the beef roll is cook (about 8 mins)
  8. Remove from pan.
  9. In the same pan, add in the diced cherry tomatoes and seasoning except the cornflour mixture.
  10. When the sauce starts to boils, add in the beef rolls to cook for a while to absorb the sauce.
  11. Remove & set aside.
  12. Now, add the cornflour mixture gradually to thicken the sauce.
  13. Pour the sauce over the beef rolls and serve.

Note:
You can also use enokitake mushroom in it. Do adjust the amount of the seasoning if you prefer more sauce.

Sunday, July 9, 2006

Teriyaki Cod
日式照烧鳕鱼


My family has expensive taste buds. My son only likes to eat Cod. Now I realized, so does my daughter! 

I usually steam or pan fried Cod. Once a while, I will prepare Cod differently. My son is already so picky with food. I don’t want him to be also picky with how his food is prepared. 

This dish is really nice and tasty. For those who don’t like Cod because of the smell and taste will find that the marinade did a very good job covering it. This is one of my husband’s favourite too.


Ingredients:
  • Cod

Marinade:
  • 1 tablespoon Sugar
  • 1 tablespoon Mirin
  • 1 tablespoon Wine
  • 2 tablespoon Soy Sauce

How to do it:
  1. Mix the marinade.
  2. Pour the marinade over the Cod and marinate for at least ½ hour.
  3. Dust Cod with corn flour and sauté in pan till lightly burnt. Pour away excess oil.
  4. Pour the remaining marinade for the Cod in the pan.
  5. Cook till the sauce thickens. (about 6-7 mins).
  6. Remove and serve hot.

Note:
Don’t worry if you can’t get Mirin. It taste as good without it! Be careful not to burn it!