AdSense

Showing posts with label squid. Show all posts

Monday, July 28, 2014

{ Lunch: Fried Rice with Cauliflower and Squid }


My lunch on Friday ...

I bought a squid with roe on Thursday and marinated it for over night.  I had some leftover small shrimps that I have to clear for the week and also some cauliflower from my daughter's lunchbox.  All these assembled and became my lunch.

Simple Fried Rice with Egg, Peas and Shrimps

Baked Cauliflower tossed in Curry, Paprika and Parmesan Cheese

Oven Grilled Squid with roe in Miso

Lunch: Fried Rice with Cauliflower and Squid

Tuesday, March 18, 2014

Ika Meshi


Super short post here cos I'm busy busy busy today.  Taking a break to share some food here.

I made some glutinous rice stuffed squid, better known as Ika Meshi, for dinner.  If you like what you see, hop over HERE to the write up on how it is done.

Okay, I'm going back to my kitchen to continue cooking stare at the Ika Meshi!

Wednesday, July 24, 2013

Grilled Squid in Miso Sauce
味噌酱烤鱿鱼


This is one of my cooking trials that end up being my favourite. ^^

I'm not sure if anyone would like this (because my husband always say I have 'funny' taste in food) but I rather share food that I like than food that I don't. I'm sure I will find people with the same taste as I do to like this. :P

Don't worry, I won't start sharing all kinds of weird tasting food that I like here. I will reserve that for torturing my family. :P


Ingredients:
  • 3 Squid, innards and 'skin' remove
  • 1 tablespoon Miso Paste
  • 1 1/2 tablespoon Mirin
  • 1 tablespoon Sake or Cooking Wine
  • a pinch of Sugar
  • 1 Calamansi (optional)

How to do it:
  1. Slice open the squid so it will be flat.
  2. Score  on the on inside of the squid. Do not cut thru.
  3. If using head, remove the eyes.
  4. Pat squid dry and thread squid with skewers on both sides.
  5. Mix miso paste, mirin, sake and sugar well.
  6. Spread the miso sauce sparingly on the side with cuts.
  7. Grill squid in preheat oven at 250C for 12 mins
  8. Bast squid with miso sauce sparingly once to twice in between grilling.
  9. Grill the head and side fins separately.
  10. Once done, remove skewers and cut squid into pieces.
  11. Served with a squeeze of calamansi if you like a little tang .

Note:
  • The more sauce you bast the squid with, the more salty it will be. So use sparingly.
  • Treading the squid with skewer is a must otherwise they will curl up during cooking which will makes grilling very difficult.
  • When you tread the squid with skewers, they will form the letter 'V' with 1 end of the skewer meeting. You may want to wrap the meeting ends of the skewers with foil so it will be easier to hold (with gloves) to remove the squid.
  • If you want to have a grossy look like the first pic here, spray or spread a little oil toward the end of the grilling and let it grill a while before removing.


Monday, August 6, 2012

Sweet and Sour Squid for #CookForFamily Initiative

Daniel from Daniel's Food Diary started the #CookForFamily initiative with the main objective of getting more bloggers and their readers to start cooking. I'm glad to be part of it.

I don't know about you but for me, I treasure each time my family is able to eat together. My husband has long working hours and usually reached home past 8pm. So we can hardly eat as a family.

Each time, he is able to come home earlier for dinner, I will try to cook more dishes. Dinner or any meal times together is another great way for family bonding.

This is one of the dinners I have prepared for my family for the month of July. One of the 3 days in the whole of July that we were able to eat as a family. :)


For this dinner, we had:

The photos below are what we had for the other 2 dinner we had as a family. :) I'll be sharing the recipes in later posts.


Cooking for your family doesn't restrict to dinner. It can be breakfast, lunch or even tea or supper. Cook for that special person or persons in your life to show appreciation for what he, she or they have done for you. Hopefully they too appreciate what you have prepared for them because nothing beats home-cooked food. :)

You can set aside once a week for home cooked meals if you really can't find the time. Perhaps on a Sunday?

One of the breakfast I made for the family on a Sunday was on eggs. It was so good to be able to sit down together to enjoy the breakfast each of us liked.

Well, mine was the omelette set on the bottom right, which was done with all leftovers used for the rest of the set. :P Not a personal favourite but it's the company I enjoyed and the happy faces on my family's faces that I looked for. :)


I cook several times a day. My daughter is studying in the afternoon session. We will meet her lunch kaki for lunch every Thursday. ;)  Other than that, I will make lunch for her before she goes to school. This is one of her lunches I did for her.


My son is in the morning session. Likewise, I will make lunch for him when returns home from school. Usually, not "proper meal" as in rice or noodle. Just food he like and can fill him, like the burger below. :)


If you have been following my blog, you should know that I only pick-up cooking when my elder son was close 3 years old. :P My son is in P4 this year, you go do the calculations. :P

If you think cooking is difficult, cooking is time consuming, start with something easy. You can't go wrong with salad! That can't be difficult or time consuming, right? :)  If I can do it, you can too! :)

I do hope that this #CookForFamily initiative,will get more people to start cooking for their family. If you are reading this, why not pick a date to do it? Soon I hope! :)

Now for the recipe I'm sharing, Sweet and Sour Squid 酸甜花枝, a quick and easy dish.


Ingredients:
  • 2 Squid, cleaned, scored and sliced into smaller pieces
  • 2 Shallot
  • 2 glove Garlic
  • 2 slice Ginger
  • 1 fresh Red Chilli, de-seed and diced

Seasonings:
  • 1/3 tablespoon Apple Cider or White Vinegar
  • 2/3 tablespoon Sugar
  • Salt to taste

How to do it:
  1. Blanch squid till just cooked. It should under a minute.
  2. Drain squid and reserve 5 tablespoon of water used to blanch squid, more if you like more sauce.
  3. Meanwhile, grind shallot, garlic and ginger together.
  4. Heat wok with oil.
  5. Saute chilli and the spice mixture in step 3 till fragrant.
  6. Add in the reserved water and seasonings to taste.
  7. Bring to a simmer.
  8. Turn off the heat.
  9. Return cooked squid to the wok and toss to coat well with sauce.
  10. Dish and serve.

Note:
  • Adjust the taste to your liking. If you like it less sweet, add less sugar.
  • Do not over cook the squid as it will turn chewy. Hence, remember to turn off the heat before adding the squid to the sauce.

Thursday, February 16, 2012

Grilled Sambal Squid
参巴烏賊


I have a craving to make sambal belacan yesterday, mainly because my husband is not in Singapore. I good time to make it! ;) He hates the odor. I think it's aroma. XD

I couldn't decided to grilled in the oven or in the Happy Call Pan. Sally, a fellow HCP member, suggested using the pan (but of course). I took up the challenge and put my dinner at risk. XD

I must say I'm lucky I took the risk. The squid is very soft, not chewy at all, even after reheating. Even my son who dislike eating squid, love it.

You will realised that I used a banana leaf. It also helps in the cooking as it acts as a barrier between the squid and the pan. There no direct contact with the heat source, tendency of over-cooking is minimised. The sambal that spilled over the banana leaf were thicken and slightly caramelised but not those that were on the leaf. If you are unable to get hold of a banaa leaf, you will have to cook at a lower heat and move the pan a lot.

Here's my recipe using the sambal belacan I shared before this post.


Ingredients:
  • 3 medium Squid
  • 1 Banana Leaf
  • 1 Shallot, sliced
  • 1 Lime
  • 1 petals from Pink Ginger Flower Bud, sliced thinly (optional)
  • 3 tablespoon Sambal Belacan, homemade or store bought

How to do it:
  1. Add in squid to sambal belacan and marinade for 30 minutes.
  2. Grease pan with a bit of oil and heat pan on medium high heat.
  3. Place a piece banana leaf in the pan and spread the squid with the sambal on it.
  4. Cover the pan and cook for 6 minutes.
  5. Open the pan and cook for another 2 minutes.
  6. Top with ginger flower and cover pan for half a minute.
  7. Open the pan, dished top with sliced shallot and drizzle with lime juice.
  8. Serve immediately.


Thursday, January 19, 2012

Stuffed Mushroom
花枝招展


I was making Braised Chicken feet with mushroom and decided to set aside a few of the mushroom to make this dish.

This is done using the Happy Call Pan.  If you don't own a HCP, there's always the regular wok or steamer to do the job. Please refer to the alternative method at the end of the recipe for instructions.


Ingredients:
  • 200g prawns, shelled, cleaned and minced
  • 2 Squid, cleaned and outer 'skin' removed
  • 6 Dried Mushroom, soak to soften and stalk removed
  • a small handful of Wolf berries
  • 1 teaspoon Corn Flour
  • a pinch of Salt
  • a dash of Pepper
  • 100ml Water
  • 1/3 tablespoon Oyster Sauce
  • a pinch of Sugar
  • Cornflour Mixture as thickener

How to do it:
  1. Squeeze water out of mushroom, dab dry and set aside.
  2. Cut squid into thick ring of 2.5cm each piece.
  3. Slice squid downward with less than 1cm apart but be careful not to slice thru it. You can use a scissor to do this too.
  4. When it's done, the squid will look like a flower with a big opening in the middle.
  5. Dab dry and set aside.
  6. Mix minced prawn well with 1/2 teaspoon corn flour, a pinch of salt and a dash of pepper.
  7. Dab the underside of the mushroom with a little cornflour.
  8. Stuff the squid with prawn paste and place it on the mushroom.
  9. Top with a Wolfberry.
  10. Pour water into the pan.
  11. Add oyster sauce, sugar and wolfberries.
  12. Bring to a simmer.
  13. Add in the stuffed mushroom.
  14. Cover the pan and cook in low fire for 15 minutes.
  15. Open and remove the stuff mushroom to a dish.
  16. Thicken the sauce with cornflour mixture.
  17. Pour over the stuff mushroom.
  18. Drizzle sesame seed oil if desired and serve.

Note:
  • The cooking time depends on the size of the stuff mushroom you have. The bigger the mushroom, the more minced prawn you need. Hence, the longer cooking time required too.
  • Try to choose squid that can fit onto the mushroom, so the 'flower' can sit inside the mushroom.
  • Unuse parts of the squid, except for the head, can be minced and mixed together with the prawns to be used.

Alternative for non-HCP user:
  1. Follow steps 1 to 9.
  2. Place the mushroom in a deep dish
  3. Steam it for 15 mins or cooked thoroughly.
  4. Remove and place it on a plate. Retain the sauce.
  5. In a wok, pour in the sauce retained from the steaming.
  6. Add 1 teaspoon of oyster sauce and a pinch of salt and sugar to taste.
  7. Bring to a simmer and stir in some corn flour mixture to thicken the sauce.
  8. Pour the sauce over, drizzle with sesame seed oil and serve.


    before it's cooked

    Tuesday, December 13, 2011

    Ika Teriyaki
    日式照烧烏賊


    Another easy recipe using the Happy Call Pan. ;)

    I did my own teriyaki sauce here but you can always get ready-made ones from the supermarket for less hassle. I like to make my own sauce, though it may not be authentic, as I can adjust the taste. Furthermore, I don't use teriyaki sauce that often. So making it when I need it makes more sense to me.

    You may do this using a regular non-stick pan if you don't have a Happy Call Pan. Just add in 2 - 3 tablespoon of water when you are cooking it as the regular pan (covered) doesn't not generate as much liquid as the HCP.

    Ingredients:
    • 2 medium Squid, innards removed and cleaned
    • 1 tablespoon Sake
    • 3 tablespoon Mirin
    • 3 tablespoon Light Soy Sauce
    • 2/3 tablespoon Brown Sugar
    • 1 tablespoon Oil

    How to do it:
    1. Marinate for half an hour.
    2. Place squid in the pan and pour the marinade into pan too.
    3. Grill with pan covered for 4 minutes in medium low fire.
    4. Grill on the other side for another 4 minutes.
    5. Open cover and slit the squid by using a scissor.
    6. Continue to grill on medium low for 1-2 minutes with cover opened, to thicken sauce.
    7. Turn the squid in-between grilling to get the colour even.
    8. Remove from pan and spoon some thicken teriyaki sauce over.
    9. Serve.


    Sake                                            Mirin

    Wednesday, June 22, 2011

    Glutinous Stuffed Squid 烏賊飯


    I had this years ago and have never come across it again. I totally miss it, hence I'm trying my luck to replicate it. This is my second attempt on this dish. It's definitely much better my first attempt. ;)

    If you would like try it out, here's how I did it. I soaked about 4 to 5 tablespoon of glutinous rice, which is enough for 2 squids, in water BUT seasoned with a tablespoon of light soy sauce, 1/4 tablespoon each of sugar and mirin. I soaked the rice for 3 hours.

    Meanwhile, remove the innards of the squids. When the rice is done soaking, stuff the rice in the squid till 3/4 full. Use a toothpick or skewer to seal the opening. However, be careful not to tear the squid because it will be harder to secure it again and not having it 'explode' while cooking.

    Place the stuffed squids in a pot with enough water covering it. Add in 2 tablespoon of light soy sauce, 1 tablespoon Mirin, and a 1 tablespoon of sugar. Bring it to a gentle boil then reduce to a simmer. Continue simmering for 3 hours. Turn the squids around in between cooking. It's alright if the sauce reduced to 2/3. However if it get to thick, add hot water to dilute it.

    I used a thermal pot on my second attempt on this dish and I didn't have to add water. I just had to reboil it once. However, directly cooking does make the squids more tasty.

    Remove the squids when it's done and let it cool a bit before you slice it. It's a little tricky slicing it. You might want to oil your blade to do it. Meanwhile, turn up the heat and boil the sauce to thicken it a little.

    Drizzle some thicken sauce over the sliced squid and serve.


    { This is how it looks for my first attempt on the stuffed Squid; simmering for 3 hours over direct heat, ie, not using the thermal pot. The glutinous rice was plain and bland as I did not season it but the squid was in a deep shade of brownish orange. You can see from the rings that sauce had penetrated into the squid. }

    Friday, June 25, 2010

    Sweet and Sour Squid 酸甜鱿鱼卷


    This is a very simple dish.  To me, this dish is like an appetizer as it stimulate my appetite. The flavour intensity of this dish can adjusted according to your taste. Like it more sour, add more vinegar.  Likewise, add more sugar if you prefer it sweeter, etc. Here's my guide to this dish.

    Ingredients:
    • 3 Squid
    • 2 slice Ginger
    • 1 Fresh Chilli, seeded
    • 2 Spring Onion, white part only & reserve the green part for other use
    • 2 Shallot
    • 1 clove Garlic
    • 1 tablespoon Sugar
    • 1 tablespoon Apple Cider or White Vinegar
    • 1 tablespoon Light Soy Sauce
    • 1 teaspoon Chinese Cooking Wine
    • 1/2 tablespoon Cooking Oil
    • 1/2 teaspoon Salt

    How to do it:
    1. Clean and cut squid into pieces.
    2. Boil a pot of water.
    3. Add in ginger, spring onion, Chinese cooking wine and salt.
    4. Blanch squid pieces till they starts to curl and cooked.
    5. Drain and set aside. Reserve the liquid.
    6. Meanwhile, grind chilli, shallot, garlic together.
    7. Heat oil and saute the paste till fragrant but not brown.
    8. Add in sugar, apple cider, light soy sauce and 2 tablespoon of liquid from blanching the squid.
    9. Bring to a boil.
    10. Add in the squid pieces and mix well with sauce.
    11. Dish and drizzle on some sesame seed oil.
    12. Serve.

    Tuesday, September 29, 2009

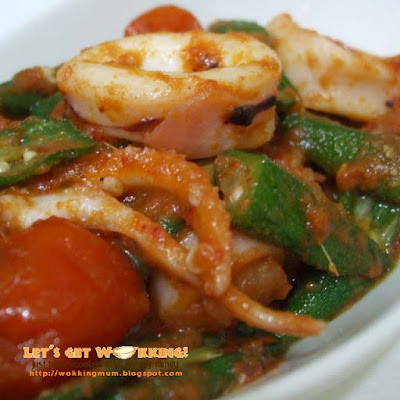
    Sambal Okra and Squid


    This is one of my favourite dish. I will only make this when my husband is not coming back for dinner. Noone at home eat this. :( I have to coach my son on his work after his dinner so I don't have that much time to cook an additional dish just for myself. Not to mention the additional washing to do.

    You probably know, I cook separately for my kids as they have their dinner earlier. I don't like to eat cold food hence I'll cook again when my husband's back for dinner. Imagine the amount of time spend just to make dinner. Okay, blame me for being fussy. :P


    Ingredients:
    • 1 medium Squid
    • 15 Okra aka Ladies' Finger, sliced
    • 5 Cherry Tomato or 1 Tomato, cut into quarters

    Chilli Paste:
    • 4 Fresh Red Chilli
    • 8 Dried Chilli
    • 6 Shallot
    • 4 clove Garlic
    • 1 stalk Lemongrass
    • 1/3 tablespoon Belacan
    • 1 teaspoon brown sugar
    • Salt to taste

    How to do it:
    1. Remove soft bone and innards of squids.
    2. Cut squids into rings.
    3. Set aside.
    4. Grind all ingredients for chilli paste, except for sugar and salt, together.
    5. Heat wok with 1 teaspoon of oil.
    6. Stir fry chilli paste till fragrant.
    7. Add sugar and salt to taste.
    8. Leave to cool.
    9. In a wok, heat 1/2 tablespoon oil..
    10. Add squid and stir fry till half cooked.
    11. Dish and set aside.
    12. In the same wok, heat 1/2 tablespoon oil.
    13. Add in okra and  tomatoes.
    14. Stir fry for a minute.
    15. Add in the chilli paste.
    16. Stir fry for 8 minutes or till well cooked.
    17. Dish and serve.
    18. Add in squid to marinade for at least 30 minutes.
    19. Place squid with chilli paste on banana leaf.
    20. Grill in preheated oven at 180C for 15 minutes or till cooked.
    21. Remove and top with fresh shallot sliced and drizzle with lime jucie.
    22. Serve immediately.

      Note:

      • If you prefer it more spicy, use chilli padi instead of regular chilli for the chilli paste.

      Saturday, March 7, 2009

      Grilled Squid

      Do you like bbq stuff? I do! Ohh ... I missed the BBQ Stingray at my parent's place. You know I can't take spicy food but I just love the BBQ Stingray there. Each time I eat that, my face with be as red as a cooked crab and my face wet with perspiration. :P BBQ squid is one of the dishes I will order sometimes. Now occasionally, I will do it at home. It's so much cheaper. ;P

      Ingredients:
      • 5 medium Squid
      • 1 Banana Leaf, optional
      • 1 Shallot, sliced
      • 1 Lime
      Chilli Paste:
      • 6 Fresh Red Chilli
      • 12 Dried Chilli
      • 8 Shallot
      • 6 clove Garlic
      • 1 stalk Lemongrass
      • 1/2 tablespoon Belacan
      • 3 petals from Pink Ginger Flower Bud
      • 1 teaspoon brown sugar
      • Salt to taste
      How to do it:
      1. Remove soft bone and innards of squids.
      2. Cut squids into rings.
      3. Set aside.
      4. Grind all ingredients for chilli paste, except for sugar and salt, together.
      5. Heat wok with 1 teaspoon of oil.
      6. Stir fry chilli paste till fragrant.
      7. Add sugar and salt to taste.
      8. Leave to cool.
      9. Add in squid to marinade for at least 30 minutes.
      10. Place squid with chilli paste on banana leaf.
      11. Grill in preheated oven at 180C for 15 minutes or till cooked.
      12. Remove and top with fresh shallot sliced and drizzle with lime jucie.
      13. Serve immediately.
      Note: You can pan grill if you do not have an oven. If you like it hotter, grinde in some chilli padi to the chilli paste. The pink ginger flower adds a pleasant aroma. If you can't find it, leave it out.

      Wednesday, July 25, 2007

      Black Pepper Squid


      I couldn't get over the Black Pepper Crayfish I cooked yesterday and I just eat it again. Sooo, I just had to cook it again today but with squid, which was suppose to be for another dish.

      Squid taste nice with black pepper. I had cooked Grilled Squid with Black Pepper some time back. Grilled squid is tough with overcooked. The one is just nice - chewy but tender.

      For this dish, I cut down the black pepper to 2 tablespoons and chilli was not added too. Oh, I also reduced the water to just 2 tablespoons as this doesn't need too much cooking to get the flavours in it. You can do the same if you are using Prawns.

      In case you are wondering how I cut the squid, I sliced across the squid leaving about a centimeter from the edge. It looked like the squid had lots of rings attached. After which, I half it. When you fried it, it will curl and look like a flower, pretty.

      Okay, enough. No more black pepper dish for me liao.

      Tuesday, July 3, 2007

      Grilled Squid with Black Pepper


      I bought a few squid aka sotong because my son requested for it. I saved one for him and use the rest for this dish. Really simple to make.

      By the way, why do people say "blur like sotong"? Are sotong really blur? Maybe it's the way they swim? Hahaha ... So after eating sotong, don't be blur just like it huh.

      Ingredients:
      • 2 Squid, skin (the thin purple one), and internals removed
      • 1 tablespoon Chinese Cooking Wine
      • 1/2 tablespoon Black Pepper
      • 1 teaspoon Salt, preferably coarse salt
      How to do it:
      1. Slash the squid.
      2. Marinate with wine, rub salt and pepper on it.
      3. Set aside with the squid still with the above marinade for 1/2 hour.
      4. Pierce squid with 2 skewers to prevent it from curling while grilling.
      5. Grill squid for 7 - 10 minutes on both sides till cooked.
      6. For extra flavours, add some fried/toasted basil leaves to be eaten with the squid.
      Note:Do not over cook the squid otherwise it will be tough.

      Wednesday, July 26, 2006

      Fried Fritters with Squid Paste
      沙拉鱿鱼糊油条


      I cook this once in a blue moon when we are all sick of eating the usual vegetable and meat dishes. It’s like a snack to go with beer…


      Ingredients:
      • 2 pair of fried fritters, cubed
      • 1/2 bowl of squid paste

      Salad Sauce:
      • 1/2 bowl of salad cream
      • 1 tablespoon sugar
      • 1 tablespoon condensed milk
      • 1 teaspoon lemon juice

      How to do it:
      1. Mix all the ingredients of the salad sauce and set aside.
      2. Spread some squid paste on 1 side of the fried fritters.
      3. Deep fry the fried fritters with the squid paste till golden brown.
      4. Pour the salad cream on the fried fritters and mix well.
      5. Serve.

      Note:
      1. If you can’t get squid paste, you can make your own.
      2. Remove the skin, head and the soft bone from the squid. Leaving only the main part.
      3. Mince it and mix with some cornflour.
      4. There you have it. And it taste better then the ready made one.

      Monday, July 24, 2006

      Stir-Fried Prawns with Veggies
      鲜虾炒什菜


      I especially like this dish because it’s very pleasing to the eye. It’s really nice to serve when you have guests coming over for dinner. I bet they will like it too!

      Ingredients:
      • 12 prawns, shelled and deveined
      • 10 stalks asparagus, cut into sections4
      • Baby corn, cut into sections
      • 1/3 carrot, sliced
      • 1 tablespoon garlic, minced
      • 1 tablespoon onion, minced
      • 3 slices ginger

      Seasoning:
      • 1 tablespoon oyster sauce
      • ½ teaspoon sugar
      • 1 teaspoon Chinese wine
      • Cornflour mixture (2 tablespoon each of cornflour & water)

      How to do it:
      1. Wash the prawns and set aside.
      2. Boil a pot of water. In it, add 1 teaspoon of salt and oil.
      3. When it’s boiling, add in the asparagus, baby corn and carrot to blanch it for 5 mins.
      4. In a wok or fry pan, add in 1 teaspoon oil and stir-fry garlic, onion and ginger till fragrant.
      5. Add in the prawns.
      6. When the prawns are about 70% cooked, add in the vegetables and the seasoning, except the cornflour mixture.
      7. Stir-fry well.
      8. Slowly add in the cornflour mixture will stirring.
      9. Serve.

      Note:
      I have tried replacing prawns with scallops before, it nice too. But be careful not to over-cook the scallops if you are using them.I have also tried replacing asparagus with broccoli. Don’t add too much otherwise you will have to change the name of the dish to stir-fried broccoli with prawns instead.