AdSense

Tuesday, May 29, 2012

Stir-fried Hokkien Mee
福建面


My mother used to cook this or something like this when I was a kid. She always said she cook it 'anyhow'. ;) My mother never really do much cooking.  She came from a big family and according to her, she was assigned the duty of washing clothes for the family. Hence, she knows nuts about cooking. So, this explains why I started picking up cooking only after my elder son turned almost 3.:P

I never get to learn how to cook this from her in the end, because each time she cooked, it looked and tasted a bit different (due to the ingredients she used) and she would said just 'anyhow' cook if I asked. LOL

Years later when I started working, I realised that what my mother did could be the local zichar's Hokkien Mee.:D

This, here you see, is my replica of the zichar's Hokkien Mee (without using lard) though. Not my mum's version. XD

Ingredients:
  • 200g Flat Yellow Noodles
  • 100g Lean Pork, sliced
  • 6 medium Prawns, shelled and deviened
  • 200g Choy Sum
  • 1 tablespoon Minced Garlic
  • 2 tablespoon Cooking Oil
  • 1 teaspoon Corn Flour
  • a pinch of Salt

Seasonings:
  • 300ml Water or Chicken Broth
  • 1/2 tablespoon Oyster Sauce
  • 1 1/2 teaspoon Dark Soy Sauce
  • 1/2 tablespoon Light Soy Sauce
  • Corn flour Mixture

How to do it:
  1. Marinate pork slices with a pinch of salt and corn flour.
  2. Set aside.
  3. Blanched noodles, drain and set aside.
  4. Stir-fry 1/4 tablespoon garlic in a tablespoon oil till fragrant.
  5. Add in the pork slices and prawns.
  6. Stir fry till just cooked.
  7. Dish out and set aside.
  8. In the same wok, add in the remaining oil and garlic.
  9. Stir-fry till fragrant.
  10. Add in the blanched noodles.
  11. Toss to coat well with garlic and oil.
  12. Add in water and bring to a boil.
  13. Add in the seasonings, except for salt and corn flour mixture.
  14. Cook till noodle is well cooked but not marshy.
  15. Add in the choy sum, the pre-cooked pork slices and prawns.
  16. Mix well with noodles and sauce.
  17. Gradually, stir in the corn flour mixture to thicken the sauce.
  18. Serve immediately.

Note:
  • Adjust the 'darkness' of the sauce by adjusting the amount of Dark Soy Sauce. Usually a premium Dark Soy Sauce is thicker and darker.
  • The amount of Oyster Sauce and Light Soy Sauce used to season the noodles also depends on if you are using water or chicken broth. Please adjust according to your taste.

Monday, May 28, 2012

Mango Pavlova and Soda
芒果帕芙洛娃与苏打


I had cravings for something (real) sweet and decided to my favourite dessert, Pavlova. I don't bake much because I really bad at it. It takes lots of patience and I hate the washing up the most. In addition, my family doesn't eat much either, except for cookies.

I prefer Pavlova that's crunchy and not marshmallow-like inside, so I baked it a little longer at a lower temperature. I can store it longer this way too. I'm serving it with Mango. You can served it with other fruits for the Pavlova too.  I had enough mango so I blended some into puree and used it to make Mango Soda too.

To those with sweet-tooth, this is for you. ;)


Ingredients:
  • 4 Egg Whites (from 60g Eggs at room temperature)
  • 140g Extra Fine Sugar
  • 1 teaspoon Vanilla Extract or Essence
  • 1 teaspoon White Vinegar
  • 1/2 tablespoon Corn Flour, sifted

How to do it:
  1. Beat egg whites till soft peaks.
  2. Add in sugar gradually, in small amount (a tablespoon at a time) each time.
  3. Beat on high speed till sugar has dissolved and the meringue is stiff peaks and shiny.
  4. Beat in the vanilla extract.
  5. Add in the vinegar and sprinkle the cornstarch over the meringue
  6. Fold in to the meringue gently.
  7. Place in a piping bag or zip-loc bag with or without a noozle.
  8. Pipe meringue into a well like shape (see left photo at the bottom of this post)
  9. Bake in preheated oven at 110C for 1 1/2 hours.
  10. Leave the oven door ajar for 15mins to cool in the oven.
  11. Remove to to cool on the rack before storing in air-tight container.


To make Mango Pavlova:
  1. Pipe in some butter cream into the Pavlova 'well'.
  2. Top to diced mangoes.
  3. Serve.


To make Mango Soda:
  1. Scoop some Mango Puree to the bottom of the glass.
  2. Pour in Sprite or 7-up.
  3. Add in some ice cubes and mint leaves, if you like.
  4. Serve.


Pavlova Shells


I used the remaining meringue to make Meringue Cookies


Thursday, May 24, 2012

Minty Calamansi with Preserved Sour Plum
薄荷酸梅酸酐汁


This is one of my favourite drinks, especially one a hot day. I love to make this and have it when we are having fried or greasy food too. Great to serve it really cold!

Ingredients:
  • Juice of 4 Calamansi
  • 300ml Water
  • 3 tablespoon Sugar or to taste
  • 5 Mint Leaves, teared and crushed
  • 2 Preserved Sour Plum

How to do it:
  1. Mix and melt sugar in water. It will be easier to do it using extra fine caster sugar rather than regular caster sugar.
  2. Squeeze in calamansi juice.
  3. Chill till ready to serve.
  4. To serve, add in crushed mint leaves and preserved sour plum to the calamasi water.
  5. It taste better to have the preserved sour plum sit in the drink for a while.

Wednesday, May 23, 2012

{ Sausage with Bacon Sandwich }
热狗培根三明治


In my last post, I shared how I made Caramelised Peppered Bacon. Here, you see one of the examples on how I used it.

For the sausage, I cooked it in a pan, with 2 tablespoon of water and a few drops of cooking oil, covered. I cook till the water evaporates and continue to pan fry a little before removing it to cool. You can steam or pan fry it if you like.

To assemble, I have a hot dog bun, some alfalfa, a few leaves from my salad (you can use lettuce or any others) and 2 strips of Caramelised Peppered Bacon. Now it becomes a lovely meal. :)

Caramelised Peppered Bacon
焦糖黑胡椒培根


We love bacon cos it makes food taste extra nicer with it. :P My son prefers bacon over ham. However, you might find bacon over salty, even if it's low sodium bacon.

I like to 'season' my bacon so it's not so 'boring' and salty. It will makes a great side to any breakfast or meal. Like the Sausage with Bacon Sandwich I made with these bacon.

You got to try it to believe it. ;)

Ingredients:
  • 4 strips Streaky Bacon
  • 1 teaspoon Brown Sugar or to taste
  • Ground Black Pepper

How to do it:
  1. Pan fry bacon without oil on medium heat.
  2. Sprinkle ground black pepper on the bacon while it's cooking.
  3. Turn over and do the same.
  4. When bacon is almost done to your liking, reduce heat.
  5. If there are a lot of oil, drain it.
  6. Sprinkle brown sugar on both sides of the bacon.
  7. Cook for about 20 second till sugar melts but not burn.
  8. Remove to cool.
  9. Serve as sides.

Tuesday, May 22, 2012

Little Lunch Box #24
小饭盒


Today's my son's turn to go for his Learning Journey trip with his school. I packed super simple tuna sandwiches for him. I include a packet of 'fries' and a bottle of milk too.

For someone who hates eating bread, I made the sandwiches small. I cut a slice of bread into 4. Visually, it's not a lot but it's actually the same. :P Yup, that's my son. I still need tricks to make him eat. :P

Monday, May 21, 2012

Little Lunch Box #23
小饭盒


Look Hoot's going to Learning Journey? ;)

My daughter has is going on a Learning Journey with her school today. The kids has been asked to pack lunch as they will not be able to buy food.

As usual, my daughter wanted (boring) sandwiches. I can't resist but to make her a little owl, among the ham sandwiches and kaya sandwiches. I packed crispy seaweed snacks and a bottle of milk for her too.

For those who are curious about how I keep the food cool so that they won't turn bad, especially the ham sandwiches, I have an ice-pack to make the lunch box 'air-conditioned'. I put it on the tray that comes with the box (the one in black). The ice-pack doesn't come in contact with the sandwiches so they wont turn soggy too. Mystery solved. ;)

Friday, May 18, 2012

Spicy Miso Clams
辣味味噌炒蛤蜊


This got to be one my of favourite dish. I can eat this alone and once you start, you can't stop till they are all gone. :P

I usually cook it using my wok pan. However, this recipe here that I'm sharing is done using the Happy Call Pan.

It's harder to cook this way as you can't stir-fry it to get a good mix. I shake the pan instead, trying to get the clams to be coated well with the sauce. Definitely not as convenient compared to using the wok but it works.


Ingredients:
  • 600g Clams, cleaned
  • 3 Shallot, chopped
  • 4 clove Garlic, chopped
  • 2 fresh red chilli, chopped
  • 1 tablespoon Miso
  • 1 teaspoon Sugar
  • 1 tablespoon Cooking Wine
  • 1 tablespoon Oil
  • Cornstarch mixture (thickener)

How to do it:
  1. Soak clams in salted water for 20 mins to let it spit out the dirt.
  2. Drain and set aside.
  3. Mix miso, sugar and wine together and set aside.
  4. Heat oil in wok.
  5. Stir fry shallot, garlic and chilli till fragrant.
  6. Add in clams.
  7. Cover pan for 1/2 minute; shake pan.
  8. Open pan and add in the miso mixture; shake pan to mix well.
  9. Cover and continue cooking till all the clams are opened.
  10. Discard those that did not open.
  11. Gradually stir in cornflour mixture to thicken the sauce.
  12. Serve.

Thursday, May 17, 2012

Shark's Fin Melon with Cordyceps Militaris
虫草花顿鱼翅瓜汤


One of my son's favourite soup is Shark's Fin Melon Soup and my daughter's orange soup, Cordyceps Militaris Chicken Soup.

Here, I combine both their favourites. Cordyceps Militaris makes the soup extra fragrant and sweet. This is one of the few soups that they both like. Usually, when one of them like a certain soup, chances are, the other one hates it. =_=|||

You probably know what I'm going to say next. "I have weird kids." :P


Ingredients:
  • 500g Shark's Fin Melon, skin and seeds removed and cut into smaller pieces
  • 250g Pork Ribs
  • 1.5 ltr Water
  • 15g Cordyceps Militaris 虫草花
  • 2 tablespoon Wolfberries 枸杞子
  • 8 Dried Seedless Red Dates 红枣
  • Salt to taste


    How to do it:
    1. Blanch pork ribs.
    2. Place blanched pork ribs in a fresh pot of water.
    3. Put all ingredients, except wolfberries and salt in a pot.
    4. Bring to a boil before reducing to a simmer.
    5. Simmer for 3-4 hours.
    6. Add wolfberries during the last hour before end of cooking
    7. Add salt to taste.

      Wednesday, May 16, 2012

      Cheesy Tuna Croquette
      金枪鱼可乐饼


      This is one of my kids' favorite and my husband's too. The funny thing is my daughter who doesn't like tuna like this more than her brother, who love tuna sandwich.  I have weird kids, I tell you.

      Anyway, My daughter alone can finish almost all that I have prepared, which is about 7 croquettes. =_=||| Hope you like this as much as she does.


      Ingredients:
      • 3 medium Potatoes, cooked and mashed
      • 1 canned Tuna, drained (I'm using Heinz Canned Tuna)
      • 3 tablespoon Shredded Parmesan Cheese
      • Salt and Pepper to taste
      • All purpose flour for dusting
      • 1 Egg, beaten
      • Breadcrumbs
      • Oil for frying

      How to do it:
      1. Mix mashed potatoes, tuna and Parmesan Cheese together.
      2. Add salt and pepper to taste.
      3. Scoop about 2 tablespoon of mixture and shape into a ball.
      4. Dust with flour shaking excess.Dip into beaten egg.
      5. Coat with breadcrumbs.
      6. Deep fry till golden brown.
      7. Drain and serve immediately.

      Note:
      • The mixture is a bit soft. If you have problem lowing the croquette into the oil, you might like to use a slotted spoon.
      • I'm using using shredded Parmesan Cheese not grated Parmesan Cheese. It gives the melty look.
      • You can add some mozzarella cheese too.


      Tuesday, May 15, 2012

      Cream of Chicken
      奶油鸡汤


      I was hungry one night and decided to make myself a bowl of Cream of Chicken with the homemade Chicken Broth I made earlier that day.

      It occurred to me that I had never shared my Cream of Chicken recipe. This recipe here uses flour to make it creamy and thick, which is very similar to an old recipe I shared on Cream of Mushroom.

      So here's my recipe for Cream of Chicken ...

      Ingredients:
      • 350ml Chicken Broth, homemade or instant
      • 40g Butter
      • 30g Plain Flour
      • Salt to taste
      • Some pre-cooked Chicken Fillet, chopped or shredded (optional)

      How to do it:
      1. Melt butter in a pot and at the same time add flour gradually.
      2. Mix well to form a roux (cooking till dough-like).
      3. Add chicken broth gradually while stirring.
      4. Keep stirring till roux has blend in well with the broth and that it become creamy.
      5. Bring to a gentle simmer.
      6. Add salt to taste.
      7. Serve with chopped or shredded chicken.


      Monday, May 14, 2012

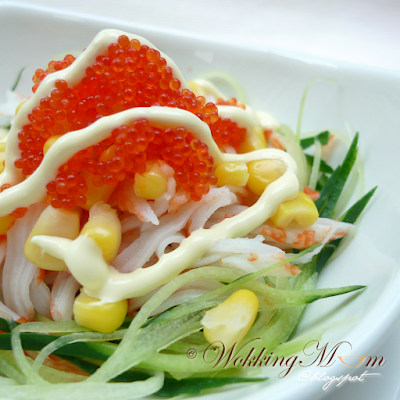
      Crabstick and Corn Salad
      蟹肉棒玉米沙拉


      This is a remake of a dish that I shared sometime back.

      I love adding Tobiko (fish roe) as it gives the salad the extra crunch. I will use Ebiko (shrimp roe) if I can't get Tobibo. For those who are totally unable to get Tobiko or Ebiko, may like to try Cavier. It's a lot more saltier than Tobiko and Ebiko. So it might want to use it sparingly. Otherwise, just leave that out.

      I'm going to list, as a guide, on the quantity of ingredients used here. You are free to adjust accordingly to your liking.

      Ingredients:
      • 5 Crab Stick or Imitation Snow Crab Legs, shredded
      • 1/2 Japanese Cucumber, seeds removed, julienne and soak in cold water for 2 mins
      • 4 tablespoon Whole Kernel Corn, steamed and cooled
      • 1 1/2 tablespoon Tobiko or Ebiko
      • Japanese Mayonnaise

      How to do it:
      1. Drain cucumber and corn.
      2. Place all ingredients in a bowl, mine is in the order of cucumber, snow crab legs, corn and tobiko.
      3. Drizzle some mayonnaise and serve.

      Friday, May 11, 2012

      Message on a Toast
      吐司物语


      I shared this a few years ago in my (inactive) kid's craft blog. As you can see there, the photos are also missing from Blogger and the unfortunate thing is, I didn't have a back-up for all my photos in that blog. :(

      Since tomorrow is Mother's Day, ahem, I thought I would share with you how you can 'write' a short message on your toast. I bet this neat trick will surprise your mother or your father on the coming Father's Day. Oh! And it's a great way for guys who forget birthdays, anniversaries, any important dates, to 'say' sorry. Just don't use it twice. It won't work the second time. XD

      Needless to say, it's a great idea for kid's lunchbox as well!


      What is needed:
      • 1 slice of old (not stale) bread
      • Alphabet cookie cutters, assorted cookie cutters
      How to do it:
      1. Just press the cookie cutters on the bread.
      2. Don't press too hard and cut out the shape. Just hard enough to get the shape imprinted on the bread.
      3. Toast the bread in a toaster or oven at 180C for 7 mins, with imprint facing up.
      4. Turn over and toast for another 5 mins or till lightly brown. 
      5. If you are using frying pan, toast with the bread with the imprint, facing down. 
      6. Toast on low heat. If it's too hot, the toast will get burnt.
      7. If you like, turn over and toast till lightly brown.
      8. Remove bread from frying pan once it has brown.
      9. Use toast as normal.

      Note:
      • If you don't have cookie cutter, try using a chopstick with round end to 'write' in the bread using slight pressure.
      • I used 1 day old bread because it's tougher than fresh ones. It won't be cut through as easily. However, using freshly baked bread is fine. Just be gentle. :)

      PS. Have a very Happy Mother's Day to all mothers out there!


      Friday, May 4, 2012

      Little Lunch Box #22
      小饭盒


      Opps! Another lunch box post. Recently, my broadband has been giving me lots of problem. It kept dying on me. :( It's frustrating to type the recipe half way through and not being to continue. 

      So here's another quick post on what I prepared for my daughter today before the line drop again. It's one of those that didn't go as well as it was planned. Well, at least it's still looked like a frog. Ribbit! Ribbit! ;)

      I'm using Pandan Bread here for the green colour and with kaya (my daughter was thrilled cos she love kaya). The eyes are from fish cakes. I saved a bit of it from my daughter's breakfast to do it. I secured the eyes using spaghetti.

      The frog's mouth is filled with scrambled eggs and the tongue using ham. The fly (yes, that's a fly on the tongue!) and the wordings are made out of cheese.

      So, there you have it. Hope you were tickled like what my daughter was when she saw this. :)


      Thursday, May 3, 2012

      Little Lunch Box #21
      小饭盒


      The elder one has remedial class this afternoon and will be having lunch in school.

      I have prepared for him Onigiri for him for tea when he return home. The Onigiri has Chuka Kurage in it and sprinkled with Furikake, something to fill him a little till dinner time.


      Wednesday, May 2, 2012

      Little Lunch Box #20
      小饭盒


      Fruits is a no-no for the little one. You will not see me pack fruits in her lunch box. She hates fruits. I will still try my luck once a while. I'll be happy if she will just take a bite or two.

      I made a all 'fruit' lunch box for the little one, which can never happened; for now. Till the little one decides that (real) fruits are yummy and happily accept them in her lunch box, it will be ham and cheese 'fruit' sandwiches for the time being. ;)


      ~ . . .

      After I posted this, there was this little conversation between me and the little one, when she saw the lunch box I prepared for her ...
      Little One: "Oh! It that (the dissected sandwich) lemon + watermelon?"
      Me: "No. That's suppose to be a slice of lemon."
      Little One: "Ermm ... But lemon don't have black seeds."
      Me: -_-|||

      So, this lunch box, sort of, failed. Lemon really don't have black seeds. XD

      Little Lunch Box #19
      小饭盒


      I bought some Apple Baked Ham yesterday, which is my kids' favourite. The elder requested bringing ham for school. I told him, it would be sandwiches (which he hated :P) as I don't think I can wake up at 5am to prepare his lunchbox for him :P

      So, this sleepy head mum did a simple ham rolled sandwiches for the elder one to bring to school for his recess. I packed his favourite strawberry milk too.