AdSense

Friday, October 2, 2009

Braised Abalone

I made this dish during Chinese New Year this year. Yeah, it's that long ago.

My husband's friend gave him a few cans of abalone but unfortunately they were rather tough and bland. It's not nice to give them to our parents since we already know how it taste like. We can't throw them away too. I'll be send to Hell if I do that. So the best them to do it to try making them tastier. Well, braising the abalone did helps a lot. I have since kept the rest of the abalone for next year's Chinese New Year's dinner.


However I hesitated putting up this recipe. My husband commented that it's too costly and risky for anyone to try out this just with a recipe found on the Net. He is worried people who do try it will try to hunt me down and ask me to pay them a can of abalone. :P

Why did I put up this recipe now? Celine, a diner wrote on my chatbox yesterday asking for it as she wanted to make it for her mother-in-law's birthday. How sweet! How can I reject her? But please don't hunt me asking me for a refund, okay? All I can offer you is a can of tough and bland abalone. :P


Ingredients:
  • 4 Dried Scallop, soak for at least an hour
  • 4 Fresh Scallop (optional)
  • 1 handful Broccoli florets or other veggies
  • 6 Dried Mushroom, soak to soften
  • 1 canned Abalone (mine contains 1 1/2 abalone)
  • 1/2 tablespoon Oyster Sauce
  • 1/2 tablespoon Chinese Cooking Wine
  • Chicken Stock
  • Cornflour mixture (thickener)

Additional to taste:
  • 1-2 teaspoon Oyster Sauce
  • 1/2 - 1 teaspoon Dark Soy Sauce
  • Rock sugar

How to do it:
  1. Place  mushroom with stalk removed, dried scallop and abalone in pot, preferably a claypot.
  2. Add in the water used to soak the dried scallop, oyster sauce, Chinese cooking wine and enough stock to cover all ingredients.
  3. Bring abalone pot to a boil and then reduce to a simmer.
  4. Simmer for 45 minutes.
  5. While braising the abalone, blanch vegetable with a pot of water with a teaspoon of salt.
  6. Lay on a dish.
  7. If you are using fresh scallop, blanch it just before the abalone is ready.
  8. Before removing the braised ingredients, season with additional oyster sauce if necessary, dark Soy Sauce for colour and rock sugar to taste.
  9. Braise for another 15 minutes.
  10. Remove the braised abalone, mushroom and dried scallop, taking care not to break the dried scallop (like I did).
  11. Lay them on the dish with the vegetable.
  12. Drain the sauce remaining from the pot and reheat the sauce.
  13. When sauce begin to bubbles, gradually stir in the cornflour mixture to thicken the sauce.
  14. Pour sauce over abalone.
  15. Serve immediately.

Note:
  • You can also add in the liquid from the canned abalone. I didn't use mine as it didn't make a difference.
  • You can cut down cooking time by slicing the abalone instead braising it in whole.
  • I took much longer to braise the bland abalone. In my opinion, braising 1 hour for a regular mushroom is more than enough.
  • I use fresh chicken stock prepared a day before, by simmer a whole chicken in 2 litre of water for 4 hours.
  • If you are using chicken stock cube, you might want to omit adding the oyster sauce in the initial cooking as stock cube is seasoned.
There you have it, Celine. I hope your mother-in-law will like it. I would like to wish her a very Happy Birthday. And may happiness, health and good fortune be with her always.

Happy Wokking!

一品锅

Wednesday, September 30, 2009

Butter Cookies


It''s Children's Day and I thought I'll bake the kids some cookies. I don't want to bake their favourite though but something that they will still like.

I wanted to make the cookie bigger but didn't have a big star tip. I used another tip and it didn't turn out as nice. Plus I suck at piping.


This cookie is buttery and crumby. I'm glad the kids like it even though the outlook was not as pretty. However, my son said it's not sweet enough for him so I melted some chocolate chips and dip some cookies into it. Kids are so hardto please sometimes. :P


Ingredients:
  • 120g Unsalted Butter, soften
  • 70g Icing Sugar
  • 1 Egg
  • 160g Top Flour
  • 1 teaspoon Vanilla Essence

How to do it:
  1. Beat butter and sugar till smooth.
  2. Add egg and vanilla essence and mix well.
  3. Sift in flour and mix well to form a soft dough.
  4. Refrigerate for 20 minutes.
  5. Put dough into a pipping bag with a star tip.
  6. Pipe onto a lined baking tray.
  7. Bake in a preheated oven at 180C for 15 minutes.
  8. Cool before storing in a airtight container.


Tuesday, September 29, 2009

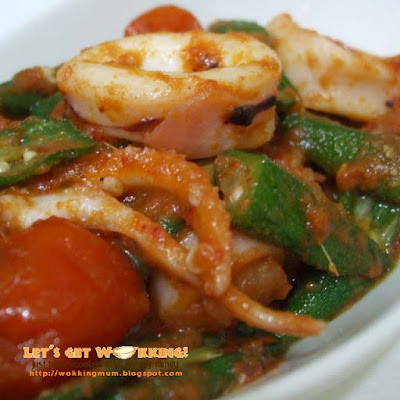
Sambal Okra and Squid


This is one of my favourite dish. I will only make this when my husband is not coming back for dinner. Noone at home eat this. :( I have to coach my son on his work after his dinner so I don't have that much time to cook an additional dish just for myself. Not to mention the additional washing to do.

You probably know, I cook separately for my kids as they have their dinner earlier. I don't like to eat cold food hence I'll cook again when my husband's back for dinner. Imagine the amount of time spend just to make dinner. Okay, blame me for being fussy. :P


Ingredients:
  • 1 medium Squid
  • 15 Okra aka Ladies' Finger, sliced
  • 5 Cherry Tomato or 1 Tomato, cut into quarters

Chilli Paste:
  • 4 Fresh Red Chilli
  • 8 Dried Chilli
  • 6 Shallot
  • 4 clove Garlic
  • 1 stalk Lemongrass
  • 1/3 tablespoon Belacan
  • 1 teaspoon brown sugar
  • Salt to taste

How to do it:
  1. Remove soft bone and innards of squids.
  2. Cut squids into rings.
  3. Set aside.
  4. Grind all ingredients for chilli paste, except for sugar and salt, together.
  5. Heat wok with 1 teaspoon of oil.
  6. Stir fry chilli paste till fragrant.
  7. Add sugar and salt to taste.
  8. Leave to cool.
  9. In a wok, heat 1/2 tablespoon oil..
  10. Add squid and stir fry till half cooked.
  11. Dish and set aside.
  12. In the same wok, heat 1/2 tablespoon oil.
  13. Add in okra and  tomatoes.
  14. Stir fry for a minute.
  15. Add in the chilli paste.
  16. Stir fry for 8 minutes or till well cooked.
  17. Dish and serve.
  18. Add in squid to marinade for at least 30 minutes.
  19. Place squid with chilli paste on banana leaf.
  20. Grill in preheated oven at 180C for 15 minutes or till cooked.
  21. Remove and top with fresh shallot sliced and drizzle with lime jucie.
  22. Serve immediately.

    Note:

    • If you prefer it more spicy, use chilli padi instead of regular chilli for the chilli paste.

    Monday, September 28, 2009

    Grilled Spicy Prawns


    I had wanted to cook Laska but realised that I have forgotten to get a couple of ingredients. -_-" I'm glad I didn't make Laska anyway as my husband had to work late. I won't be able to finish all of it myself.

    I decided to grilled the prawns instead. I just need to blanch some veggies, a bowl of soup and rice and my dinner is settled. And the good thing is I can repeat the same thing for my husband when he returns home as it's so easy and fast to prepare. No cold and leftover dinner. :)

    Oh, my kids don't eat this. They eat much earlier and they have their own dinner menu. ;)

    Ingredients:
    • 10 Medium to Large Prawns, shelled and devien
    • 1 tablespoon Sweet Chilli Sauce
    • 2 tablespoon Lemon Juice
    • Zest of 1/2 Lemon
    • 1 tablespoon Chopped Basil
    • Olive Oil for brushing
    • A dash of pepper
    • A pinch of salt

    How to do it:
    1. Combine all ingredients together.
    2. Marinate prawns for 15 minutes.
    3. Pierce a wooden skewer or in my case, a stalk of lemongrass through 3 prawns.
    4. Brush oil on the grill pan.
    5. Grill the prawns for 2 minutes on each side or till cooked.
    6. Remove and serve immediately.

    Note:
    The grilling time depends on the size of the prawns. Don't over cook the prawns as the prawns will become dry and hard.


    Saturday, September 26, 2009

    Groupa with Fermented Black Bean


    This is another fish dish for my husband. My kids hate it. Seriously, I don't quite like it either. :P It's the fermented black beans. I never like it since young as it reminds me of the eggs of ...... I didn't even dare touch it before. But my husband loves it though.

    Having said that, there's nothing wrong with the taste especially after adding the dried Tangerine Peel. I just need to get over the appearance of the beans. :P

    Ingredients:
    • 300g Fish Fillet (I use Grouper here)
    • 2 tablespoon Shredded Ginger
    • 1 1/2 tablespoon Black Bean Paste (Please refer below)
    • 1/2 tablespoon Oil

    Black Bean Paste:
    • 100g Chopped Fermented Black Beans
    • 1 teaspoon Chopped Dried Tangerine Peel
    • 1 tablespoon Chopped Garlic
    • 1/2 tablespoon Sugar
    • 1 tablespoon Oil

    How to do it:
    1. Heat oil in wok.
    2. Add all ingredients except sugar and stir fry till fragrant.
    3. Add sugar and stir fry further till ingredients well mixed and fragrant.
    4. Dish and set aside.
    5. Arrange ginger on a plate.
    6. Place fish on top.
    7. Spread black bean paste over fish.
    8. Steam for 10 minutes or till cooked.
    9. Sprinkle spring onions and chilli on fish.
    10. Pour hot oil over fish.
    11. Serve immediately.

    Note:
    • Salt is not included as fermented black bean is already salty.
    • Add the fermented black bean paste according to your taste.

    Friday, September 25, 2009

    Chicken and Bamboo Pith (Thick) Soup 竹笙鸡丝羹

    One of my son's favourite soup but mind you, he doesn't take much of the ingredients in it, which is why I added lots of imitation snow crab meat. I have thicken the soup for variation but you don't have to if you don't like it.

    Ingredients:
    • 1 litre Chicken Broth
    • 1 Chicken Drumstick or Breast
    • 5 Fresh Shitake Mushroom, sliced
    • 2 Bamboo Pith aka Bamboo Mushroom, soak to soften and cut
    • 5 Imitation Snow crab meat.
    • 1/2 tablespoon Oyster Sauce
    • 1 teaspoon Light Soy Sauce
    • 1/2 teaspoon Chinese Cooking Wine
    • 1 Egg white or whole egg, beaten
    • Cornflour mixture (thickener)

    How to do it:
    1. Cook chicken in broth.
    2. Remove chicken when it's cooked.
    3. Shred the chicken meat.
    4. Add shredded chicken, mushroom, bamboo pith and crab meat to the broth.
    5. Bring to a boil and let it simmer for another 15 minutes.
    6. Add in oyster sauce, light soya sauce and Chinese cooking wine.
    7. When the soup starts to boil again, gradually stir in the cornflour mixture to thicken the soup.
    8. Turn off the heat and stir in the beaten egg immediately.
    9. Serve.

    Thursday, September 24, 2009

    Maple and Herb Lollipops 迷迭香枫蜜棒棒鸡

    Wow! Another long absence. I have been really busy. The kids have more enrichment/tuition classes. Hence, I'm out of the house most of the day and I have to wait around waiting for their classes to finish.

    Some of you might know, my son is in the afternoon class and so his tuition classes are in the morning when his sister is in school. And when he is in school in the afternoon, it will be his sister's turn to go for enrichment. Now you know why I'm out most of the day. By the time we reach home, it will be time for me to cook for dinner. Oh and not to forget the tons of housework waiting for me to clear too. By the time I finished everything, I'll be too tired to sit down in front of the computer to blog (sometimes too late!).

    I'm still here though. But I might not be able to reply to your queries. If you really need me to clarify any of my recipes here, you can post them on the chatbox. I'll try to get back as soon as I can.

    Okay, here's a recipe you can try during the weekends. I bet the kids will love. :)

    Ingredients:
    • 10 Chicken Drumlets
    • 2 tablespoon Maple Syrup
    • 1 tablespoon Oyster Sauce
    • 1 teaspoon Dark Soy Sauce for colour (optional)
    • 1 teaspoon Pepper
    • 1/2 teaspoon Dried Rosemary or 1 1/2 teaspoon fresh Rosemary, stem removed and chopped

    How to do it:
    1. Scrape meat from 'skinny end' of the drumlet and push the meat down to form a 'ball'.
    2. Mix all the other ingredients together and marinate the drumlets with it for at least an hour.
    3. Heat a saucepan with oil.
    4. Fry the drumlets till they turn golden brown.
    5. Drain and serve immediately.

    Note:
    • I won't suggest you fry and serve it later as the drumlets will turn slightly hard when it's cold due to the maple syrup.
    • You can also use honey instead of maple syrup.

    Friday, August 7, 2009

    Prawns with Golden Garlic

    Our family loves garlic, maybe except for my husband. My daughter especially love it. She can munch on fried garlic on its own. :P Every time I cook this, my daughter will eat all garlic on the prawns followed by the other part of the prawn, leaving behind a small ball of white prawn meat. :P Bad habit!! I'll have to coat it with the garlic bits then she will finish it. So I had to cook it with lots of garlic. Otherwise it won't be enough for her. Ingredients:
    • 300g Prawns, shelled and deviened
    • 10 clove Garlic, minced
    • 1/2 tablespoon Chinese Cooking Wine
    • 1/2 tablespoon Sugar
    • 1/2 teaspoon salt
    • 1 1/2 tablespoon Cornflour
    • 3 tablespoon Oil
    How to do it:
    1. Marinade prawns with Chinese cooking wine and sugar for 30 minutes.
    2. Heat oil in wok.
    3. Add garlic when oil is slight hot.
    4. Fry garlic in low heat till lightly brown.
    5. Drain and set aside.
    6. Meanwhile, drain prawns from the liquid.
    7. Add salt and cornflour.
    8. Mix well.
    9. Shallow fry prawn in hot previously use to fry the garlic.
    10. When the prawns is 80% cooked, drain.
    11. Leave about 1/2 tablespoon of oil in the wok.
    12. Return the prawns and garlic to continue cooking till prawns are completely cooked.
    13. Dish and serve.
    Note:
    • The oil must not be hot when frying garlic. Otherwise the garlic will burn too fast.
    • If you want to add curry leaves, like what I did, fry them only after frying the garlic.
    • You must work fast, when returning the prawns and garlic back to continue cooking. This is to make sure the garlic will not get burnt and the prawns can be will coated with the garlic.
    • You can replace salt with chicken seasoning powder for more flavour (MSG loaded mah.).

    Thursday, August 6, 2009

    Chocolate coated Cornflakes

    My little daughter helped me made this during the school holidays for a kids' magazine. The magazine will have the step-by-step instructions in photo, so it's easier for the kids to follow. If my 4 year old can do it, anyone can.  

    Ingredients:
    • 1 bar of 75g Chocolate
    • 30g Butter
    • 1 box of 25g Corn Flakes
    • Sprinkles of hundreds and thousands (colourful candy bits)
    How to do it:
    1. Boil a pot of water.
    2. Remove from fire.
    3. Place a bigger heat proof bowl or pot over the water.
    4. Break chocolate and place inside bowl.
    5. Stir to melt the chocolate.
    6. Add in butter and stir to melt together with the chocolate.
    7. Pour in the corn flakes.
    8. Stir gently, not to crush the corn flakes.
    9. Coat corn flakes well with chocolate.
    10. Spoon chocolate coated cornflakes on to paper cups.
    11. Sprinkle hundreds and thousands over it.
    12. Cool it to set in the refrigerator.
    Note: You can add in raisin, dried fruits or chopped nuts too!

    Wednesday, August 5, 2009

    Stewed Beef with Vegetables

    My daughter doesn't like carrots and potatoes. That's was before I made this dish. She began to love them after that. She ate the beef in this dish too. It helps that I use thinly sliced beef (Shabu Shabu beef), so it's easier for the kids to eat. You can use pork instead if you like. Ingredients:
    • 150g Shabu Shabu Beef, may be refer too as Steamboat beef too
    • 1 Medium Potato, skinned and chopped
    • 1 Medium Carrot, skinned and chopped
    • 1/2 Onion
    • 1/2 tablespoon Mirin
    • 1 tablespoon Chinese Cooking Wine
    • 1 1/2 tablespoon Light Soy Sauce
    • 1/2 tablespoon Sugar
    • Salt to taste
    • 150ml Water
    How to do it:
    1. Stir fry beef with a little oil till almost cooked.
    2. Remove and set aside.
    3. Add in the vegetables into the pot to stir fry.
    4. Add in the remaining seasoning except for salt.
    5. Bring to a boil before reducing heat into a simmer for 15 minutes.
    6. Return the beef back into the pot and continue to simmer for another 15 minutes.
    7. Add salt to taste.
    8. It is ready with the vegetable become soft right through the middle.
    9. Serve with rice.

    Tuesday, August 4, 2009

    French Beans with Sesame Seed Sauce

    Urgh! For weeks, I haven't been able to first access my blog and when I finally do, I can't post. It was so frustrating. The problems have been resolved, I hope. I still get error message now and then but so it looks fine to me. I'm keeping my fingers crossed. Hopefully, my posts won't suddenly just disappear one day. I'll be posting the newer recipes one as I had forgotten the exactly measurements for the older ones :P Lazy me don't have a habit of writing them down. :P I shall not waste time ranting. If you like sesame seed, you have to try this. I know sesame seed is hard to digest. So, I have grind it into powder form. We just love the aroma and the taste of this dish.  


    Ingredients:
    • 100g French Beans, ends removed
    • 3 tablespoon Ground Toasted Sesame Seed
    • 1 teaspoon Sugar
    • 1/2 tablespoon Light Soy Sauce
    • 3 tablespoon Water
    • Salt to taste 

    How to do it:
    1. Heat oil in wok.
    2. Stir fry french bean till 80% cooked.
    3. Add in the rest of the ingredients except salt.
    4. Continue stir frying till sauce is almost dry.
    5. Add salt to taste, if need.
    6. Give the french beans a finally toss.
    7. Dish and serve.

    Wednesday, July 29, 2009

    Chicken Feet and Peanut Soup with Pork Ribs 花生鸡脚排骨汤


    This is a variation of this soup. It uses Pork ribs instead of chicken bones. It's a preferred variation for those who like to eat the pork ribs. We love to eat it, dipped in dark soy sauce with pepper.

    Ingredient:
    • 10 Chicken Feet
    • 250g Pork Ribs
    • 1.5 litre water
    • 8 Red Dates, pitted
    • 100g Raw Peanuts
    • Salt to taste
    How to do it:
    1. Blanch chicken feet and pork ribs.
    2. Put all ingredients except salt in a pot of water.
    3. Bring to boil then lower fire and simmer for another 3 hours.
    4. Add salt to taste.
    5. Serve.

    Saturday, July 4, 2009

    Cornflakes Cookies

    I enrolled my son a a baking class during the June School Holidays. This is one of the cookies he baked. Well, this is not exactly what he did. It was in the shape of a teddy bear. It was rather nice but we still prefer the chocolate chip cookies. It's still our all time favourite. Anyway, because the kids wanted to do baking so instead of using the cookie cutter which is more work and more difficult, I get them to roll the dough into balls instead. I think it's more fun. They love to push the chocolate button in the center of the dough. Actually, I think they just love 'stealing' the chocolate to eat. haha ... Ingredients:
    • 125g Butter
    • 65g Castor Sugar
    • 1 teaspoon Vanilla Essence
    • A pinch of Salt
    • 125g All purpose flour (I use Top Flour)
    • 1/4 teaspoon Baking Powder
    • 25g Corn Flour
    • 1 tablespoon Milk Powder
    • 25g Frosties Cornflakes, crushed fine
    • Chocolate Button, optional (I use Mini M & Ms)
    How to do it:
    1. Cream butter, sugar, vanilla essence till white and fluffy.
    2. Add in all the flour and milk powder.
    3. Add in the crushed cornflakes and mix well.
    4. Roll 5g dough into a ball.
    5. Lay all the ball dough in baking pan with baking paper.
    6. Press a chocolate button to the center.
    7. Bake in preheated oven at 180C for 12 minutes till golden brown.
    8. Cool and store in air tight container.
    Note: If you prefer to use a cookie cutter, after step 3, continue with the following steps:
    • Roll dough between two sheets of baking paper.
    • Refrigerate for 30 minutes.
    • Cut shapes out with cookie cutters.
    • Bake in preheated oven at 180C till golden brown.
    • Time required depends on how thick and how big your cookies are.

    Tuesday, June 16, 2009

    Cheesy Chicken Fingers


    Cheese again! My kids love cheese. And not to mention fried stuff. Who wouldn't?

    However, as it's heaty to take too much fried stuff, I only once a week. And it's usually comes with water chestnut drink.

     This dish is similar to this except I have cut down on the cheese. You can say that it's a cheaper but crunchier version. :)

    Ingredients:
    • 1 skinless chicken breast meat
    • 1 teaspoon salt
    • 1 cup Breadcrumbs or Panko (Japanese breadcrumbs)
    • 1/2 cup Shredded Parmesan Cheese
    • 1 Egg, beaten
    • 1/3 cup Flour
    How to do it:
    1. Cut the chicken meat into strips
    2. Marinate with salt for 30 minutes.
    3. Dust the chicken with flour.
    4. Dip the chicken in the beaten egg.
    5. Coat well with Panko mixed with Parmesan Cheese.
    6. Deep fry till golden brown.
    7. Dish and drain away excess oil.
    8. Serve with or without your desire sauce.
    Note:
    • You can sprinkle on some chilli powder or paprika after frying too.
    • You can use Parmesan Cheese powder instead of the shredded type.

    Wednesday, June 10, 2009

    Maple Cookie

    I haven't baked for a long long time. I managed to clear most of my housework yesterday. After washing all the pots and dishes, I set up the water play box for the kids outside our house and started baking with little disturbance. I still have to outside to break up their argument. Haiz!

    I'm surprised I'm still able to finished baking the whole lot. In fact, I did a second batch soon after because the kids finished almost all the first lot of cookies as soon as I packed them.


    Ingredients:
    • 300g Top Flour or Cake Flour
    • 5g Baking Powder
    • 4g Salt
    • 180g Unsalted Butter
    • 100g Brown Sugar
    • 1 Egg
    • 60ml Maple Syrup

    How to do it:
    1. Beat butter and sugar till light and fluffy
    2. Add egg and beat well.
    3. Blend in the maple syrup.
    4. Fold in the flour, baking powder and salt till a dough is formed.
    5. Divide dough into 4g balls.
    6. Lay all the ball dough in baking pan with baking paper.
    7. You can flatten it a little or leave it as it is.
    8. Bake in preheated oven at 180C for 13 minutes till golden brown.
    9. Cool and store in air tight container.

    Monday, June 8, 2009

    Sprite with Plum Powder

    I'm not sure if you practice this but what I was young, my mother would let us drink Coke with salt when we are having a sore throat or if we are heaty. :P Now she still ask me to drink it when she knows I have soar throat. After that she would ask me not to scream so much at the kids to avoid having soar throat. LOL

    Honestly, I hates the taste of Coke with salt but sometimes it really works for the throat. Before I cut down on frizzy drinks, I changed from drinking coke with salt to Sprite or 7up with grind preserved sour plum instead. It taste so much better that the former.

    Sometimes, when I ran out of preserved sour plum, I use the powder form instead. It's not as good as the preserved fruit of course but in cases of emergency, the sour plum powder 酸梅粉 works fine for me.

    If you are from Singapore, you will be familiar with sour plum powder. We dip fruits like guava, pear in it and eat it together. Especially good when the fruits are cold. Hence, I always have a packet in my fridge.

    Next time, if you want to have a frizzy (lime/lemon base) drink with a twist, try adding sour plum powder. One thing to take note of if you are using the powder and not the preserved fruit. Mix the powder to the drink in a jug, then pour it into your glass.

    This is because the salt in the powder won't dissolve easy. If you add the powder directly to the glass of Sprite, the salt will stay at the bottom. Guess what happen when with drink it with a straw? :P

    Alternatively, add sparingly. :)

    Sour plum powder 酸梅粉

    Saturday, June 6, 2009

    Cheesy Garlic Bread


    My husband decided to go drinking with his pals today. *roll eyes* I get nagged for staying up late to blog but somebody can go drinking when that same somebody just worked past midnight yesterday and had to wake up early as usual to get to work this morning. *shrug* I'm not complaining.

    At least I get to blog in peace. LOL. Okay, for this recipe, which is one of my kid's favourite, is really easy to do. It's is actually this recipe plus cheese. But because cheese is added here, I cut down the garlic to 2 clove garlic with 1 tablespoon butter.

    For this particular one you see in the photo, 1 tablespoon of Mozzarella Cheese is added into the garlic spread. You can use any cheese you like. Sometimes I use Cheddar with Parmesan Cheese too. It's basically whatever leftover bits of Cheese I have. I have not tried Cream Cheese though.

    What you do is to mix the soften butter, garlic, cheese and the optional parsley and garlic powder together. Use that to spread on your bread before you toast it. The bread I use here is hotdog bun. I like it that it's still a bit soft on the inside but cruchy on the thin outer crust. So it won't hurt the kids' gums when they eat it.

    Another great idea for pinic. ;) Do remember to wrap the garlic bun/bread with a 2 to 3 pieces of kitchen towels before to wrap it with foil so it will not be too soggy later.

    Friday, June 5, 2009

    Sandwich Kebab


    It's the kids' school holiday. Yeah, the whole of June. I thought I'll have more time to do my stuff (like blogging) since I don't have to fetch my kids to school anymore. Boy was I wrong!

    I'm only saved on 4 trips but there are still the tuition classes and enrichment class. On top of that, with them at home most of the time, the house is always in a mess. To save the house, I bought them out. :P Either to window shopping (to enjoy the air-con), the newly open wet plus dry playground at a shopping centre near my place or to ride on their bikes. Unless, someone buys me a notebook, I won't be able to blog when I'm out. :P

    I did however complete a few of my sewings. I hand sew my stuff so I don't need to carry the sewing machine (which I don't own one) with me in case you are wondering how I could sew outside. Since my husband is still at work (yes, it's past midnight now), I'm taking the time to make a quick post. Otherwise, he nag at me for stay up late just to blog. :P So, here it is.

    This is something I did for a magazine sometime ago. I'm not sure if they will be using it. My son likes it, so I thought I'll just share it with you. It's basically sandwich presented in a fun way.


    You just need the basic ingredients for sandwich. What I used here are bread, ham, cheese, lettuce, Japanese cucumber and cherry tomatoes. I used a flower cookie cutter to cut the bread, ham and cheese to cut them into smaller pieces. The lettuce is tear into size.

    The Japanese cucumber are thin enough, so I just slice them to the thickness I want. The top of the cherry tomato must be cut off so it's easier to pierce through. You can use bamboo skewers if you like but what you see here is 'pokey sticks'. It's a little fragile.

    I had wanted to get Mitsuya Tasty Bisuit Stick but it wasn't stocked up at the gocery store at my place. If you are making sandwiches for pinic this school holiday, try making these instead.

    Thursday, May 21, 2009

    Roasted Dang Gui Chicken

    This is another of our favourite chicken dish. I use my Sharp Water Oven to do this. As usual, the chicken turned out succulent. And we love the aroma when we open the cover. :) Perviously, I did not add water, Gou Qi Zi 枸杞子 (Wolfberries) and Hong Zao 红枣 (Red Dates) when I roast the Chicken. There will still be some liquid at the end of the roasting. I call that Chicken Dang Gui 当归 (Angelica Sinensis) Essence :P It's really thick. I wanted more sauce so we can dip the chicken meat with, so I add in some water when roasting the chicken. On top of that, I added some wolfberries and red dates to make the sauce sweeter. I also add in a few pieces of Chuan Gong 川芎 (Szechwan Lovage Rhizome) for the aroma. If you use to making Dang Gui Chicken Soup, try roasting it for a change. Ingredients:
    • 1 Chicken, cleaned
    • 500ml Hot water
    • 1/2 teaspoon Salt
    • 1 tablespoon Chinese Cooking Wine
    • 10g Dang Gui 当归 (Angelica Sinensis), grind into powder
    • 10g Gou Qi Zi 枸杞子 (Wolfberries)
    • 6 Hong Zao 红枣 (Red Dates)
    • 3g Chuan Gong 川芎 (Szechwan Lovage Rhizome)
    How to do it:
    1. Mix the Tang Gui 当归 (Angelica Sinensis) powder together with salt.
    2. Rub the powder all over the chicken, including under the skin and in the cavity.
    3. Place all ingredients and chicken in a casserole and with a lid.
    4. Cover or wrap with foil if you are using just a dish.
    5. Roast for 1 1/2 hours at 190C.
    6. Check for doneness; juices would run clear when the thickest part of the thigh is pierced with a metal skewer.
    7. Remove the lid or foil, season with salt if need.
    8. Baste the chicken with the soup sauce and continue to roast without covering the chicken for another 15 minutes to brown the skin.
    9. Serve.

    Wednesday, May 20, 2009

    Baked Cheesy Mushroom Pot

    I had leftovers of some ingredients and decided to put them all together and voila! Only thing missing is perhaps pasta and cream here. But I guess my family didn't care. They like it with rice too. Actually, they are not fans of pasta anyway. ;)  

    Ingredients:
    • 1 clove Garlic, minced
    • 1/3 tablespoon Oil
    • 4 Shitake Mushroom, sliced
    • 3 Button Mushroom, sliced
    • 1 King Oyster Mushroom, sliced
    • 1 Streaky Bacon, chopped into bits
    • 1 slice Ham, chopped into bits.
    • 1 slice Cheese (Kraft singles)
    • 1 handful Mozzarella Cheese
    • 1 tablespoon Parmesan Cheese
    How to do it
    1. Heat oil in wok.
    2. Add bacon and garlic and cook till garlic is fragrant.
    3. Add in ham and mushroom.
    4. Stir fry till mushroom are 90% cooked.
    5. Pour into a oven proof dish.
    6. Tear the singles cheese and mix well with the mushroom.
    7. Top mushroom with Mozzarella Cheese followed by Parmesan Cheese.
    8. Bake at preheated oven at 190C for 12 minutes or till cheese melts and brown slightly.
    9. Remove and serve.
    Note: This the a dish of leftovers. You don't have to follow exactly what I use. You can use only one type of mushroom if you like. I just want to finish all that was left in my fridge.

    Tuesday, May 19, 2009

    Spicy Fragrant Wings

    Wow! How long have it been since my last post? Sorry for the lack of post. My son's first exam is finally over. Phew! It's so stressful trying not to stress the boy too much. I don't remember my parents and teachers pushing me so much when I was having exams when I was younger. I don't even remember revising for exams. :P Times are different now. I'm not the type of parents who wants their kids to score As. I do hope and wish but I'm happy if he pass, especially when this is his first exam. I think he is the one who is stress because he kept saying he thinks he failed the exams. Sigh! Results won't be out till next Tuesday. But I'm not going to think about it anyway. For the first time, I actually looking forward to the June school holidays. I don't care if the kids make a mess of the house and make a lot of noise at home. Okay, maybe just a bit. I have sign up some holiday courses for the kids. No more English, Mathematics and Chinese. It's magic, science and baking!! My son is already looking forward to them. Okay, so much on updates about me. Here's an over-due recipe (and many more waiting to be posted:P) that me and my husband like a lot. Maybe you will like it too. Ingredients:
    • 8 mid joint Chicken Wings
    • 1 tablespoon minced Ginger
    • 1 tablespoon minced Garlic
    Marinade:
    • 1 Egg
    • 1/2 teaspoon Salt
    • 1 teaspoon Sugar
    • 1 teaspoon Light Soy Sauce
    • 1 tablespoon Cornflour
    Sauce
    • 2 tablespoon Thai Sweet Chilli Sauce
    • 2 tablespoon Tomato Sauce
    • 1 tablespoon Chinese Cooking Wine
    • 1 tablespoon Sugar
    • 1/2 teaspoon Black Pepper
    • 8 tablespoon Water
    How to do it:
    1. Marinate chicken with marinade for at least an hour.
    2. Deep fry chicken till golden brown.
    3. Drain from excess oil.
    4. In a wok, stir fry the ginger and garlic with 1 tablespoon oil till fragrant.
    5. Pour sauce into wok.
    6. When sauce starts to boils, put in the fried chicken.
    7. Cook till the sauce is thickened and the chicken is well coated.
    8. Dish and serve.

    Thursday, April 23, 2009

    Steamed Egg with Tofu
    蒸蛋豆腐

    My daughter loves eggs. Eggs done any way. Hard boiled, soft boiled, scrambled, pouched, fried, braised, steamed, etc. except raw eggs. :P She just loves to eat eggs. The other food she likes very much is tofu. I combined the two to come up with another dish that she loves too. It's really easy to made too! Ingredients:
    • 2 eggs
    • a pinch of salt
    • 160ml Broth
    • 1 tube Egg Tofu, cut into pieces
    • 1 Dried Scallop
    • 1 teaspoon Cornflour
    • 1/2 teaspoon Oyster Sauce
    How to do it:
    1. Soak the dried scallop in 5 tablespoon of hot water before hand.
    2. Beat egg lightly in a bowl
    3. Add broth and salt.
    4. Mix well.
    5. Sieve the egg mixture if you want a smoother result.
    6. Pour into a shallow flat dish.
    7. Place tofu in it
    8. Cover the bowl with cling wrap or aluminum foil.
    9. Heat a pot of water for steaming.
    10. When the water starts to boil, put in the dish.
    11. Remove when egg is set.
    12. While the egg is cooking, tear the scallop into strands.
    13. Return the dried scallop strands to the water.
    14. Add in oyster sauce and corn flour.
    15. Mix well.
    16. Bring the sauce to a boil while gently stirring it.
    17. Remove and pour over the steamed egg and tofu.
    18. Drizzle with sesame seed oil if you like.
    19. Serve.
    Note:
    • Use a shallow dish to steam the egg, then you don't have to cut the tofu too thick and you will be able to see the tofu in the egg when it's done.
    • Use a flat dish so the tofu can be spread out.

    Wednesday, April 22, 2009

    Sweet Pork

    Nope, it's not sweet and sour pork, if that's you thought it is. But close though. It's one the results of my cooking experiment. ;) I ran out of vinegar so I experiment making pork without it and .... Tada! Sweet and sour pork minus the sour equals Sweet Pork! :P hehehe ... Try this. Not too bad too. ;) Ingredients:
    • 300g Pork, cubed
    Marinade:
    • 1 teaspoon Sugar
    • 1 teaspoon Sesame Seed Oil
    • 1/2 teaspoon Salt
    • 1 Egg White
    • 1 tablespoon Cornflour
    • 1/2 tablespoon Rice flour
    Sauce:
    • 2 tablespoon Water
    • 1 tablespoon Sugar
    • 1 tablespoon Light Soy Sauce
    • 1 tablespoon Chinese Cooking Wine
    • 1 teaspoon Cornflour
    How to do it:
    1. Marinate the pork in the marinade for at least 30 minutes.
    2. Fry in oil till lightly brown.
    3. Dish, drain and set aside.
    4. Bring sauce to a simmer, stirring slowing.
    5. When the sauce starts to thickens, add in the pork.
    6. Stir constantly till the pork cubes are well coated with the sauce.
    7. Dish and serve hot.

    Tuesday, April 21, 2009

    7-up Plum Lollipops

    The kids love these. Well, because it's easy to eat I guess. Occasionally, I'll made this for dinner. It always ends up with them finishing the drumlets (they call it lollipops!) first and nothing left to go with the rice. :/ I find it appetizing with the slight sour taste from the plum sauce. My husband loves this. With all the meat pushed down to the end, he just need a bite to finish one drumlet. :P Ingredients:
    • 8 Drumlets
    • Oil for deep frying
    Marinade:
    • 1/2 teaspoon Light Soya Sauce
    • 1/2 tablespoon Chinese Cooking Wine
    • 1 tablespoon Cornflour
    • 1 Egg, beaten
    • A pinch of Salt
    Sauce:
    • 200ml 7-up (Soft drink)
    • 3 tablespoon Honey
    • 1 tablespoon Chinese Cooking Wine
    • 1 tablespoon Plum Sauce
    • 1/2 teaspoon Salt
    How to do it:
    1. Scrape meat from 'skinny end' of the drum and push in down or you can leave it as it is.
    2. Marinate the chicken drumlets in the marinade for at least 30 minutes
    3. Deep fry till golden brown.
    4. Remove and drain well.
    5. In a clean wok, heat up 1/2 tablespoon oil (used to fry the chicken).
    6. Pour in the sauce mixture.
    7. Bring to a boil before lowing the heat to continue cooking the sauce in simmer.
    8. When the sauce starts to thickens, add in the fry drumlets.
    9. Coat well with sauce.
    10. Remove and serve.

    Monday, April 20, 2009

    Meat and Mushroom Pancake

    Every time when I ran out of ideas on what to cook for dinner, I will make this pancake. Nobody will complain about having this as one of the dishes for dinner. In the past, I'll be hesitant to make this often as this requires shallow frying so it's not so healthy to eat it often. With an oven, it different. I use very little or no oil. But honestly, cooking this using the shallow frying way tasted better as it's moist. Baking it makes it dry but crispy on the the outside. So you decide which way you like it. :) Ingredients:
    • 150g Minced Meat (I use pork)
    • 100g Fish Paste
    • 3 Fresh Shitake Mushroom, diced
    • 3 Water Chestnut, washed, skinned and diced
    • 2 Shallot, diced
    • 1/2 tablespoon Chinese cooking wine
    • A pinch of Salt
    • 1 piece Dried Beancurd Skin (腐皮)
    How to do it:
    1. Mix all ingredients except beancurd skin well.
    2. Set aside.
    3. Carefully rinse the beancurd skin in water taking care not to tear it.
    4. Squeeze out exceed water gently.
    5. Lay the beancurd skin flat.
    6. Spread the meat paste about 0.5cm thick on half of the beancurd skin.
    7. Fold the 3 sides of the beancurd skin over the meat paste.
    8. Fold in the the other half of the beancurd skin over the meat paste to cover it.
    9. Place on a baking tray to bake in a preheated oven at 200c for 8 minutes.
    10. Turn over and continue to bake for another 8 minutes.
    11. Remove and cut into smaller pieces to serve.
    Note:
    • I rinse the beancurd skin so it's not salty. You can also use a damp cloth to clean it but do not add any more salt to the meat paste if you are doing this.
    • I'm using a non-stick baking tray to bake. If you do not have one, you might want to sparing spread some oil on the tray to prevent sticking.
    • If you are using shallow frying method, heat your pan with 1/2 tablespoon oil to fry it. Turn over to continue frying when it turn golden brown.
    • You might want to consider making the pancake smaller to fit your pan.