AdSense

Showing posts with label **condiments. Show all posts

Friday, April 12, 2013

Homemade Breadcrumbs
自制面包糠


What do you usually do with the bread crust from the loaf of bread you buy? When you make sandwiches for your kids, do you throw away the bread trimmings? There is bound to be a lot of bread wastage if you are into making bento, right?

Next time, keep all of those to make breadcrumbs you can use for your cooking. No wastage. You can keep the breadcrumbs in air-tight container in the freezer for months.

I'm going to share how to do this using oven and pan over stove top.


For Oven Owners:
  1. All all bread crust into strips.
  2. Place all the bread crusts on a tray flat.Toast in a preheat oven at 120c for 15 mins till the bread crusts are dry. We do not want to brown them.
  3. Place them in a blender and grind them into your desire texture.
  4. If you do not have a blender, place them in a Ziploc bag and roll them with a rolling pin or similar object to crush them into bits.
  5. When they are completely cooled, store them in air-tight container till you are ready to use.

For Non-Oven Owners:
  1. Cut bread crust into strips.
  2. Place all bread crusts into a blender and grind them into your desire texture. I do not recommend you grind them too finely because it turns brown easily when toasting on pan.
  3. Heat a pan till hot then lower the heat.
  4. Place all bread crumbs into the pan and toast them till they are dry. Keep stirring and tossing to avoid burning the crumbs.
  5. When they are completely cooled, store them in air-tight container till you are ready to use.

Note:
You can do the same for stale bread too.


Monday, March 11, 2013

Caramelised Onions
焦糖洋蔥


This is one of my favourites. I can eat this with anything. It is very easy to make but take a lot of patience cos cooking it may takes up to an hour with the amount of onions before cooking reduced to less than half at the end of cooking.

Ingredients:
  • 6 Red Onion, sliced
  • 2 tablespoon Olive Oil
  • 1/2 teaspoon Sugar or Maple syrup
  • a pinch of salt
  • Water, broth or wine (optional)

How to do it:
  1. Heat pan with oil.
  2. Add in all the onion and stir-fry till onions are well coated with oil.
  3. Continue cooking till onion has softened.
  4. Add in salt and sugar or maple if using and stir well.
  5. Spread out the onion and let it cook on medium low heat.
  6. Stir once a while (abt every few minute) only to prevent it from sticking and burning. If you keep stirring, it will not brown and caramelised.
  7. If the onions are sticking, add a little water to deglaze it. You can use wine or broth instead if you like.
  8. Continue cooking till onions turned darker and darker and to a texture to your desire.
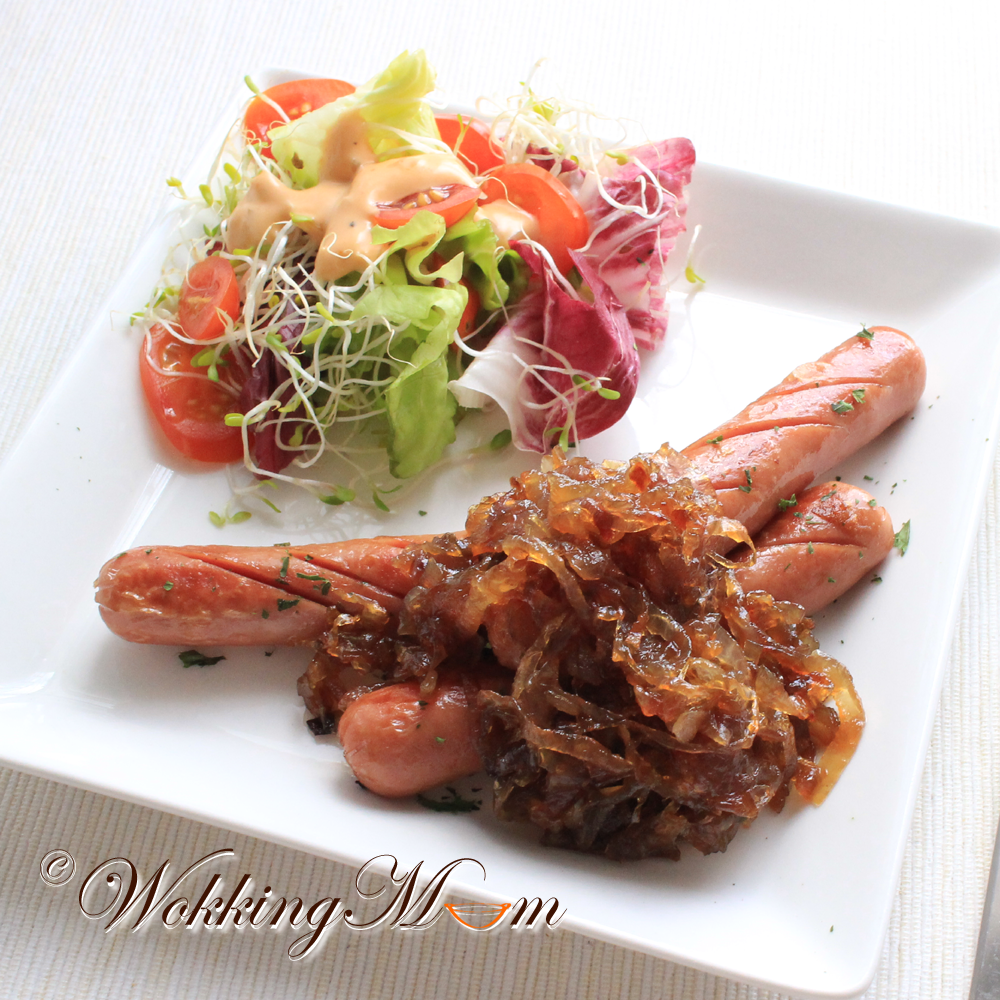
  9. Dish and serve, here with sausages.


Thursday, July 19, 2012

Oven Grilled Ebi Mentaiyaki
明太子焗大虾


I bought a bought of Ebiko for Steamed Egg Custard and since I do not wish to keep them, I decided to finished them by making this dish. This is adapted from my recipe, Hotate Mentaiyaki.

Instead of using Hotate (Scallop), I used prawns instead. In the Hotate Mentaiyaki recipe, Tobiko was used instead of Ebiko. Either one works.

I'm re-posting the recipe here for easy reference.

Ingredients:
  • 4 large Prawn
  • 1 slice Cheese, cut into 4 strips
  • 3-4 tablespoon Ebiko or Tobiko
  • 4-5 tablespoon Japanese Mayonnaise
  • Additional Mayonnaise for toppings (optional)

How to do it:
  1. Prepare prawns by cut the back of the shells with scissor.
  2. Slit and half the prawns taking care not to cut thru the bottom of the shells.
  3. Wash, clean and remove the intestinal tact at this moment.
  4. Gently but firmly press open the shells to each side so it's flat. 
  5. Pat dry and set aside.
  6. Mix mayonnaise with ebiko together.
  7. Place prawns in baking dish.
  8. Top each prawn with a piece of cheese each.
  9. Cover and spread with Mayonnaise mixture.
  10. Grill in preheated oven at 220C for 5 minutes.
  11. Remove and top with more mayonnaise if you like and grill for another 5 minutes or till mayonnaise mixture starts to bubble.
  12. Removeand serve immediately.

Note:
  • The amount of mayonnaise used depends on the size of prawns.
  • Do not add seasoning as the mayo, cheese and ebiko already give the seasoning it needs.
  • The amount of time needed to for baking depends on the size of the prawn . Shorter time for smaller prawns. It should be done when you see the mayo toppings bubbling gently.


Tuesday, April 17, 2012

Toasting Belacan
干炒峇拉煎


Belacan is made from fermented ground shrimp. It's in usually in a block form and is extremely pungent. Try cooking it and you house will be filled will the smell of belacan that doesn't seem to go away and your neigbours will probably smell it too! :P You either hate it or love it. And I love it! :P

You can only use belacan when it's cooked, so the best way (for me) is to cook the whole block of belacan so I will have ready belacan on hand and my place only smells once. :P

It's simple to 'cook' it but the process is a long one. Basically, you just need to chop the belacan into smaller pieces and dry-toast in on a pan, on medium low fire.

I keep using the the spatula to press on the belacan at first to 'mash' it and at the same time keep stirring it. Keep repeating till you start to see the belacan drying up. Stir it so it doesn't get burned. Continue stirring until all belacan is dried up and they start turning powdery and sandy.

The whole process takes about 25 - 30 mins. You can further grind it into fine powder if you want but as you can see from mine (below), the toasted belacan are like granules.

Oh! And don't be surprise on how much the block of belacan 'shrunk'. I appropriately only get about slight more than half from the original block of belacan.

Once it's cooled, you can store it in an air-tight container for future use.

Note:
I was told that light a candle next to where you toast the belacan can help minimum the spreading of the smell. You might want to give it a try next time when you do it. I will. :)

Sambal Chilli
参巴辣椒酱


I'm not sure how many people out there are like me, who can't really take spicy but yet like it. The best solution is to make my own chilli sauce. I can adjust the level of spicyness my own by adjust the type chilli used.

I made this for my sister, which is similar to Sambal Chilli  except, this has calamasi in it and it's not cooked. It's used raw as a dipping sauce. However, you can using this replace Sambal Chilli for the Grilled Sambal Squid too.

I made to as close as what she described. Basically, she wants it spicy (from the Chilli), sour (from the Calamasi) and salty (from the toasted Balacan and salt). Apparently, she still find it not spicy enough for her. :P Like I said earlier, you can adjust the level of spicyness.

Ingredients:
  • 10 Fresh Chilli, de-seed
  • 10 Dried Chilli, soak to soften
  • 4 Chilli Padi, de-seed
  • Juice of 4 Calamasi
  • 5 Shallot
  • 4 clove Garlic
  • 1 tablespoon  Toasted Belacan
  • 1/2 teaspoon Salt or to taste

How to do it:
  • Just simply pound or grind all the ingredients finely and you are done.


Thursday, February 16, 2012

Sambal (Belacan) Chilli
参巴峇拉煎辣椒酱


I'm a 'lousy' Singaporean. Why? Majority of Singaporeans can take spicy food. Very spicy food. For me, the curry to go with Prata is considered spicy. :P I belong to the minority who just can't handle the heat very well.

Having said that, I do like spicy food a lot, accompanied by lots of water of course. So, for me, the best thing to do is to make and cook my own 'spicy' food, with spicy level set to the lowest. >.<

I have been using this simple sambal belacan for all my 'spicy' food. You can adjust the level of spiciness according to the chilli you add in. The maximum I have handle is level 2. Give me level 3 and I'll be filled with water. XD

This sambal belacan goes well with both veggies and seafood. I don't think I'll need more introduction on those dishes are. :) In fact, I just used it for my Grilled Squid yesterday. Even my son loved it and suggested I used it on stingray next. :)

So here's the easy peasy and handy recipe.

Sambal Chilli Paste before cooking

Ingredients:

  • 6 Fresh Red Chilli
  • 12 Dried Chilli, soaked to soften (add with Fresh Red Chilli for level 2 spiciness)
  • 3 Chilli Padi (add with both Fresh and Dried Chilli for level 3 spiciness)
  • 3 Shallot
  • 3 clove Garlic
  • 1/3 tablespoon Belacan
  • 1 teaspoon brown sugar
  • Salt to taste

    How to do it:
    1. Grind all ingredients for chilli paste, except for sugar and salt, together.
    2. Heat wok with 1/2 tablespoon of oil.
    3. Stir fry chilli paste till fragrant.
    4. Add sugar and salt to taste.
    5. Leave to cool.
    6. Ready to use.

    Note:
    • I only keep the 'cooked' sambal for not more than 2 days.
    • If you want to make more of the sambal to keep, please follow the following steps:
    1. Chop the belacan and toast it on a pan till it's dry and powdery like.
    2. Add the toasted belacan to the rest of the ingredients, except sugar & salt.
    3. Blend it.
    4. Add sugar and salt to taste.
    5. Keep it air tight in the fridge for up to a week.
    • You can use this as an condiment with or without lime juice added.


      Sambal Belacan used on Grilled Squid

      Sunday, January 1, 2012

      Spiced Salt
      椒盐


      Spiced Salt 椒盐 is yet another handy condiment to have in your kitchen. Sometime back I had a bamboo clams baked on a dish of spiced salt, which I will find time to experiment. It adds aroma to the dish that's baked with it.

      I remembered when I was a kid, one dish that's often served during wedding dinner was fried spring chicken and it always came with spiced salt.

      It's pretty easy to make it yourself. You can adjust the how spicy by adjusting the amount of pepper you add in. After making it, I like to store it in the salt shaker and use it with french fries. :)


      Ingredients:
      • 2 teaspoon Sichuan Peppercorn
      • 2 teaspoon Ground Black Pepper
      • 1 teaspoon Pepper
      • 2 tablespoon Salt

      How to do it:
      1. Add Sichuan Peppercorn to a dry pan.
      2. Pan fry it over low fire for 5 minutes till fragrance.
      3. Add salt and continue to stir fry for a minute.
      4. Add both the ground black pepper and pepper.
      5. Stir-fry for another half a minute.
      6. Remove and it's ready to be used.

      Using the Spiced Salt here with Prawns

      Friday, December 30, 2011

      Mushroom Dried Scallop XO Sauce
      香菇瑶柱XO酱


      My husband had to go China every month for their company's new project and half a year ago, one of their partners in China gave him a big pack of Dried Scallop and Dried Shitake Mushroom each.


      Dried Mushroom                             Dried Scallop   

      One of the stuff I have been experimenting using them is the XO sauce. It's an great condiment to have. We love it with fried rice and I add it to some of the dishes I ate for dinner too. As much as I like ready-made XO sauce, they are either to spicy or too strong for the kids to handle. It's best if you can made your own XO sauce adjusted it to your own taste.


      There isn't any hard and fast rule on my homemade XO sauce. If you prefer it more oily (ingredients will be softer soaked in oil), add more oil during cooking. If you want it hotter, add more Dried Chilli.

      I'm using the Happy Call Pan to do this. You can use a regular non-stick pan too. The biggest difference is that the HCP cooks faster and is more moist. I used the HCP to steam cook the dried scallops too. If you do not have the pan, you will have to soak the dried scallop and steam it for an hour before you can shred them.

      Ingredients:
      • 60g Dried Scallops, soaked with 4 tablespoon water
      • 1 1/2 tablespoon Dried Shrimp, soaked to soften and chopped
      • 3 Red Chilli (replace with Dried Chilli if you want it spicy)
      • 3 tablespoon Chopped Garlic
      • 3 tablespoon Chopped Shallot
      • 5 Dried Shiitake Mushroom, soaked to soften and chopped
      • 5 Dried Shiitake Mushroom, soaked to soften and sliced
      • a dash of Pepper
      • Sugar or to taste (optional)
      • 4 tablespoon Oil

      How to do it:
      1. Pour dried scallops with water into the pan after soaking it for 15 minutes.
      2. Close pan and cook it in medium low heat for 4 mins or till water is almost dry.
      3. Use the back of the spoon to press the dried scallops. They should be soft enough to break into pieces. If not, add a bit more water and cook longer.
      4. Remove the dried scallops, tear into smaller shreds if necessary or give it a pause in the blender and set aside.
      5. Heat oil in the same pan in medium low heat but not smoking.
      6. Add in the garlic and shallot and saute till fragrant.
      7. Add in the rest of the ingredient except shredded dried scallops.
      8. Saute till fragrant by covering and shaking for 2 minutes.
      9. Add a tablespoon of mushroom water.
      10. Cover and continue cooking for another 2 minutes.
      11. Add in shredded dried scallop.
      12. Stir-fry till mixed well.
      13. Cover and continue cooking for 4 minutes, shaking the pan to prevent burning. I open the pan occasionally to give it a good stir too.
      14. Add pepper and sugar to taste if necessary, stir-fry to mix well.
      15. Dish and store for later use.
      Note:
      • The dried scallops I used are very small (pls refer to photo above). Hence, it's easier and faster to steam and shred it. If you are using larger one, you might need a longer time to soak and soften it.
      • The mushroom I used are slightly larger than a 50cents coin. If you are using larger one, you might want to reduce the number of mushroom.


      My simple fried rice with homemade XO Sauce for extra flavours


      Friday, July 16, 2010

      Roasted Garlic 烘蒜蓉

      My family except my husband loves garlic I will put lots of garlic in my cooking, if my husband is not eating, because the kids always fight for it. :)

      They especially like fried garlic and and onion too! I always make these two items and sometimes ginger shreds.  I stock them up as you can add them to almost any food. Or for my kids, eat them as it is. :P

      I prefer to oven roast minced garlic. It's less oily and you can keep it longer as they are much drier than if you fried them in oil. I can also removed those that have turned brown and let the others continue roasting. If you fry them in oil, you can't do that.

      I spray some oil on my tray, spread the garlic and spray a little oil over the garlic. It's much easier if you use the oil spray but if you don't have one, you can use a brush to brush the tray then toss the garlic with the oil before spreading them flat. Just use enough oil to spread the tray so the garlic doesn't stick to it. You don''t need a lot of oil for this.

      I roast it at 180C for a totally 20 minutes but checking in-between to give it a stir and spread them flat again so they will brown evenly and to remove those that have browned. You won't have this problem if your minced garlic are about the same size. With my 'kungfu', my minced garlic are still not quite uniform.  Hence, I need to do the in-between picking. :P

      The roasted garlic will turn out very dry, crunchy and not oily at all. The minus point is it takes a much longer time to do it compare to oil frying.

      I'll be using these for my next post, Cream of Mushroom with Roasted Garlic. :)

      Saturday, June 6, 2009

      Cheesy Garlic Bread


      My husband decided to go drinking with his pals today. *roll eyes* I get nagged for staying up late to blog but somebody can go drinking when that same somebody just worked past midnight yesterday and had to wake up early as usual to get to work this morning. *shrug* I'm not complaining.

      At least I get to blog in peace. LOL. Okay, for this recipe, which is one of my kid's favourite, is really easy to do. It's is actually this recipe plus cheese. But because cheese is added here, I cut down the garlic to 2 clove garlic with 1 tablespoon butter.

      For this particular one you see in the photo, 1 tablespoon of Mozzarella Cheese is added into the garlic spread. You can use any cheese you like. Sometimes I use Cheddar with Parmesan Cheese too. It's basically whatever leftover bits of Cheese I have. I have not tried Cream Cheese though.

      What you do is to mix the soften butter, garlic, cheese and the optional parsley and garlic powder together. Use that to spread on your bread before you toast it. The bread I use here is hotdog bun. I like it that it's still a bit soft on the inside but cruchy on the thin outer crust. So it won't hurt the kids' gums when they eat it.

      Another great idea for pinic. ;) Do remember to wrap the garlic bun/bread with a 2 to 3 pieces of kitchen towels before to wrap it with foil so it will not be too soggy later.

      Thursday, November 6, 2008

      Mini Onion Rings

      Asians especially the Chinese and Malays will know this very well. It's actually, deep fried onion or shallot. My son calls it mini onion rings. If my daughter could speak well, she would probably called it fried alphabets because she is always showing me how each on them looks like alphabets and sometimes numbers. I see a 'D' there. ;)

      They love this on all their food and if I didn't stop them, they would most likely treat them like tibits and finish it at one go. :P My mother used to make this but she doesn't like to do it because she always burned them. So what she did was to fried them with lots of oil and kept them together with the oil and we drizzle our noodles or porridge with the oil and scoop out some of the fried shallot them at the same time. It's more like a flavoured oil.

       For me, I want my flavoured oil AND my fried shallot. However, my flavoured oil only allows me for 1 or at most 2 cooking. A friend who made the best fried shallot I have tasted told me the trick to making nicely brown and crispy fried shallot is not using a lot of oil but just the opposite. Enough oil to just about cover the finely sliced shallot just do. Add a tiny pinch of salt and fry the shallot over low fire.

      You have to constantly but gently stir it so the shallot will brown nicely. Be prepared to stand over your stove for at least 15 minutes stirring to do this. Drain them from the oil and spread them on paper towels to remove excess oil and keep them an airtight container.

      You can use it as a garnish or top some on your bowl of noodles. As for the remaining oil from frying, you can use to drizzle on your food as a flavoured oil or use it as the oil for your stir-fry. It smell really nice.

      Tuesday, October 14, 2008

      Ikan Bilis Powder
      江鱼仔粉


      The most useful cooking tip I learn when I first became a mother was how to prepare Ikan Bilis (Anchovies) Powder. It was from a leaflet from a Infant Formula Company. I'm still using the same method to do it after 6 years except now it's easier for me with the use of oven. The kids still loves porridge sprinkled with Ikan Bilis Powder. No other seasonings is required and it's amazing how fast they can finish their bowl of porridge and ask for seconds. :) Hmmm ... maybe I shouldn't crack my head so much thinking of what to cook for them. ;)


      Previously, without an oven, I would dry fry (no oil) the Ikan Bilis in small amount using low fire after draining them as dry as I could. Don't even try skipping the washing part. It will be very salty especially for babies. After they turned light brown (see picture above) and are completely dried, they will be crunchy. You can try one after they are cooled. If they are not crunchy, you have to returned them to the pan and continue frying. Now, with an oven, things are so much easier. Drain the Ikan Bilis and spread them evenly on a flat pan and bake them at 180C for 20 to 25 minutes, stirring and spreading them evenly again half way through baking and they are ready for the next step.


      After the Ikan Bilis are fried or baked dried, you can pound them into powder. Okay, I cheated. I first used a blender to blend as powdery as possible. Next, I sift them and you will see bigger bits left on the sieve (see the edge of dish of above picture) . Pound those bits using the mortar and pestle into powder. Of course, now that the kids are older I no longer have to pound them. I just blend them as powdery as possible (as shown above). Now you can keep the Ikan Bilis Powder in an air tight container and use it as an seasoning for your porridge or other dishes.

      Friday, January 12, 2007

      Pandan Juice
      班兰汁


      This is a colour enhancer. The food you make will have a very nice pandan aroma. You can use green good colourings instead but the food will look a bit ‘fake’. Not so nice lah.

      Ingredients:
      • 6 pandan leaves
      • ½ cup water

      How to do it:
      1. Grind the leaves with the water.
      2. Remove and put into a strainer bag.
      3. Squeeze the water out of the bag.
      Note:
      If you need more juice, just add in a bit more water. Otherwise just grind more leaves.

      Saturday, December 30, 2006

      Pickled Green Chilli
      腌渍青辣椒


      I’m not a chilli person. I can't take spicy stuff but I love Green Chilli (that is not to spicy). I thought I should try making my own green chilli so I can have it when I cook Hor Fan.

      I’m not sure if my method it correct but it tasted right on the 4th day. So I guess this method is okay.

      I added a small bottle of white rice vinegar and 6 tablespoon of sugar with my sliced green chilli. I let it stand for 2 days before I add a cup of water to dilute it otherwise the smell of vinegar is too pungent.

      Add lesser sugar if you like your chili a bit more spicy.