AdSense

Showing posts with label chicken. Show all posts

Tuesday, May 5, 2015

Steamed Chicken with Chicken Essence


Recipe for Steamed Chicken with Chicken Essence

Ingredients:
  • 2 Chicken Drumstick, cleaned and dabbed dry
  • 1 tablespoon Cooking Wine
  • a pinch of Salt
  • 4 pieces Yu Zhu 玉竹 (Solomon's Seal Rhizome), cut half
  • 6 Hong Zao 红枣 (Red Dates), sliced into 3 each
  • a small handful Gou Qi Zi 枸杞子 (Wolfberries)
  • 1 to 2 bottles Chicken Essence, depending on how much sauce you like
  • Salt to taste

How to do it:
  1. Rub chicken with salt and cooking wine.
  2. You can let the chicken marinate for half an hour if you like.
  3. Add chicken in a deep dish.
  4. Add in the rest of the ingredients.
  5. Cover with foil.
  6. Steam for 2 to 3 hours.
  7. Remove foil and bast chicken with the sauce.
  8. Drizzle with some sesame oil and serve immediately.

Note:
  • I'm using Sake as cooking wine. If you use Hua Tiow (Chinese Cooking Wine), there will be the Hua Tiow Wine taste.
  • I'm using (2 bottles of) New Moon Chicken Essence. If you are using Brand's, please add 1/4 teaspoon of sugar as Brand's Chicken Essence is slightly bitter.
  • You can also use Chicken Essence with Cordyceps instead for added flavours.
as seen in https://instagram.com/p/2BBtx6gdEL/

Tuesday, September 30, 2014

Curry Chicken Satay


I haven't been updating this food blog for awhile.  If you would like to know what I have been up to, you can always check out my Instagram.

This was done in August.  I was craving for curry chicken then but not the kids.  Hence I came up with this idea of serving the curry and chicken separately.

The curry is served as a dipping sauce for the chicken.  You can also soak up your french loaf with curry to eat it too.  You can eat the chicken satay as it is like my kids too.  Or eat them all together!  It's a 2 in 1 dish.


You can use premix for the curry.  If you want to try making your own curry, you might like to try the following recipe, which I'm reposting it here for your convenience. 

However, for this dish I have shared, I did not use chicken. Hence I used chicken stock instead of water to cook it.  I added carrots too. 

Ingredients:
  • 1 Chicken, chopped into parts
  • 400g Potatoes, skinned and cut into smaller pieces
  • 30g Curry Powder for meat (cos there is curry powder for fish too)
  • 750ml Chicken Broth or Water
  • 500ml Coconut Milk
  • 200ml Coconut Cream
  • 2 tablespoon Oil
  • Salt and Sugar to taste

Spices to be grind into paste:
  • 10 Shallots, skinned
  • 3 clove Garlic, skinned
  • 10g Turmeric
  • 20g Galangal
  • 6 Red Chilli (more if you can handle it)
  • 1/2 stalk Lemon Grass

How to do it:
  1. Add 2 tablespoon of broth or water to the curry powder and mix well.
  2. Set aside.
  3. Heat wok with oil.
  4. Add in the Spice paste and fry till fragrant.
  5. Add the curry powder paste to the spice paste and mix well.
  6. Add in the Chicken and stir fry for 2 to 3 minutes.
  7. Add in the potatoes and the rest of the broth or water and coconut milk.
  8. Bring to a boil.
  9. Reduce to a simmer and continue cooking for 30 - 60 mins or till both chicken and potatoes are tender ( I simmer for almost 2 hours).
  10. Stir in the coconut cream.
  11. Add sugar and salt to taste.
  12. Bring to a boil.
  13. Serve with toasted French loaf or rice.


As for the chicken satay, if you can use your own favourite recipe or if you like, you can try this,

Ingredients:
  • 3 Chicken Drumstick, deboned and cut into small pieces

Marinade:
  • 1/2 tablespoon Oyster Sauce
  • 2 tablespoon Maltose
  • 1 1/2 tablespoon Fish Sauce
  • 1/2 tablespoon Light Soy Sauce
  • 1/4 teaspoon Salt
  • 1/3 teaspoon Dark Soy Sauce
  • 1/4 teaspoon Turmeric Powder
  • 1/2 teaspoon Garlic Powder
  • 1 tablespoon Potato Flour

How to do it:
  1. Mix ingredients for marinade well
  2. Marinate chicken for at least an hour.
  3. Drain chicken but do not need to pat dry.
  4. Thread chicken pieces in skewers.
  5. Heat oil in pan and shallow fry till done.

Note:
You can oven grill it too. Just spray a little oil on the chicken and grill in preheated oven at 200C for 15minutes, turn once in-between baking.  Increase temperature to 240C and continue grilling for a couple of  minutes to char it a little if you like.


Thursday, July 10, 2014

Pan Grilled Chicken with Mushroom Sauce


Chicken and mushroom are both my kids' all time favourite food.  When I'm feeling lazy, I'll grill chicken with mushroom.  It can never go wrong. 

It's always better than cooking the typical 3 dish 1 soup meal.  So much lesser things to prepare and cook.  And most importantly so much less washing and cleaning up to do.

Ingredients:
  • 2 Chicken Thigh, deboned
  • 1 box Cremini Mushroom, cleaned and sliced
  • 1 tablespoon Butter
  • 100ml Chicken Stock
  • Salt to taste
  • Cornflour Mixture (thickener)

Marinade:
  • 1/2 tablespoon Light Soy Sauce
  • 1/3 tablespoon Sake or Chinese Cooking Wine
  • 1/3 teaspoon Garlic Powder or 2 clove Garlic, grated

How to do it:
  1. Marinate chicken thigh in marinade for an hour.
  2. Drain and grilled on lightly greased pan, skin side down on medium low heat for 15mins.
  3. Turn chicken thighs over and grill for another 10mins or till chicken thighs are completely cooked.
  4. Meanwhile, melt butter in a pan.
  5. Stir in mushroom and a pinch of salt.
  6. Saute till the juice from the cooking starts to dry up a little.
  7. Add in the chicken stock and bring it to a boil.
  8. Season with salt.
  9. Thicken the sauce with corn flour mixture.
  10. Drizzle over the chicken thighs and serve.

Note:
  • Cremini Mushroom are similar to White (Button) Mushroom.  It is the one with a light brown cap.
  • You can use white mushroom too but I prefer Cremini Mushroom as it has firmer texture and a more earthy flavor compared to the white mushroom.


Tuesday, July 1, 2014

Fusion Chicken Rice with Roasted Chicken and Bacon


I tweaked and combined a few recipes to come up with this dish; because I wanted to eat everything  from all those dishes. ;)

My son is a rice (and soup) person.  He will ask for rice even when I made chicken cutlet.  Hence, this time, I decided to do a western-style chicken rice.  The rice here was cooked Hainanese Chicken Rice style, but with homemade chicken broth and garlic only. I didn't use pandan leaves as I didn't want a clash of flavours with the western-style chicken.


I usual roast or grill a whole chicken but the breast meat always get 'abandoned'.  So this time, I used boneless chicken thighs instead.  It's is also easier to serve and less messy to eat.

The chicken is a combo of 3 old recipes I have.  It has the Herbs from Grilled Chicken with Herbs,  the Bacon from Roast Chicken with Bacon and the Garlic from Roast Chicken with Garlic and Lemon .


Ingredients:
  • 4 boneless Chicken Thighs or Legs, cleaned and pat dry
  • 2 teaspoon Dried Thyme
  • 2 teaspoon Dried Rosemary
  • 1 1/2 teaspoon Dried Parsley
  • Rind of 1 whole Lemon
  • 2 tablespoon Lemon Juice
  • 1 tablespoon Olive Oil
  • 20 gloves Garlic, skin intact
  • 6 to 8 Slices Streaky Bacon
  • 150ml Chicken Stock
  • 2 tablespoon Sake or any other cooking wine
  • Salt and Ground Black Pepper

How to do it:
  1. Rub 2/3 of the herbs and lemon rind on all the chicken thighs.
  2. Season and rub with salt and pepper.
  3. Lay chicken thighs on a baking dish.
  4. Place bacon strips over the chicken thighs, covering them.
  5. Drizzle lemon juice and olive oil over.
  6. Sprinkle the remaining herbs and lemon rind.
  7. Scatter the garlic around the baking dish.
  8. Pour chicken stock and wine into the dish.
  9. Roast in a preheat oven at 200c for 10 -15 mins or till the bacon starts to turn crispy and brown.
  10. Remove the bacon and set aside.
  11. Continue to roast the chicken for another hour, basting it with juice from the dish occasionally to let the chicken meat absorb the flavours.
  12. Do not bast chicken during the last 15 mins of roasting to let the chicken skin become dry and turn crispy.
  13. You may want to return the bacon strips back to the chicken to let it heat up for 5 mins.
  14. Remove chicken from dish and drain roasting juice from excess oil.
  15. Chop chicken into smaller pieces and place bacon together.
  16. Drizzle juice over rice if you like.
  17. Serve chicken and bacon rice  with the sweet garlic.

Note:
  • As different oven works differently, please adjust the timing or temperature accordingly.
  • If the chicken is browning too fast, lower the temperature and roast longer.
  • Alternatively, you may wish to place a foil tent over the bacon/chicken to prevent them from browning to fast on the top but under-cook inside.


Thursday, June 19, 2014

Pandan Leaves Wrapped Chicken


Made one of our all time favourites for dinner last night.

You can hop over here for the recipe.  I made a video a few years back on how to wrap the chicken using pandan leaves without the use of toothpicks.  Should have turned the camera the other way round.  Oh well ...


Thursday, May 22, 2014

Deep Fried Chicken with Fermented Bean Curd


I have been doing lots of  "kitchen experiments" lately. This is one of my successful ones cos my daughter actually loves it. 

This is the fried and improved version of this oven grilled winglets.


Ingredients:
  • 1 boneless chicken thigh or leg, cleaned, dabbed dry and cut smaller.

Marinade:
  • 3 pieces Fermented Bean Curd
  • 5 tablespoon Fermented Bean Curd Sauce
  • 1/2 teaspoon Sugar
  • 1 teaspoon Garlic Powder or 2 clove Garlic, grated
  • 1 teaspoon Ginger Juice
  • 1 tablespoon Sake or any other Cooking Wine
  • 1 1/2 tablespoon Potato Flour
  • 1 tablespoon Rice Flour
  • 1/2 teaspoon  Baking Powder

How to do it:
  1. Combine all marinade together and mix well. You can use zip-loc bag to do this.
  2. Add in the chicken.
  3. Coat well and set aside to marinate for at least an hour.
  4. Heat oil in a small pan or wok.
  5. Fry till golden brown.
  6. Remove and drain excess oil on paper towel.
  7. Serve.

Note:
  • I like to fry in small pan as lesser oil is used. You will have to work in batches though and turn the chicken when frying.
  • The chicken thigh that I used is about 300g and I cut it into about 10 one to 2 bite bit size.
  • For this recipe, the chicken is coated thinly with the mixture that stay crispy even after it has cool down.

Sunday, April 20, 2014

Oven Grilled Chicken with Mayonnaise and Herbs


One of my favourite dish is the Baked Cod with Garlic Mayo.  Recently, I decided to try out the same idea on chicken with my (dying) homegrown herbs. Better eat them before they all dry out (due to the hot weather) and die. :P

I did the same dish 3 times before deciding which is the family's favourite. Once with dried herbs grilled on rack and the next was without rack. The 3rd tried out was with fresh herbs grilled on rack.

My husband preferred the fresh herbs as it's more subtle and not too overpowering. But he preferred grilling the chicken straight on the pan so the chicken can absorb the juices. I preferred the stronger aroma from the dried herbs but I, too, preferred grilling it on the pan. The chicken turned out very juicy and flavourful. Even the kids loved it.

Try it out and let me know which do you prefer. :)


Ingredients:
  • 4 Chicken Leg, deboned
  • 5 tablespoon Japanese Mayonnaise
  • 2 sprig Fresh Rosemary
  • a small bunch Oregano (abt 4 stems)
  • a small bunch Thyme (abt 10 stems)
  • 1 teaspoon Garlic Powder or 2 clove Garlic, grated
  • Ground Black Pepper
  • Salt

How to do it:
  1. Remove leaves of all the herbs from its stems.
  2. Tear them into bits or you can chop them up if you like.
  3. Mix them with the mayonnaise.
  4. Spread the mixture all over clean and dabbed dry chicken.
  5. Spread a little mixture under the skin too if possible.
  6. Let it marinate for at leave 2 hours or overnight.
  7. Season the chicken with salt and black pepper all over.
  8. I added more black pepper on the skin.
  9. Grill chicken in preheat oven at 180c for 30 mins.
  10. Increase the temperature to 200c and continue to grill chicken another 10 mins or till the skin starts to brown.
  11. Remove and serve.

Note:
  • You may replace fresh herbs with 1 teaspoon of dried herbs each.  I prefer using garlic powder as fresh garlic will taste bitter if it's burned.
  • If you prefer the chicken to be dried and more crispy, grill it on a rack.
  • You can use the sauce from the chicken to roast more flavour vegetables.
  • Have 'tent' made from foil to cover the chicken, if you find the chicken browning too fast. Remove it at step 10 to continue grilling to brown the skin.


Monday, January 20, 2014

{ Dinner: Grilled Chicken with Herbs }


One of those days that the kids didn't want rice. They prefer chicken than pork hence you see me cooking more of chicken.

Serving this with Mushroom Soup and Baked Cauliflower Mash.

This is one of my favourite grilled chicken recipe, which I have shared in 2007. I'm re-posting this recipe again as the picture on the older post has gone missing.


Ingredients:
  • 2 Chicken Drumstick

Marinade:
  • 1/2 teaspoon Dried Thyme
  • 2 teaspoon Dried Rosemary
  • 1/2 (of a whole) Lemon Rind
  • 1/2 teaspoon Salt
  • 1 tablespoon Lemon Juice
  • 1 tablespoon Olive Oil

How to do it:
  1. Mix marinade.
  2. Add chicken to marinade and set aside for at least 1/2 hour.
  3. Heat grill pan with a little oil.
  4. Grill chicken skin down first, till brown.
  5. Turn over and continue to grill the other side of the chicken.
  6. Serve.


Monday, January 13, 2014

Chicken Soup with Shark's Cartilage
鲨鱼软骨鸡汤


I hesitate for a long time before deciding to share this recipe.  Why?  Because it involve Sharks. Yes, sharks.  I realised anyone sharing anything about eating sharks (fins) gets lots of flaming.

I'm not trying to go against environmentalists out there who are against eating Shark's Fin and promote eating it here. Like I mentioned before in some of my posts, I will not encourage eating it but will not reject it if it's served to me. It will be a waste of food, whether or not if it's Shark's Fin. 

Just a thought here.  Maybe if we all start eating Shark's meat like what we used to do, the fishermen will not just harvest the fins and throw the remains back into the sea.  Shark's meat was my father's favourite. I remembered eating it very often when I was a child. My father often cooked it with Black Fermented Bean.  Even the Lor Mee I had when I was a child was loaded with the soft and sweet Shark's meat. I do not know when the wet markets stopped having Shark's meat for sale. Finding shark's meat is even harder than Shark's Fin now. :P

Anyway, if you are still thinking of flaming me or send me hate mails for this post, please do the same for those who are sharing about Foie Gras too.  It is cruel how the geese are raised and fed, all for its liver.  No?  BUT, Foie Gras remains a delicacy and is much loved by many.  Not much petitions to stop eating Foie Gras around leh.  Well, not as much as Shark's Fin.  Everybody is still happily eating it. :P  Not very fair to the geese, you know.  Likewise for any other animals which are raised in harsh environment so that the farmers can get the most of them. :P  They, the farmers, are the ones who needed the 'education'.  ;)

For me, I just want to share a collagen rich recipe here. Not to start a food war or anything. If you don't like what you see, you can just leave.  And don't waste time sending me hate mails or comments. I get lots of those before.  Doesn't affect me much nowadays.  Just go spend your time usefully somewhere else.  Thank you.  ;)


Please note that this soup is for those who are very patient.  You need at least 4 hours of simmering to to turn the cartilage into gelatinous/jelly like and the soup milky.  The cartilage shown in the pictures here had only be simmered for 2 hours (just so you can see how it's going to be like half way into cooking).  You can see part of it turning jelly like.  You won't be seeing much of the cartilage or rather the shape of it after 4 hours.

Ingredients:
  • 1 large Shark's Cartilage
  • 1 Chicken Carcass
  • 10 Chicken Feet
  • 2 Chicken Drumstick
  • a handful Wolfberries
  • a slice of Ginger
  • 3 litres Water

How to do it:
  1. Blanch shark's cartilage, chicken carcass, feet and drumstick.
  2. Add all the above, except drumsticks, and ginger into a pot of water.
  3. Bring to a boil before reducing to a simmer.
  4. Simmer for 3 hours before adding the chicken drumsticks.
  5. Continue to simmer till the shark's cartilage turn gelatinous/jelly.
  6. Add in the wolfberries and cook for another minute.
  7. Add salt to taste.
  8. Serve.

Note:
  • I add chicken drumstick at a later time as I'll serving it with the soup. If you just wish to serve the soup without any meat, you can omit it.
  • You may use other parts of chicken instead of drums if you wish.
  • Please eat whatever gelatinous cartilage that has not all melted into the soup and not just drink the soup only. It's packed with collagen


Saturday, January 4, 2014

{ Breakfast: Pan-Grilled Teriyaki Chicken Burger }


This is one of the many back-dated posts that I mentioned earlier which I meant to share in January but didn't get to do it. So while I have time to update, I'll try to do as much back-dated posts as I can.

For those who are subscribing to my feed, my apologies for the flooding.

I made this for breakfast during one of the weekends, many weeks ago :P. The bun was sliced half. I buttered it a little and pan grilled them. You can catch a glimpse of the grill lines on the underside of the top bun on the picture below. :P I served it with homemade chips here.


Ingredients:
  • 4 Chicken Breast, deboned

Marinade:

  • 1/2 teaspoon Garlic Powder or 3 Fresh Garlic, grated
  • 1 tablespoon Sake
  • 1/2 tablespoon Light Soy Sauce
  • 1/2 tablespoon Sugar

Teriyaki Sauce:
  • 4 tablespoon Sake
  • 1 tablespoon Mirin
  • 5 tablespoon Light Soy Sauce
  • 1 tablespoon Maltose or Sugar
  • 1 teaspoon Ginger; done by squeezing grated ginger


How to do it:

  1. Pat dry chicken and add into marinade.
  2. Marinate for an hour.
  3. Heat pan with a little oil.
  4. Drain the chicken meat and pan grill with skin side down.
  5. Flip over when it's beginning to brown.
  6. Pan grill till chicken is almost cooked
  7. Meanwhile, combine ingredients for the sauce and simmer.
  8. The sauce should slower starts to thicken a little.
  9. Pour the hot sauce into the grill pan where the chicken is grilling.
  10. Bring the sauce to a boil if it's not so.
  11. Coat the chicken well with the sauce while the sauce is thickening.
  12. Remove once the chicken is well coated with the sauce.
  13. Serve with rice or as a burger like what I have done here.

Note:
  • I'm trying to cut time by cooking the sauce while grilling the chicken. If you are doing so, please make sure you control the timing well. The sauce should not be too thick before adding the chicken. Reduce heat or add a little water if it get too thicken.
  • You don't have to follow my lazy way. You can just finish grilling the chicken then prepare the sauce. After that  then add the chicken to the sauce to coat it. ;)
  • You can use ready made teriyaki sauce if you like too.


Tuesday, November 26, 2013

{ Dinner: Pan Grilled Chicken Chop with Ham and Cheese }
火腿芝士鸡扒


I had to run some errands yesterday and didn't plan for dinner.

Before I headed home, I dropped by Cold Storage and bought a tray of (4pcs) boneless chicken thighs for under $10.

I went home and dug into my fridge for other ingredients and decided to make this for dinner. It was a rush job, all done under an hour for 4 servings. As I didn't have enough time to marinate the chicken well, I used honey baked ham and cheese to further enhance the taste.

I'm pleased that the rushed out dinner wasn't that bad. ;)


Ingredients:
  • 2 Chicken Drumstick or Breast, deboned
  • 4 slices Ham Baked Ham, cut into strips
  • 4 slices Cheese

Optional Ingredients:
  • 10 - 15 New/Baby Potatoes or any potato of your choice, scrubbed and cleaned (skin if you prefer not to have the skin on)
  • 2 Carrot, skinned and chop into smaller pieces.
  • 3 medium Onion, cut into half (I'm using red onions here)

    Marinade:
    • 1 teaspoon Dried Thyme
    • 2 teaspoon Dried Rosemary
    • Rind of 1 Lemon
    • 1 teaspoon Chicken Powder or Salt
    • 1 teaspoon Light Soy Sauce
    • 2 tablespoon Lemon Juice
    • Sprinkle of  Ground Black Pepper (optional)

    How to do it:
    1. Clean and dab chicken meat dry.
    2. Add marinade to chicken meat and blend well with the meat..
    3. Set aside for 1/2 hour.
    4. Heat grill pan with a tablespoon olive oil.
    5. Grill chicken skin down first for about 2 mins, till brown.
    6. Turn over and continue to grill the other side of the chicken till it's completely cooked.
    7. Place ham on top of chicken chop; skin side up and top with cheese.
    8. Cover and continue grilling for a 10-15 seconds till the cheese starts to melt.
    9. While pan grilling the chicken meat, prepare the vegetables, if you are serving it with the chicken chop.
    10. Boil the vegetables in a pot of lightly salted water for 10-15 mins till they are tender. This is to cut down cooking time. I usually just let them roast in the oven.
    11. Drain and set aside.
    12. Pan fry 3 strips of diced streaky bacon till lightly brown. 
    13. Pan grill the onion at the same time while pan frying the diced bacon.
    14. Add in the drained vegetables and toss well in the oil.
    15. Transfer the vegetables and roast at 240c for 15 mins.
    16. Sprinkle with some salt and set aside to be served.
    17. Serve chicken chop with roasted vegetables.

    Note:
    • Oil Splatter Alert! I'm using a HCP grill pan to cook it. If you do not have one, use a pan with a cover.
    • If you do not have an oven to roast the vegetables, you can pan fry them lightly but it will take a longer time as you have to turn them one at a time to avoid burning them.


      Thursday, November 21, 2013

      { Dinner : Simple Quick Fix }


      I wish I could get takeaways everyday and I can just laze around and get fat. :P  Nah, I don't want to get fat though I AM getting fat from the zero exercise I have. I just hate having to think what to cook everyday.

      Today, it's one of those days that my mind went blank so I just cook whatever comes in mind and with whatever is in the fridge.

      So, here's dinner; Fried Chicken, Blanched Broccoli, Preserved Turnip Omelette and Cream of Mixed Vegetables.


      PS. Salad is mine. I had to have it almost every dinner. ;)


      Friday, November 15, 2013

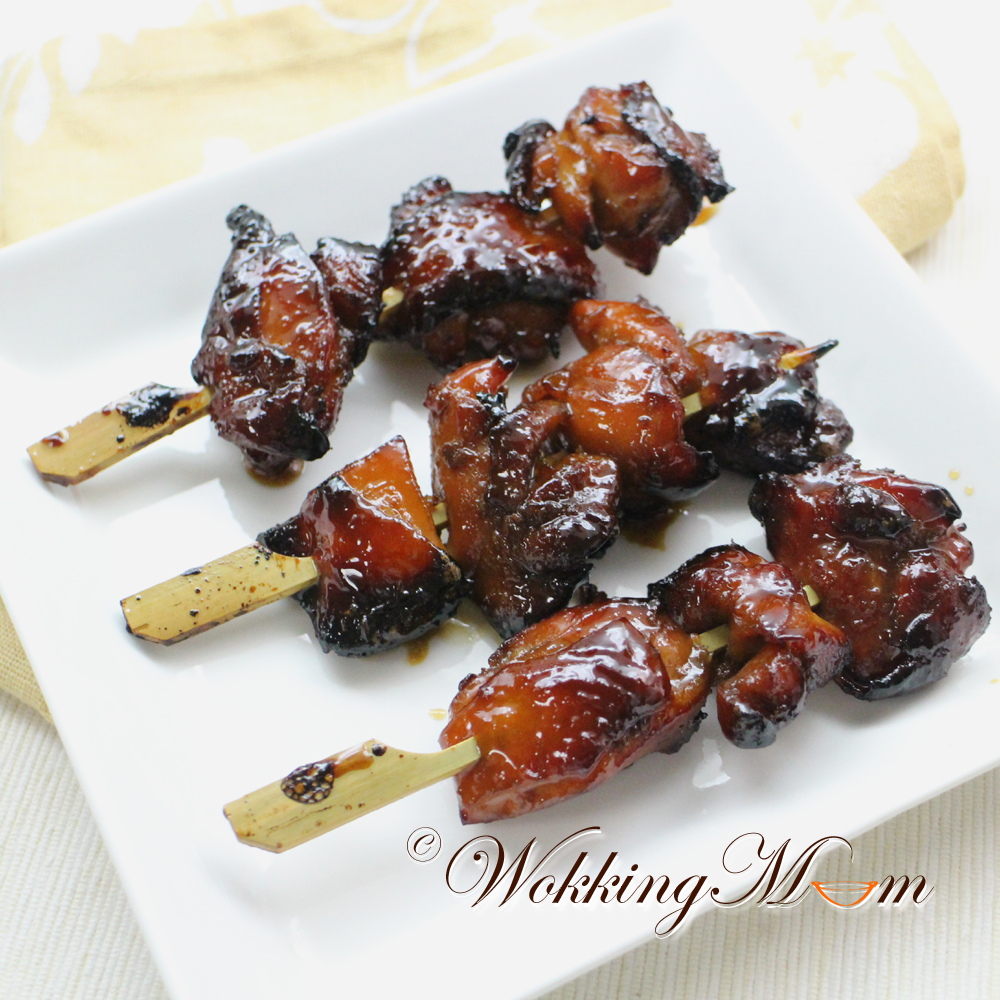
      Chicken Yakitori
      鸡肉串烧


      My sister's husband is away on a business trip and she was "freed". :P  She came over to our place for dinner 2 nights in a row.

      The night before I had plans to make Chicken Yakitori and thought I will just prepared a simple Yakitori Don with maybe a bowl of miso soup. It all changed when I woke up.


      The morning I went to the wet market, I saw really nice Daikon and instantly made me crave for Radish and Ribs Stew. But I didn't have time to do that as it was going to be a busy day for me. I decided to made Oden instead since the kids love that too.

      My sister messaged later and said that she will be coming over for dinner. I realised there might not be enough food. I was only planning to make Chicken Yakitori, Oden and Steamed Egg Custard. I decided to make an additional dish, Pork and Vegetable Stew. The Cheese Stuff Pork Cutlet was an last minute additional as I still have a few pieces of pork left and I didn't want to keep them.

      I end up cooking what you see above yesterday (for my sister). I don't usually cook so much for dinner but sometime I just go a little crazy and stuff everybody silly with food. :P

      Here's an update recipe of the Chicken Yakitori that I made.


      Ingredients:
      • 4 Chicken Breast, debone and cut into bit sizes

      Marinade:
      • 1/2 teaspoon Garlic Powder or 3 Fresh Garlic, grated
      • 1 tablespoon Sake
      • 1/2 tablespoon Light Soy Sauce
      • 1/2 tablespoon Sugar


      Sauce:
      • 4 tablespoon Sake
      • 1 tablespoon  Mirin
      • 5 tablespoon Light Soy Sauce
      • 1 tablespoon Maltose or Sugar

      How to do it:
      1. Pat dry chicken and add into marinade.
      2. Marinate for an hour.
      3. Meanwhile, combine ingredients for the sauce and simmer for about 10mins or till sauce begin to thicken.
      4. Set aside to use it for basting.
      5. Drain the chicken meat and thread the meat using bamboo skewer (soaked in water before hand).
      6. Grill chicken meat in preheated oven at 220c for 15mins or till you see oil dripping out of the meat.
      7. Reduce to oven temperature to 200c.
      8. Bast chicken meat with the sauce and grill for 7mins.
      9. Turn it around and do the same.
      10. Repeat the above 2 steps for another 2 times.
      11. Remove and serve with a squeeze of lemon if you like.

      Note:
      • The meat will turn hard when it's cooled if you are using sugar for the sauce. Unless you are going to eat it while it's hot, I strongly suggest using maltose instead of sugar for the sauce.
      • If you like it a little charred on the edge, increase the oven temperature to 200c the last 5mins of the grilling.


      Monday, October 14, 2013

      Paper Wrapped Chicken
      纸包鸡


      This dish is very similar to Pandan Wrapped Chicken, in my opinion. Instead of using pandan leave to wrap the chicken, which give it an extra fragrant, it uses grease/baking paper to enclose the meat.

      Even though these are 'deep fried', they're not oily. Unless during the folding of the baking paper, you had some holes at the corners, otherwise you should be enjoying flavourful and tender chicken meat.

      However if you are still skeptical about deep frying them, you can always try oven baking. It's a lot harder to estimate the done-ness with the meat wrapped up though. It will take a much longer time too.


      Ingredients:
      • 3 Chicken Drumstick, debone and cut into 3 pieces
      • 2 tablespoon Oyster Sauce
      • 1/2 tablespoon Light Soy Sauce
      • 1/2 tablespoon Sugar
      • 1/2 tablespoon Sake or Cooking Wine
      • 1 teaspoon Ginger Juice
      • 1 teaspoon Garlic Powder
      • 1/2 tablespoon Corn Flour

      How to do it:
      1. Mix all ingredients together.
      2. Marinate for half an hour.
      3. Meanwhile prepare some grease paper or baking paper.
      4. Cut them into a square big enough to fold the chicken meat into an envelope shape.
      5. Put a piece of marinated chicken meat in the middle of a piece of baking paper place diagonally.
      6. Fold the bottom corner up covering the chicken meat, followed by the left and right corners making sure to overlap the bottom fold, ie, no holes in the bottom left and right corners after folding.
      7. Bring over the top corner of the paper and tug into the 'pocket' formed by the previous 3 folds. Make sure there are no holes in the top left and right corners after folding. Secure with staples or toothpicks if needed.
      8. Heat oil in a pot.
      9. Fry the paper wrapped chicken for about 3 minutes each side or till it is completely cooked.
      10. Drain the parcels from excess oil on a wire rack.
      11. Serve as it is or unfolded.

      Note:
      • Instead of 'deep frying' the parcels, you can also oven bake them.
      • I baked a few at 220C for 15mins. You have to do you own estimation as the size/different of the meat is different.