AdSense

Showing posts with label *grilling. Show all posts

Saturday, July 12, 2014

{ Breakfast: Grilled Portobello Mushroom Burger }


I'm clearing mushrooms that I bought earlier this week that I ended up not cooking.  I had a tray of medium sized portobello mushrooms so I thought I will just grill them for breakfast today.

The kids want theirs with ham and cheese; without bread. :/  I haven't been well and lost my appetite. So I'm going to force myself to have a heavier breakfast.  I had cravings for caramelised onions, so adding that to my mushrooms should help whet my appetite.


I oven grilled the portobello mushroom for 10mins at 240c, with butter, garlic powder and and a splash of balsamic vinegar, basting the mushroom with the sauce from it.

The burger bun was halved and toasted. I had the burger with lettuce, tomatoes, cheese, the juicy portobello mushroom; topped with yummy caramelised onions.

Did this whet your appetite like it did for me?


Tuesday, July 1, 2014

{ Breakfast : Grilled Portobello Mushroom with Ham, Bacon and Poached Egg }


This was last Saturday's breakfast which was some of our favourite food that I have combined together as a meal. 

I have the oven working on the mushroom and cheese, the grill pan on the bacon and the deep pan on the poached egg at the same time, while I prepare the salad.


For the Portobello Mushrooms, I spreaded 1/2 teaspoon of butter and seasoned it with salt and pepper.  I let it grill in the oven at 250c for 10 minutes.  In between grilling, I turned the mushrooms and let it the other side of the mushroom soak up and juice and continue grilling.  Just before the mushrooms are done, place 1 or 2 slices of ham on the mushroom to heat it up.

I sprinkled some Shredded Parmesan Cheese on a piece of baking paper and let it turn brown and crisps at the same time as  the mushrooms are grilling.

Meanwhile, pan grill the bacon till they are brown and crispy. Let them sit on paper towel to drain excess oil.

While the rest are cooking, have a a pan or pot filled with water deep enough to cover eggs.  Let the water be in a gentle simmer.  You will see tiny bubbles from the base of the pan or pot but the water should not be jumping. reduce the heat to the lowest you can get just to maintain heat.  Add a teaspoon of vinegar to the water. 
Now, crack the egg into a bowl (I'm using cold eggs).  Gentle pour out into the pan with hot water.  Let it simmer for about 4 minutes or to your preferred done-ness.  Use a slotted spoon to gentle remove the egg.  You can do a few eggs together or one at time.

Dish the mushroom with ham on the plate. Gently place the poached egg on the mushroom. Top with bacon, Break the Parmesan chips into smaller pieces and sprinkle over. Drizzle with truffle oil and season with salt and pepper.

Breakfast is served.


Tuesday, April 22, 2014

Honey Baked Cod


I'm re-posting one of my favourite recipes. This recipe brings back lots of memories I had when I was working in a Japanese Company, Rubycon.

I was such a workaholic then. Never would have thought I would give up my job to be a full time homemaker.  Some of my ex-colleagues are still with the Company but my ex-boss was being posted to Korea.  I hope they are all well.

Ingredients:
  • 2 slice Cod

Marinade:
  • 6 tablespoon Soy Sauce
  • 5 tablespoon Honey
  • 1 tablespoon Sake
  • 1 tablespoon Water

How to do it:
  1. Mix the marinade well.
  2. Pour over the the cod and marinate for 30 minutes.
  3. Preheat oven at 180C.
  4. Lay your baking tray with baking paper.
  5. Drain cod from marinade and reserve the marinade.
  6. Simmer the marinade till it thickens. Use this as basting sauce.
  7. Grill the cod for 20 minutes skin-side up.
  8. Bast the cod with the sauce a couple of times.
  9. Carefully turn the cod over.
  10. Continue to grill, basting the cod a few times till the surface caramelised.
  11. Serve immediately.

Note:
  • As this dish contain honey, be careful not to burn the cod. Adjust the temperature of your oven and the timing accordingly.
  • Adjust the sweetness of the dressing according to your taste.

Sunday, April 20, 2014

Oven Grilled Chicken with Mayonnaise and Herbs


One of my favourite dish is the Baked Cod with Garlic Mayo.  Recently, I decided to try out the same idea on chicken with my (dying) homegrown herbs. Better eat them before they all dry out (due to the hot weather) and die. :P

I did the same dish 3 times before deciding which is the family's favourite. Once with dried herbs grilled on rack and the next was without rack. The 3rd tried out was with fresh herbs grilled on rack.

My husband preferred the fresh herbs as it's more subtle and not too overpowering. But he preferred grilling the chicken straight on the pan so the chicken can absorb the juices. I preferred the stronger aroma from the dried herbs but I, too, preferred grilling it on the pan. The chicken turned out very juicy and flavourful. Even the kids loved it.

Try it out and let me know which do you prefer. :)


Ingredients:
  • 4 Chicken Leg, deboned
  • 5 tablespoon Japanese Mayonnaise
  • 2 sprig Fresh Rosemary
  • a small bunch Oregano (abt 4 stems)
  • a small bunch Thyme (abt 10 stems)
  • 1 teaspoon Garlic Powder or 2 clove Garlic, grated
  • Ground Black Pepper
  • Salt

How to do it:
  1. Remove leaves of all the herbs from its stems.
  2. Tear them into bits or you can chop them up if you like.
  3. Mix them with the mayonnaise.
  4. Spread the mixture all over clean and dabbed dry chicken.
  5. Spread a little mixture under the skin too if possible.
  6. Let it marinate for at leave 2 hours or overnight.
  7. Season the chicken with salt and black pepper all over.
  8. I added more black pepper on the skin.
  9. Grill chicken in preheat oven at 180c for 30 mins.
  10. Increase the temperature to 200c and continue to grill chicken another 10 mins or till the skin starts to brown.
  11. Remove and serve.

Note:
  • You may replace fresh herbs with 1 teaspoon of dried herbs each.  I prefer using garlic powder as fresh garlic will taste bitter if it's burned.
  • If you prefer the chicken to be dried and more crispy, grill it on a rack.
  • You can use the sauce from the chicken to roast more flavour vegetables.
  • Have 'tent' made from foil to cover the chicken, if you find the chicken browning too fast. Remove it at step 10 to continue grilling to brown the skin.


Friday, November 15, 2013

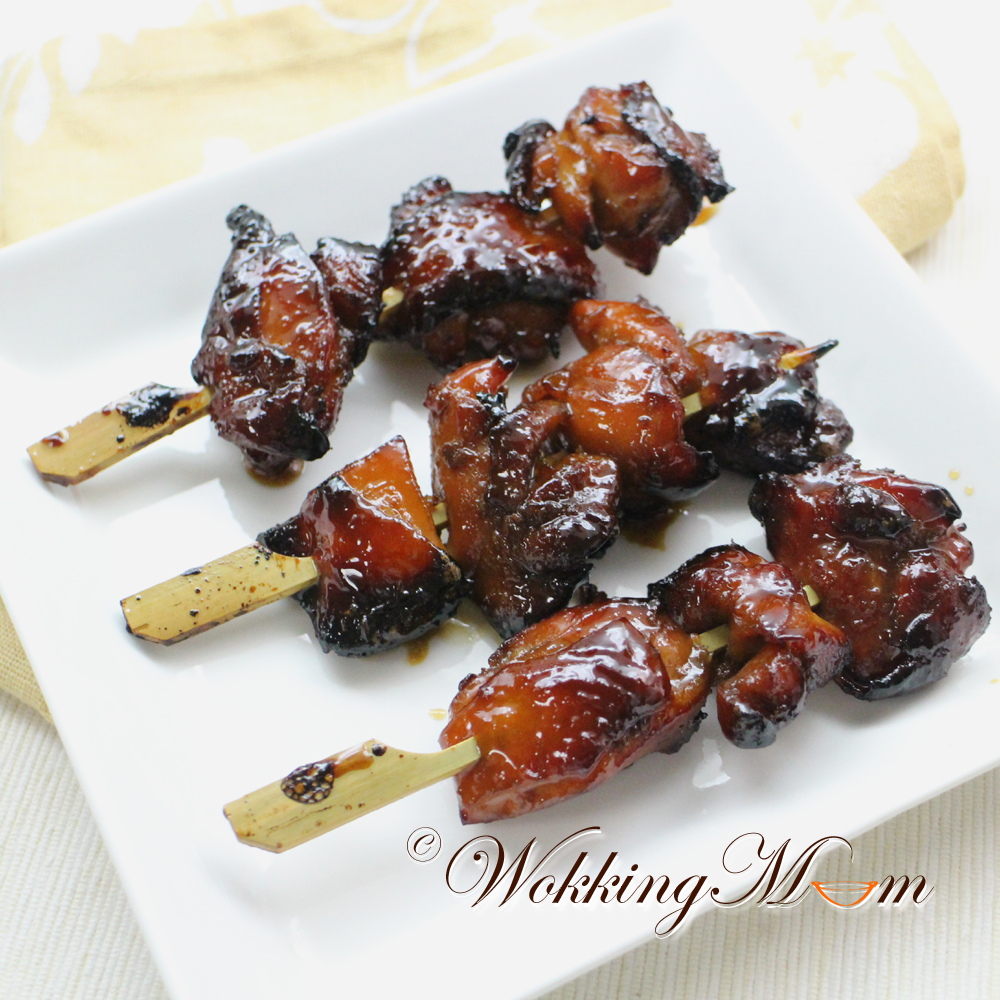
Chicken Yakitori
鸡肉串烧


My sister's husband is away on a business trip and she was "freed". :P  She came over to our place for dinner 2 nights in a row.

The night before I had plans to make Chicken Yakitori and thought I will just prepared a simple Yakitori Don with maybe a bowl of miso soup. It all changed when I woke up.


The morning I went to the wet market, I saw really nice Daikon and instantly made me crave for Radish and Ribs Stew. But I didn't have time to do that as it was going to be a busy day for me. I decided to made Oden instead since the kids love that too.

My sister messaged later and said that she will be coming over for dinner. I realised there might not be enough food. I was only planning to make Chicken Yakitori, Oden and Steamed Egg Custard. I decided to make an additional dish, Pork and Vegetable Stew. The Cheese Stuff Pork Cutlet was an last minute additional as I still have a few pieces of pork left and I didn't want to keep them.

I end up cooking what you see above yesterday (for my sister). I don't usually cook so much for dinner but sometime I just go a little crazy and stuff everybody silly with food. :P

Here's an update recipe of the Chicken Yakitori that I made.


Ingredients:
  • 4 Chicken Breast, debone and cut into bit sizes

Marinade:
  • 1/2 teaspoon Garlic Powder or 3 Fresh Garlic, grated
  • 1 tablespoon Sake
  • 1/2 tablespoon Light Soy Sauce
  • 1/2 tablespoon Sugar


Sauce:
  • 4 tablespoon Sake
  • 1 tablespoon  Mirin
  • 5 tablespoon Light Soy Sauce
  • 1 tablespoon Maltose or Sugar

How to do it:
  1. Pat dry chicken and add into marinade.
  2. Marinate for an hour.
  3. Meanwhile, combine ingredients for the sauce and simmer for about 10mins or till sauce begin to thicken.
  4. Set aside to use it for basting.
  5. Drain the chicken meat and thread the meat using bamboo skewer (soaked in water before hand).
  6. Grill chicken meat in preheated oven at 220c for 15mins or till you see oil dripping out of the meat.
  7. Reduce to oven temperature to 200c.
  8. Bast chicken meat with the sauce and grill for 7mins.
  9. Turn it around and do the same.
  10. Repeat the above 2 steps for another 2 times.
  11. Remove and serve with a squeeze of lemon if you like.

Note:
  • The meat will turn hard when it's cooled if you are using sugar for the sauce. Unless you are going to eat it while it's hot, I strongly suggest using maltose instead of sugar for the sauce.
  • If you like it a little charred on the edge, increase the oven temperature to 200c the last 5mins of the grilling.


Friday, August 30, 2013

Oven Grilled Chicken Wings with Fermented Bean Curd
豆腐乳烤鸡翼


I made this for late night supper sometime back. :P The kitchen was filled with the wonderful aroma after the grilling I'm sure my neighours could smell it (bcos I can always smell their cooking too!) I hope they don't complain about it. ;)

My chicken wings looked a bit weird here because I removed all the bones in it, except for the wing tips. I had intend to use it to make something else but changed my mind.


Ingredients:
  • 4 Chicken Wings
  • 3 tablespoon of sauce from Fermented Beancurd
  • 1 piece of Fermented Beancurd
  • 1/2 tablespoon Sugar
  • 1/2 tablespoon Sesame Oil
  • 1 stalk Coriander, chopped
  • 1 Fresh Red Chilli, de-seeded and chopped

How to do it:
  1. Smashed fermented beancurd and mix with the sauce.
  2. Add in the sugar, coriander and chilli.
  3. Mix well and marinate chicken wings with the mixture for at least an hour.
  4. Grill in the oven at 220C for 25 minutes.
  5. Bast chicken wings in-between grilling with reseved marinade.
  6. Serve with calamasi if you like.

Note:
If if you prefer it to be a more spicy, use chilli padi instead of normal chilli.


Wednesday, July 24, 2013

Grilled Squid in Miso Sauce
味噌酱烤鱿鱼


This is one of my cooking trials that end up being my favourite. ^^

I'm not sure if anyone would like this (because my husband always say I have 'funny' taste in food) but I rather share food that I like than food that I don't. I'm sure I will find people with the same taste as I do to like this. :P

Don't worry, I won't start sharing all kinds of weird tasting food that I like here. I will reserve that for torturing my family. :P


Ingredients:
  • 3 Squid, innards and 'skin' remove
  • 1 tablespoon Miso Paste
  • 1 1/2 tablespoon Mirin
  • 1 tablespoon Sake or Cooking Wine
  • a pinch of Sugar
  • 1 Calamansi (optional)

How to do it:
  1. Slice open the squid so it will be flat.
  2. Score  on the on inside of the squid. Do not cut thru.
  3. If using head, remove the eyes.
  4. Pat squid dry and thread squid with skewers on both sides.
  5. Mix miso paste, mirin, sake and sugar well.
  6. Spread the miso sauce sparingly on the side with cuts.
  7. Grill squid in preheat oven at 250C for 12 mins
  8. Bast squid with miso sauce sparingly once to twice in between grilling.
  9. Grill the head and side fins separately.
  10. Once done, remove skewers and cut squid into pieces.
  11. Served with a squeeze of calamansi if you like a little tang .

Note:
  • The more sauce you bast the squid with, the more salty it will be. So use sparingly.
  • Treading the squid with skewer is a must otherwise they will curl up during cooking which will makes grilling very difficult.
  • When you tread the squid with skewers, they will form the letter 'V' with 1 end of the skewer meeting. You may want to wrap the meeting ends of the skewers with foil so it will be easier to hold (with gloves) to remove the squid.
  • If you want to have a grossy look like the first pic here, spray or spread a little oil toward the end of the grilling and let it grill a while before removing.


Tuesday, July 16, 2013

Grilled Chicken Wings
烧烤鸡翅膀


Chicken wing is one of our favourite food. The kids love it fried. I love it grilled. If I have a portable BBQ grill, I will use that. BBQ-ing chicken wings over charcoal is the best. ;)  For now, using the oven will do.


Ingredients:
  • 8 Chicken Wings
  • additional Calamansi for serving

Marinade:
  • 2 teaspoon Garlic Powder or 5 Garlic clove, grated
  • 1/2 teaspoon Ginger Juice
  • 1 tablespoon Cooking Wine
  • 1 tablespoon Light Soy Sauce
  • 1/2 teaspoon Dark Soy Sauce
  • 2 teaspoon Sugar
  • 1/2 teaspoon Chicken Powder or Salt
  • Juice from 2 Calamansi

How to do it:
  1. Pat dry cleaned chicken wings.
  2. Twist to break the joints of chicken wing so you can grill it flat.
  3. Mix ingredients for marinade.
  4. Add chicken wing.
  5. Marinate for at least 2 hours, turning occasional so the chicken wings is evenly marinated.
  6. Grill chicken wing in reheat oven at 200C for 20 to 25 minutes.
  7. Flip over for grilling every 5 minutes.
  8. During the last flip, spread some oil if you like to get the chicken wings slight charred.
  9. Serve with a squeeze of calamansi.


Tuesday, March 12, 2013

Grilled Sambal Winglets
烤参巴鸡翼


Chicken wings or winglets are the family's all time favourite. You can do it in all sort of ways. One of my favourite is in sambal chilli.

I can't take spicy food (although I love it) so it's always good to be able to make it on my own so I can adjust how hot I want the sambal to be. Add dried chilli and more chilli padi if you want it more spicy. I can't do that cos if I do, I'll be full drinking water. :P

Ingredients:
  • 8 Chicken Mid-joint
  • Additional 1 Calamansi to be squeezed over grilled winglets (optional)

Sambal:
  • 10 Fresh Red Chilli, de-seed
  • 3 Chilli Padi, more if you like it spicy, de-deed
  • 3 Shallot
  • 1 teaspoon brown sugar
  • Juice of 1 Calamansi
  • Salt to taste

    How to do it:
    1. Blend, all ingredients for sambal into paste and set aside.
    2. Pat dry winglet and marinate with half the sambal for at least an hour.
    3. Lay winglets on oiled rack for grilling.
    4. Spread half of the remaining sambal on the winglets.
    5. Spray on a bit of cooking oil if possible.
    6. Grill in preheated oven at 200C for 30mins, turning the winglets mid way.
    7. Spread the remaining sambal on the winglet when you turn the winglets for further grilling.
    8. Serve with a additional squeeze of calamansi if you like.


    Thursday, January 10, 2013

    Grilled Sea Bass with Thyme and Garlic Butter


    My husband is away on an overseas business trip for the past week (meaning less cooking :p)

    Usually I will eat whatever leftover from the kids' dinner. However, I had a piece of Seabass in the fridge that I wanted to clear, so I made a simple dinner for myself yesterday instead of having leftovers.

    I had the sea bass grilling in the oven while I worked on the sides. This also means less cleaning up. You can pan-fry it too. You can have to watch over it so it will burn.


    Ingredients for Grilled Sea bass:
    • 1 slice Sea bass
    • 1/4 teaspoon Garlic Powder
    • 1/4 teaspoon Onion Powder
    • 2 sprig Fresh Thyme
    • Salt and Ground Black Pepper to taste

    Ingredients for Zesty Garlic Butter:
    • 2 clove Garlic, minced
    • Zest of 1 Lemon
    • 1 tablespoon Butter

    Ingredients for Mashed Cauliflower:
    • 230g Cauliflower, cut into florets
    • 1/3 tablespoon Butter
    • 1 tablespoon Parmesan Cheese (optional)
    • Salt to taste

    How to do it:
    1. Clean and pat dry sea bass.
    2. Mix herbs and spice ingredients for sea bass together.
    3. Rub all over the sea bass and set aside for 15 mins.
    4. Meanwhile, prepare the zesty garlic butter but mixing all ingredients together.
    5. Spread half of the butter on the skin side of the seabass.
    6. Grilled the sea bass on rack in preheat oven at 250C for 8 mins, longer if you want the skin browned.
    7. Turn over, spread the remaining butter and continue to grill for another 8 mins.
    8. While the sea bass is grilling in the oven, prepare the cauliflower.
    9. Steam the cauliflower florets for 10 mins. You can blanch them too.
    10. Drain well and pour into a blender.
    11. Add the butter and half of the parmesan cheese.
    12. Blend till smooth.
    13. Add salt to taste.
    14. Scoop out onto a plate and sprinkle the remaining parmesan cheese.
    15. You can bake it in the oven to brown it if you like.
    16. Remove sea bass from oven and serve together with the mashed cauliflower.
     

    Saturday, July 21, 2012

    Oven Grilled Winglet with Fermented Beancurd
    腐乳烤鸡翼


    I love Fermented Beancurd and I always  find it a waste to throw away the leftover sauce in the bottle. I used that to season chicken wings. :P

    I love the taste of chicken wing but I'm hesitant to share the recipe as I'm not sure how many would accept it or find it weird. However some Facebook friends have been asking for the recipe since I shared the photo.

    So, for those who has the same taste as me ;P, here's the recipe ...


    Ingredients:
    • 8 Chicken Winglets or other parts
    • 3 tablespoon of sauce from Fermented Beancurd
    • 2 piece of Fermented Beancurd
    • 1/2 tablespoon Sugar

    How to do it:
    1. Smashed fermented beancurd and mix with the sauce.
    2. Add in the sugar and mix well.
    3. Marinate winglet with the mixture for at least an hour.
      Grill in the oven at 220C for 25 minutes.
    4. Serve it with lime if you like.

    Note:
    If you want a more intense flavour, bring reserve to a simmer and use that to bast the winglet inbetween grilling.


    Thursday, July 19, 2012

    Oven Grilled Ebi Mentaiyaki
    明太子焗大虾


    I bought a bought of Ebiko for Steamed Egg Custard and since I do not wish to keep them, I decided to finished them by making this dish. This is adapted from my recipe, Hotate Mentaiyaki.

    Instead of using Hotate (Scallop), I used prawns instead. In the Hotate Mentaiyaki recipe, Tobiko was used instead of Ebiko. Either one works.

    I'm re-posting the recipe here for easy reference.

    Ingredients:
    • 4 large Prawn
    • 1 slice Cheese, cut into 4 strips
    • 3-4 tablespoon Ebiko or Tobiko
    • 4-5 tablespoon Japanese Mayonnaise
    • Additional Mayonnaise for toppings (optional)

    How to do it:
    1. Prepare prawns by cut the back of the shells with scissor.
    2. Slit and half the prawns taking care not to cut thru the bottom of the shells.
    3. Wash, clean and remove the intestinal tact at this moment.
    4. Gently but firmly press open the shells to each side so it's flat. 
    5. Pat dry and set aside.
    6. Mix mayonnaise with ebiko together.
    7. Place prawns in baking dish.
    8. Top each prawn with a piece of cheese each.
    9. Cover and spread with Mayonnaise mixture.
    10. Grill in preheated oven at 220C for 5 minutes.
    11. Remove and top with more mayonnaise if you like and grill for another 5 minutes or till mayonnaise mixture starts to bubble.
    12. Removeand serve immediately.

    Note:
    • The amount of mayonnaise used depends on the size of prawns.
    • Do not add seasoning as the mayo, cheese and ebiko already give the seasoning it needs.
    • The amount of time needed to for baking depends on the size of the prawn . Shorter time for smaller prawns. It should be done when you see the mayo toppings bubbling gently.


    Monday, April 23, 2012

    BBQ Chicken Winglets
    BBQ酱烤鸡翼


    I ordered McDonald's last week and requested only BBQ sauce for our meals, which include McNuggets by the way. We were given 4 packs of it. We only used 2 and the remaining 2 were kept in the fridge.

    While cleaning and packing my fridge last Friday, I decided to just use the BBQ sauce on a pack of winglets to clear it. Yes, I know. Another winglets recipe. :P We love winglets and I always buy it on standby to make as snacks or late night supper. ;P

    Oh! Please don't start going to McDonald's to 'collect' the BBQ sauce. Other BBQ should work well for this too.I don't McDonald's to find out and ask me to close my blog. :P


    Ingredients:
    • 10 Mid Joint Wings

    Marinade:
    • 2 pack (abt 50g) McDonald's BBQ Sauce (just if you happen to have them) or any BBQ Sauce
    • 1 teaspoon Worcestershire Sauce
    • 1 tablespoon Maltose* or Honey
    • 1/2 teaspoon Ground Black Pepper
    • 1/2 tablespoon Water* (if using Maltose only)

    How to do it:
    1. Mix ingredients for marinade together. *Please see notes below for further instructions*
    2. Marinate mid joint wings with marinade for at least an hour.
    3. Drain wings from marinade.
    4. Heat marinade in a pan and bring it to a gentle simmer.
    5. Cook till it is thicken. Use this as the basting sauce.
    6. Meanwhile, grill mid joint wings in a preheated oven at 200C for 25 minutes, basting it with the thickened marinade every 5 to 6 minutes.
    7. Serve when done.

    Note:
    • I have friends who have difficulties mixing the maltose in the marinade. So here's a tip, add half a tablespoon of water to the marinade in a pan.
    • Heat it till maltose is starting to melt then turn off the heat immediately.
    • Stir the mixture until maltose is completely melted.
    • Let the mixture cool before using it as a marinade.
    • However, if you are using Honey, you don't have to do this as honey is much easier to mix.

    Wednesday, March 14, 2012

    Sweet Bovril Winglets
    保卫尔烤鸡翼


    I did this on the spur of the moment as my late night supper. I love Bovril and Marmite but prefer Bovril. I have been having it since I was a little girl.

    During those days, Bovril was in Beef Flavour. Then it was discontinued and came the vegetarian version. When the Beef Flavour was back again, it never make its way to Singapore. I was super lucky that a very good friend of mine was holidaying in London and she brought back 4 bottles of Bovril Beef for me. I'm so blessed. :)

    For this simple recipe, you can use the vegetarian Bovril because you won't be able to get the Beef version in Singapore. The winglets will have a subtle taste of Bovril. You'll enjoy it if you like Bovril.

    Ingredients:
    • 8 Chicken Winglets

    Marinade:
    • 1 tablespoon Borvil
    • 1 teaspoon Maltose or Honey
    • 1/2 teaspoon Brown Sugar

    How to do it:
    1. Mix marinade together well.
    2. Add winglets to the marinade and marinate for 2 hours.
    3. Drain winglets from marinate and place on a baking tray. Retain marinade.
    4. Bring reserved marinade to a boil and set aside to use for basting. Add a bit more sugar if you want the sauce sweeter.
    5. Grill in preheated oven at 220C for 25 mins, basting it in-between.
    6. Remove when done and serve.


    Monday, March 12, 2012

    Tangy Hoisin Winglets
    酸味海鲜酱烤鸡翼


    I had marinated the winglets with Hosin Sauce the night before, intending to use cook it the next day but changed my mind.

    I tweaked my recipe a little and oven grilled them for supper instead. Then were slightly burned but that doesn't affect the taste. It was really good. My husband didn't even reject me when I offered to let him have more. :P

    If you like something tangy, you would love this. :)


    Ingredients:
    • 12 Chicken Mid-joint
    • 4 tablespoon Hoisin Sauce
    • 2 tablespoon Maltose
    • 1 1/2 teaspoon Garlic Powder
    • Juice of 1/2 - 1 Lemon
    • Additional 1 Calamansi to be squeezed over grilled winglets (optional)

    How to do it:
    1. Marinate chicken mid joint with Hoisin Sauce the night before or for at least 4 hours.
    2. Combine maltose, garlic powder and lemon juice together.
    3. Add in to the marinated chicken and continue to marinate for half an hour.
    4. Drain winglets but retain the marinade.
    5. Heat marinade in a pan and bring it to a gentle simmer. 
    6. Cook till it is thicken. Use this as the basting sauce.
    7. Meanwhile, grill winglets in a preheated oven at 220C for 25 minutes, basting it with the thickened marinade every 5 to 6 minutes.
    8. Serve with juice of a calamansi if you like.

    Tuesday, February 21, 2012

    Oven Grilled Salmon with Dill
    莳萝叶烤三文鱼


    This is my husband all time favourite fish dish and the only (cooked) salmon dish I take. It's another easy dish to make.

    My husband has been reaching home past 9pm lately. I just had this prepared beforehand. When he is back, I let the oven do the cooking while he takes a bath. When he is out, it's ready and it's till a hot and 'fresh', not reheated supper dinner. Most importantly, minimum cleaning required. ;)

    I'm reposting the recipe I posted a few years ago, with minor adjustment, for easy reference.

    Ingredients:
    • 1 slice Salmon
    • 1/2 teaspoon Garlic Powder
    • Zest of 1 Lemon
    • 1/2 tablespoon Dill, chopped
    • 1/2 teaspoon Olive Oil
    • 1/3 teaspoon Salt
    • a dash of Ground Black Pepper
    • A wedge of Lemon

    How to do it:
    1. Rub salt and pepper on salmon and set aside.
    2. Mix the rest of the ingredients together except lemon.
    3. Spread the herb mixture on both sides of the salmon, more on the top.
    4. Grill in oven at 220C for 15 minutes or till cooked.
    5. Squeeze lemon juice on salmon and serve immediately.


    Thursday, February 16, 2012

    Grilled Sambal Squid
    参巴烏賊


    I have a craving to make sambal belacan yesterday, mainly because my husband is not in Singapore. I good time to make it! ;) He hates the odor. I think it's aroma. XD

    I couldn't decided to grilled in the oven or in the Happy Call Pan. Sally, a fellow HCP member, suggested using the pan (but of course). I took up the challenge and put my dinner at risk. XD

    I must say I'm lucky I took the risk. The squid is very soft, not chewy at all, even after reheating. Even my son who dislike eating squid, love it.

    You will realised that I used a banana leaf. It also helps in the cooking as it acts as a barrier between the squid and the pan. There no direct contact with the heat source, tendency of over-cooking is minimised. The sambal that spilled over the banana leaf were thicken and slightly caramelised but not those that were on the leaf. If you are unable to get hold of a banaa leaf, you will have to cook at a lower heat and move the pan a lot.

    Here's my recipe using the sambal belacan I shared before this post.


    Ingredients:
    • 3 medium Squid
    • 1 Banana Leaf
    • 1 Shallot, sliced
    • 1 Lime
    • 1 petals from Pink Ginger Flower Bud, sliced thinly (optional)
    • 3 tablespoon Sambal Belacan, homemade or store bought

    How to do it:
    1. Add in squid to sambal belacan and marinade for 30 minutes.
    2. Grease pan with a bit of oil and heat pan on medium high heat.
    3. Place a piece banana leaf in the pan and spread the squid with the sambal on it.
    4. Cover the pan and cook for 6 minutes.
    5. Open the pan and cook for another 2 minutes.
    6. Top with ginger flower and cover pan for half a minute.
    7. Open the pan, dished top with sliced shallot and drizzle with lime juice.
    8. Serve immediately.