AdSense

Showing posts with label egg. Show all posts

Tuesday, July 1, 2014

{ Breakfast : Grilled Portobello Mushroom with Ham, Bacon and Poached Egg }


This was last Saturday's breakfast which was some of our favourite food that I have combined together as a meal. 

I have the oven working on the mushroom and cheese, the grill pan on the bacon and the deep pan on the poached egg at the same time, while I prepare the salad.


For the Portobello Mushrooms, I spreaded 1/2 teaspoon of butter and seasoned it with salt and pepper.  I let it grill in the oven at 250c for 10 minutes.  In between grilling, I turned the mushrooms and let it the other side of the mushroom soak up and juice and continue grilling.  Just before the mushrooms are done, place 1 or 2 slices of ham on the mushroom to heat it up.

I sprinkled some Shredded Parmesan Cheese on a piece of baking paper and let it turn brown and crisps at the same time as  the mushrooms are grilling.

Meanwhile, pan grill the bacon till they are brown and crispy. Let them sit on paper towel to drain excess oil.

While the rest are cooking, have a a pan or pot filled with water deep enough to cover eggs.  Let the water be in a gentle simmer.  You will see tiny bubbles from the base of the pan or pot but the water should not be jumping. reduce the heat to the lowest you can get just to maintain heat.  Add a teaspoon of vinegar to the water. 
Now, crack the egg into a bowl (I'm using cold eggs).  Gentle pour out into the pan with hot water.  Let it simmer for about 4 minutes or to your preferred done-ness.  Use a slotted spoon to gentle remove the egg.  You can do a few eggs together or one at time.

Dish the mushroom with ham on the plate. Gently place the poached egg on the mushroom. Top with bacon, Break the Parmesan chips into smaller pieces and sprinkle over. Drizzle with truffle oil and season with salt and pepper.

Breakfast is served.


Monday, April 28, 2014

{ Breakfast : Burger with Egg and Mushroom }


This was Sunday's breakfast.

The kids have been asking for burgers very often for weekend burgers. =_=||  They really like the meat patties so much. :P

This time round, I made smaller meat patties but a bit too small till you can't even see it. It's in between the cheese and the omelette.  The egg was seasoned with salt and pepper and also drizzled with truffle oil. I topped it with sauteed button mushroom too.

Sunday, April 20, 2014

Simplfied Hot Plate Tofu


This is a cheat copycat version of the popular sizzling hot plate tofu from zhi char stall. It's a simple hot plate tofu using just a few ingredients that my kids eat.

You can add or replace the the vegetables used here to your preference.


Ingredients:
  • 1 tube Egg Tofu, cut into thick pieces
  • 2 Fresh Shitake Mushroom, stalk removed and cut into smaller pieces
  • a handful Green Peas
  • a 1/4 Carrot, skinned and sliced
  • some diced Red Pepper for colour (optional)
  • 1 clove Garlic, minced
  • 1 Egg, beaten
  • 1/2 tablespoon Oyster Sauce
  • 1/3 teaspoon Sugar
  • 3 tablespoon Stock or Water

How to do it:
  1. Dab dry egg tofu and deep fry in hot oil till golden brown.
  2. Remove, drain from oil and set aside.
  3. Meanwhile, blanched the carrot till it's slightly soften.
  4. Drain and set aside.
  5. Heat pan with a tablespoon oil.
  6. Saute garlic till fragrant but not brown.
  7. Add in the vegetables.
  8. Stir-fry for awhile.
  9. Add in the tofu.
  10. Add in the oyster sauce, sugar and stock.
  11. Stir-fry till the vegetables are cooked and stock is almost absorbed.
  12. Meanwhile, heat up a oiled pan or hot plate.
  13. Pour in the the beaten egg and swirl around to make sure the egg covers the whole pan.
  14. Pour in the cooked tofu and vegetable.
  15. Serve immediately.

Note:
  • If you are using hard vegetables such as baby corn, carrot, sweet peas, etc., you can either blanch them or stir fry them first before adding the rest of vegetables as they need a longer time to cook compared to the rest.
  • Turn off the heat before you crack the egg. If the pan or hot plate is heated well enough, there will be enough heat to continue cooking the egg. This way also prevents the egg from over-cooking before adding the tofu and vegetables.


Friday, April 11, 2014

{ Little Lunch Box #62 }
小饭盒


My mind's a blank on what to prepare for the little one for her lunch in school.

This was not what I had planned. It was suppose to be sandwiches but I went home buying the bread and all sort of stuff except ingredients for the sandwich. =_=||   Always so distracted.


So, she had "Pie" (Baked Cheesy Cauliflower Mash), "Pau" (Poached Egg with Egg Crepe) and a slice of "cake" (Musubi) for lunch today.


Instruction on how to make the "Pau" (Poached Egg with Egg Crepe) ...

  1. Prepared the egg crepe first. It is done by cooking a beaten egg on a oiled pan. You don't fry it so just oil the pan and clean off excess oil with a paper towel. This is to make sure that the egg crepe doesn't stick and tear when you remove it.
  2. Have a 'piece' of spring onion blanch briefly, with a drop of oil preferred, ready too. This is to help soften the spring onion so it can be used at a string to tie the egg pouch later.
  3. Have cling wrap placed loosely over a small bowl.
  4. Crack and egg inside and gather the top and tie it using a part of the cling wrap.
  5. Move it around in simmer water to cook the egg till the done-ness you want. The egg I did was cooked with cooked white and soft yolk.
  6. Remove the cling wrap and place it in the middle of the egg crepe.
  7. Carefully gather up the edge of the egg crepe and tie it using the spring onion. Be gentle.
  8. And it's done.


Thursday, December 12, 2013

{ Dinner : Kani Maki with Wakame Eggroll }


Made this simple dinner for the kids last night. 

It was inspired by a post I saw on Instagram. I stacked up reverse Kani Maki supposedly to make it looked like a Xmas Tree. :P

The eggroll has wakame and the balance kani surimi I used for the maki and lightly seasoned with vegetarian oyster sauce.

I'll be away on a trip with my family on Saturday and will be back only on 22 December. I'm trying to clear what ever housework I have, as well as to get the kids' stuff ready for school next year before the trip. Hence, the lack of recipe posts. I'll be sharing more recipes when I'm back, that is, after clearing the after trip laundry. (Already beginning to hate at thoughts of it. :P)

Meanwhile, have a good week everyone!


Saturday, December 7, 2013

{ Breakfast: Pancake with Egg, Sausage and Bacon }


This morning's breakfast was Pancakes with whatever I'm trying to clear in the fridge. :P

I bought 2 boxes of button mushroom a few days ago but did not store them properly and they were all bruised and turning brown. So my daughter was happy that she's having her favourite mushroom soup again.

The bacon was expiring soon, so I had to clear that too. I added an egg (with a runny yolk) and a couple of sausages too.

This was the kids' breakfast. I can't eat this much for breakfast. I'm just having some simple fluffy pancakes.


Tuesday, December 3, 2013

Braised Noodle aka Lor Mee
卤面


Lor Mee is my daughter's favourite local food. I love it to, especially with raw garlic, pickled green chilli and lots of black vinegar!

During the olden days, it has shark's meat it in. Nowadays, to make is simple, beaten egg white is used instead. The recipe I'm sharing is not authentic but it's good enough for my family.

I added crispy fried bean curd skin and ready made Ngoh Hiang to it too.


Ingredients:
  • 600g Yellow (flatten) Noodles
  • 300g Pork Belly
  • 2 Hard Boiled Eggs
  • 2 Egg White or 2 Whole Egg, beaten
  • Some Bean Sprout

Braising Sauce:
  • 500ml Water
  • 3 clove Garlic, smashed with skin intact
  • 1 tablespoon Light Soy Sauce
  • 1 teaspoon Dark Soy Sauce

Soup Sauce:
  • 1.5 litre Pork Bone Stock
  • 1 Star Anise
  • 1/2 tablespoon Chinese 5-spice Powder
  • 1/2 tablespoon Oyster Sauce
  • 1 tablespoon Sugar or to taste
  • Salt to taste
  • Cornflour Mixture (thickener)

How to do it:
  1. Combine ingredients for braising sauce together in a pot enough to cover the pork.
  2. Add in pork belly and hard boiled eggs.
  3. Bring to a boil and reduce to a simmer.
  4. Braise for an hour till the pork is tender.
  5. Remove the pork and cut into smaller pieces.
  6. Remove the eggs and half them.
  7. Retain the braising sauce.
  8. Bring the bone stock to  a boil.
  9. Add in the braising sauce, star anise and 5-spice powder.
  10. Season with sugar and salt.
  11. Thicken with cornflour mixture.
  12. Turn off the heat and gently stir in the beaten egg white.
  13. The soup sauce is ready to be used.
  14. Blanch some noodles and bean sprout.
  15. Drain and pour into a serving bowl.
  16. Pour hot soup sauce over and top with pork belly, egg and other ingredients.
  17. Serve immediately.

Note:
  • You can use chicken stock instead of pork bone stock.


Friday, November 8, 2013

{ Breakfast: Egg in Ham Cup }


If you follow me on Instagram, you will recognise this meal. I shared it in early October and forgotten about it because my baby sister's wedding and the kids' examination period was around the time.

I will be busy again as my daughter agreed to participate in a recital just today with a rehearsal next Wednesday!! And full dress rehearsal ... next Friday!!! The actual recital is on 24 November. I don't even have time to go hunt for her dress and shoes! Sigh!

I hope she really can manage it. Keeping fingers and toes crossed for her. And I thought I can relax a bit now that the exams are over. :/

Sharing this easy peasy breakfast idea (while I still have the time to sit in front of my lappy), though a bit late. Maybe you can try this weekend.


You will need muffin tray or cup, preferably shaved ham, 2 slices for each cup, an egg of course, some additional chopped veggies or bacon and sprinkle of Parmesan cheese.

You just need to push the ham in the muffin cup, crack the egg into it. You can break up to egg if you like. Add some chopped veggies and sprinkle the cheese. Bake it at 200c for 15 mins and Viola!

I served it with Cheese Bread and Mushroom Soup.


Wednesday, November 6, 2013

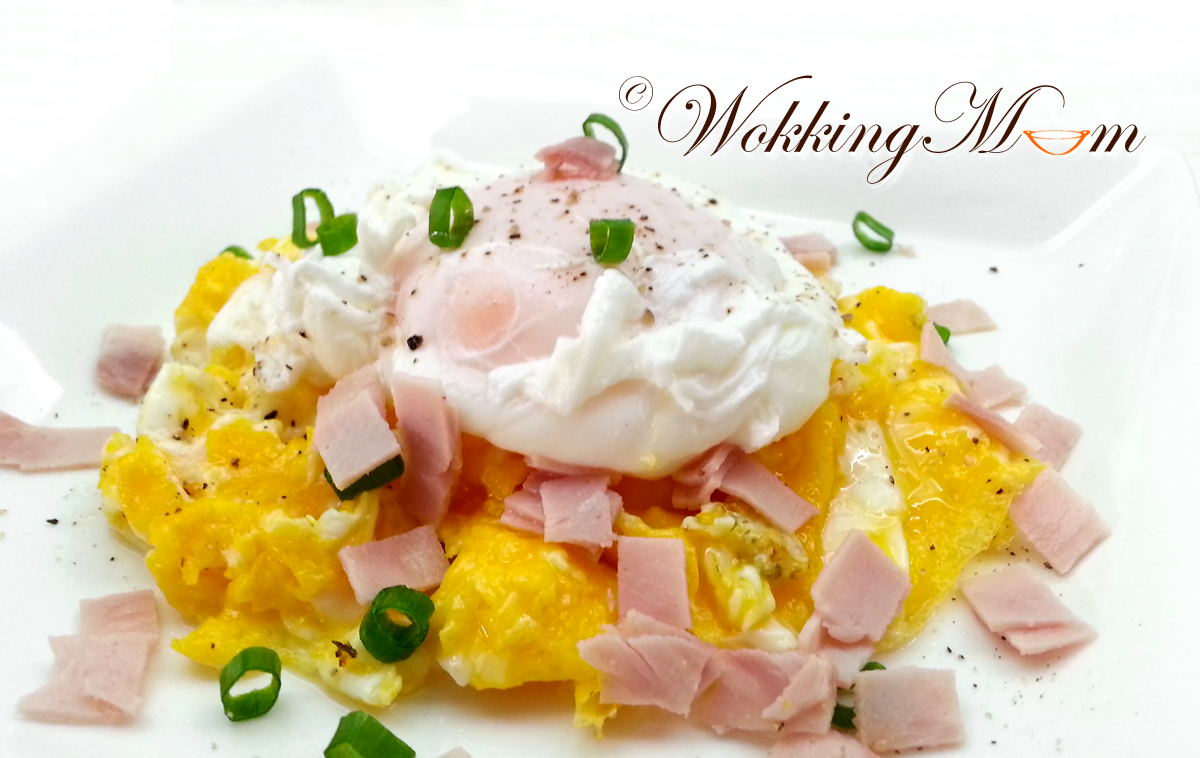
{ Breakfast: Scrambled and Poached Eggs }
炒蛋加荷包蛋


This was our breakfast last Saturday.

Both my kids have their own egg preference. So on that day I decided to make both Scrambled and Poached eggs and serve them together. They have different sides though. My son had additional bacon while my daughter had ham.

I had my eggs with chopped ham with no sausages and bacon. :)


Ingredients:
  • 500ml Water or enough water to cover the egg in the pot
  • Eggs
  • 2 teaspoon White Vinegar

How to do it:
  1. Bring water to a boil.
  2. Reduce to a gentle simmer.
  3. Add in the vinegar. This is to help egg white congeal.
  4. Crack egg into ladle and gently pour into the simmering water.
  5. Use a chopstick to stir the water getting closer to the wall of the pot as possible.
  6. Stir to create a whirlpool and that the egg stays in the middle. This will prevent the egg white from spreading.
  7. Continue cooking for half a minute or till your desire doneness.
  8. Remove egg with a slotted spoon.

Note:
You have make an egg at a time.


Saturday, October 26, 2013

{ Breakfast: Mini Burger Set }
迷你汉堡套餐


This was for breakfast today.

I made Mini Cheesy Burger today. For the patties, I used minced meat, fish paste, crab stick and mozzarella cheese. The burger, using butter roll,  was with a sliced of cheese, some shredded cabbage with mayonnaise.

The side were simple egg roll, edamame beans and salad

What did you have for breakfast?


Thursday, September 19, 2013

{ Birthday Meal: Rice Vermicelli in Double-Boiled Chicken Soup with Abalone Slices and Egg }
鲍鱼鸡汤面线


It was my husband's birthday and usually during on birthdays, we get to eat Rice Vermicelli or Mee Sua as it symbolised longevity. Egg is a must too. I have a very typical traditional Chinese husband (old fashion :P)


For the soup, I had a blanched chicken in 1.2 litre of water steaming for almost 4 hours. This was only possible for me since I'm using a steam oven. Great thing too as I was really busy on that day itself too. You can using a double boiler to do it to. I don't own one so I usually, I would simmer over low heat if I'm not using my oven but that requires monitoring.

What to you have on your birthdays? My mother used to cook this for me on my birthday too. I'm looking forward to the day someone's cook this for me on my birthday again. I'm old fashion too. :)


Tuesday, September 10, 2013

Stir Fry Silky Scrambled Egg with Prawns
滑蛋虾球


I used to have scrambled eggs with tomatoes when I was younger. It was cooked by my aunt and usually the egg was fried till it's brown and fragrant.

I preferred it more fluffy and moist. Here, I added prawns to it to make more tasty.


Ingredients:
  • 2 Egg
  • 8 - 10 small Prawn, shelled and de-veined
  • 1 small Tomato
  • 1 teaspoon Cooking Oil
  • 1 stalk Spring Onion, diced

Marinade:
  • 1/2 teaspoon Cooking Wine
  • a dash of Pepper
  • a pinch of Salt
  • 1/4 teaspoon Cornflour

Seasoning:
  • 2 tablespoon Chicken Stock
  • 1/2 tablespoon Cornflour
  • a pinch of Salt

How to do it:
  1. Marinate prawns with the marinade and set aside in the fridge till ready to be used.
  2. Gently slice an 'x' on the surface (skin) of the tomato.
  3. Place in a pot of boiling water to cook till the skin curl out.
  4. Drain and place the tomato in cold water.
  5. Peel off the tomato skin and dice.
  6. Mix diced tomato with cooking oil and set aside.
  7. Heat pan with a tablespoon oil.
  8. Pan fry prawns till about 80% cooked.
  9. Dish and set aside.
  10. Beat eggs with salt.
  11. Add in prawns, tomatoes, spring onions and chicken stock premixed with cornflour.
  12. Give it a gently mix to blend all ingredients together.
  13. Heat a pan with 2 tablespoon cooking oil.
  14. Pour egg mixture into the pan.
  15. Reduce heat and cook till egg begins to solidify.
  16. Dish out when the egg is about 90%.
  17. The remaining heat will continue to cook the egg without browning it giving it the silky texture.


Tuesday, July 23, 2013

{ Hotcakes, Sausage and Eggs Brekkie }
松饼香肠煎蛋早餐


Last Saturday, I overslept and my son had to start tuition first without breakfast. :P

In order to make breakfast fast, I had my oven working on the peas and sausages (I used it to steam both of them). I had the peas lightly seasoned with salt and sausages sear to get the cut lines opened up.

I had 2 pans working on the pancakes. One to make pancakes and the other to keep the pancakes warm. I'm using premixed pancake mix but I added a little vanilla essence, icing sugar and baking powder to it too.

I had the egg cooked in another pan. :P  By the way, the egg shown here was a single egg with double yolk. I bought a tray of eggs with most of the eggs (that I have cracked) with double yolk. They have an average of 79g and the heaviest was 84g! The best of it was 10 eggs cost only $2.40!

I added deliciously sweet golden Kiwi to the breakfast too.

Maybe I should have ask him to just fill himself up with milk. :P


Thursday, July 18, 2013

Steamed Egg Custard with Clams
蛤蜊蒸蛋


In my previous post, I mentioned that my kids have beginning to enjoy eating clams.

I bought some clams and saved some to add to their favourite steamed egg custard.  Apparently, the clams weren't enough for them. Hence they ate the Steamed Clams with Herbs and Tomatoes too.


Ingredients:
  • 2 eggs
  • a pinch of salt
  • 160ml Chicken Stock
  • 250g Clams (more if you like)
  • 1-2 Dried Scallop
  • 1 teaspoon Cornflour
  • 1/2 teaspoon Oyster Sauce

How to do it:
  1. Clean clams and steam for 2 mins or till clams have slightly opened. 
  2. Open up the clams and remove the clam meat. Strain and reserve the clam juice.
  3. Soak the dried scallop in 5 tablespoon of hot water before hand.
  4. Beat egg lightly in a bowl
  5. Add broth, clam juice and salt.
  6. Mix well.
  7. Sieve the egg mixture if you want a smoother result.
  8. Pour into a shallow flat dish.
  9. Add clams.
  10. Cover the bowl with foil.
  11. Heat a pot of water for steaming.
  12. When the water starts to boil, put in the dish.
  13. Remove when egg is set.
  14. While the egg is cooking, tear the scallop into strands.
  15. Return the dried scallop strands to the water.
  16. Add in oyster sauce and corn flour.
  17. Mix well.
  18. Bring the sauce to a boil while gently stirring it.
  19. Remove and pour over the steamed egg and tofu.
  20. Drizzle with sesame seed oil if you like.
  21. Serve.

Note:
  • If you would like to have stuffed clams in the egg custard like what I did, mix 50g minced pork with 50g finely chopped prawn with 1 egg white and 1/2 tablespoon Cornflour till paste-like. 
  • Stuff some paste in the clams from step 1.  
  • Place the clams (shells) in the egg mixture in step 8 before adding the clams in step 9.


Saturday, April 20, 2013

Non-bake Crème Brûlée
焦糖奶油布丁


I'm not sure if you notice that the French dessert, Creme Brulee is very much like the Chinese Steamed Egg Custard 扽蛋. The difference I guess is the the layer of caramelised sugar on the top.

Few days back, inspired by the Chinese 扽蛋,  I decided to try making the French Creme Brulee the Chinese way. LOL I'm sure it can work even without using the oven. And you can tell from the pictures here that I have succeeded. ;)

So good news for those who loves Creme Brulee but do not have an oven to do it. Well, you don't need an oven after all.

Ingredients (for 2 cups):
  • 3 Egg Yolk
  • 200ml Whipping Cream
  • 100ml Fresh Milk
  • 1 1/2 tablespoon Sugar
  • 1 teaspoon Vanilla Extract
  • Additional 2 tablespoon Sugar (one tablespoon for each custard)

How to do it:
  1. Mix all ingredients except for the additional sugar together.
  2. Blend well to incorporate all ingredients.
  3. Sieve mixture into deep dish.
  4. Cover with foil.
  5. Boil a pot of water and place dish in to steam for 15mins.
  6. Cool completely before chilling in the fridge.
  7. Sprinkle additional sugar on top of the custard.
  8. Use a touch to burn the sugar to caramelise it.
  9. You can serve immediately or return to the fridge and serve when ready.
  10. To eat, use the back of a spoon to hit the caramelised sugar to break it.

Note:
  • If you don't have a torch, the closest you can do is to make caramelised sugar.
  • You will need to boil 1 part water to 4 part sugar (eg, 1 tablespoon water to 4 tablespoon sugar) till the solution turned light brown and slightly thick.
  • You have to watch the heat as you only want to caramelised the sugar and not burn it.
  • Please note that the lesser the quatity you use to make the caramelised sugar, the faster it will burn due to the wider cooking surface. So find the smallest pot you can to make this or increase the quantity of the water and sugar to avoid burning.
  • As water is used to make the caramelised sugar, it may not as hard as torching the sugar directly. Hence return the custard to the fridge for chilling immediately pouring the caramelised sugar.


Wednesday, March 6, 2013

Kanimi Surimi with Koebi Omelette
帝王蟹肉棒与小虾子干煎蛋


I bought a packet of Kanimi Surimi (imitation snow crab leg) to add for making Fried Rice and Steamed Egg Custard. The kids love this particular type (note: expensive type =_=|||)

All the pieces were stuck together frozen. I have to thaw the whole packet and finish it within days because I do not want to refreeze it. I also have half a pack of Japanese Koebi close to expiry. :P

My auntie used to make egg omelette with similar type of Koebi. She bought it from the grocer selling dried food stuff. It adds texture to the omelette and also fragrance too.


Ingredients:
  • 2 Eggs, beaten
  • 4 - 5 Kanimi Surimi (Imitation Snow Crab Leg) 帝王蟹肉棒, cut into pieces
  • 10g Kobei (Dried Baby Shrimps) 小虾子干
  • 1 tablespoon chopped Coriander (optional)
  • a pinch of Salt
  • 1/2 tablespoon Cooking Oil

How to do it:
  1. Heat oil and add in the koebi.
  2. Stir fry quickly for a few seconds.
  3. Add in the the surimi and continue to stir-fry for half a minute.  
  4. Add in beaten egg seasoned with salt.
  5. Sprinkle on coriander if using.
  6. Stir quickly to mix well with ingredients.
  7. Spread out and let the omelette fry on both side till done.
  8. Dish and serve.