Thursday, September 17, 2015

Pan-fried Bacon Wrapped Tofu


Recipe for  Pan-fried Bacon Wrapped Tofu


Ingredients:
  • 1 tube Egg Tofu
  • 5-6 strips Low Sodium Streaky Bacon

How to do it:
  1. Lay bacon side by side, overlapping a little.
  2. Place egg tofu across one end.
  3. Roll it till it meets the other end of the roll of bacon.
  4. Bacon ends should overlap.
  5. Gently place the ends part down to a hot pan.
  6. Plan fried on medium heat till the bacon is lightly brown.
  7. The bacon should stick well and encase the tofu.
  8. Turn and rotate to evenly brown all sides of brown.
  9. Remove and slice with a serrated knife.
  10. Serve as it is or with Goma (Sesame) Sauce, if you like.

as seen in https://instagram.com/p/7ug_izAdLd/

Lay streaky bacon side by side, overlapping each other with fats below before placing the tofu on top.


Thursday, September 3, 2015

Herbal Drunken Prawns


Recipe for  Herbal Drunken Prawns

Ingredients:
  • 2 pieces 玉竹 (Solomon's Seal Rhizome), cut into smaller pieces
  • 5 pieces 川芎 (Szechwan Lovage Rhizome)
  • 4-5 pieces 当归 (Angelica Sinensis)
  • 1 small handful 枸杞子 (Wolfberries)
  • 2 slices Ginger
  • 10 medium prawns, antenna, feelers and legs (etc) trimmed

Marinade for Prawns:
  • 1 tablespoon Sake or Chinese Cooking Wine
  • a pinch of salt

Seasonings:
  • 1 tablespoon Light Soy Sauce
  • 2-3 tablespoon Sake or Chinese Cooking Wine
  • 1/2 teaspoon Chicken Granules
  • 1/2 teaspoon Fish Sauce
  • Salt to taste

How to do it:
  1. Soak all Chinese herbs except Wolfberries with 100ml hot water for about 3 hours or till they are fully hydrated and set aside.
  2. Slit the back of the prawns.
  3. Clean and dab dry.
  4. Marinate prawns with sake and salt for 20 mins.
  5. In a pot, add 400 -500ml water (depending how much soup you would like to have).
  6. Add in the hydrated herbs, ginger and wolf berries and bring to a boil for a minute.
  7. Add in the seasonings except for salt.
  8. Add prawns into the soup and like it cook for about a minute or till all prawns are just done.
  9. Add salt to taste.
  10. Drizzle sesame oil and serve immediately.

Note:
If you want a stronger wine taste, you can add the cooking wine just before you season with salt.

as seen in https://instagram.com/p/7ILRywgdDL


Sunday, May 10, 2015

Macaroni with Mushroom and Cheese


Recipe for Macaroni with Mushroom and Cheese

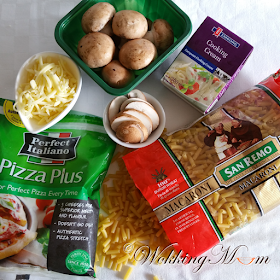
Ingredients:
  • 80g Pasta
  • 1 glove Garlic, minced
  • 1/2 tablespoon Butter
  • 8 Cremini Mushroom aka Brown Swiss Mushrooms, sliced
  • 180ml - 200ml Cooking Cream
  • 2 handful Mixed Shredded Cheese

How to do it:

  1. Cook pasta in lightly salted water and according to the package's instructions.
  2. Drain and set aside in baking dish.
  3. In a pan, add in butter.When butter started to melt, add in garlic.
  4. Saute till fragrant. Garlic should be soften but not brown.
  5. Add in mushroom and continue cooking for about a minute.
  6. Pour in cooking cream.
  7. Cooking till mushroom have absorb the liquid and the cream has thicken a little.
  8. Add a pinch of salt.
  9. Pour over the cooked pasta.
  10. Give it a gentle toss or just mix a little so the mushroom will get mixed around with the pasta.
  11. Top the pasta with cheese.
  12. Bake at preheat oven at 240c for 10mins or till cheese brown.
  13. Remove and serve immediately.

Note:
  • I'm using straight macaroni so the portion looks small but it is very compact.  Hence, although the portion seems little but is just nice for one person (but very filling for me).  Use your favourite pasta if you like. :)
  • You can add cooked (grilled/fried) chicken or fish with or without the mushroom.  Seafood would nice too.
as seen in https://instagram.com/p/2VTEEKgdKp/


Tuesday, May 5, 2015

Steamed Chicken with Chicken Essence


Recipe for Steamed Chicken with Chicken Essence

Ingredients:
  • 2 Chicken Drumstick, cleaned and dabbed dry
  • 1 tablespoon Cooking Wine
  • a pinch of Salt
  • 4 pieces Yu Zhu 玉竹 (Solomon's Seal Rhizome), cut half
  • 6 Hong Zao 红枣 (Red Dates), sliced into 3 each
  • a small handful Gou Qi Zi 枸杞子 (Wolfberries)
  • 1 to 2 bottles Chicken Essence, depending on how much sauce you like
  • Salt to taste

How to do it:
  1. Rub chicken with salt and cooking wine.
  2. You can let the chicken marinate for half an hour if you like.
  3. Add chicken in a deep dish.
  4. Add in the rest of the ingredients.
  5. Cover with foil.
  6. Steam for 2 to 3 hours.
  7. Remove foil and bast chicken with the sauce.
  8. Drizzle with some sesame oil and serve immediately.

Note:
  • I'm using Sake as cooking wine. If you use Hua Tiow (Chinese Cooking Wine), there will be the Hua Tiow Wine taste.
  • I'm using (2 bottles of) New Moon Chicken Essence. If you are using Brand's, please add 1/4 teaspoon of sugar as Brand's Chicken Essence is slightly bitter.
  • You can also use Chicken Essence with Cordyceps instead for added flavours.
as seen in https://instagram.com/p/2BBtx6gdEL/

Pickled Cucumber


Recipe for Pickled Cucumber

Ingredients:

Marinade:
  • 1 tablespoon Light Soy Sauce
  • 1 tablespoon Apple Cider
  • 1/3 tablespoon Sugar
  • 1 teaspoon Sesame Oil
  • a dash of Worcestershire Sauce (optional)

How to do it:
  1. Cut cucumber into 2cm thick or into 4 parts then halved, lenghwise, whichever you prefer.
  2. Put all cut cucumber into a ziploc bag or a container.
  3. Add roasted garlic and marinade to the cucumber.
  4. Squeeze out excess air from ziploc bag, if using.
  5. Refrigerate it for about 4 hours or till ready to serve.
  6. Turn the bag around or give the cucumber slices a stir occasionally to make sure all the pieces get well marinated.
  7. Place pickled cucumber in a dish and served with some of the marinade.

Note:
  • You can add some Japanese La Yu or Chilli if you want it to be spicy.
  • Fried or Roasted Garlic adds fragrance but will not overpower the pickled cucumber with a strong garlic smell.  You can use raw garlic if you like though.
As seen in https://instagram.com/p/1NpFINgdPL/

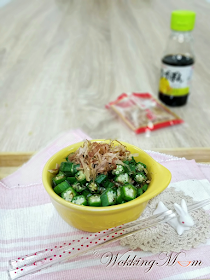
Okra Salad


Recipe for Okra Salad

Ingredients:
  • 6 to 7 Okra, washed and cleaned

Dressing:
  • Some Bonito Flakes
  • 1 1/2 tablespoon Yuzu Seasoned Soy Sauce

How to do it:
  1. Steam Orka for 4 minutes.
  2. Cut the top and the tip of okra away.
  3. Cut okra into 1 to 1.5cm thick.
  4. Top okra with bonito flakes.
  5. Drizzle Yuzu Seasoned Soy Sauce.
  6. Serve.

Note:
  • You can replace Yuzu Season Soy Sauce with 1 1/2 tablespoon Light Soy Sauce, 1/4 teaspoon Lemon Juice and a pinch of Sugar.  However the taste of the sauce will depends on the type of light soy sauce used.


Tuesday, February 3, 2015

Seafood Platter in Cream Sauce


If you are following my Instagram, you will know on Mondays, it's usually one-pot dinners for us.  Mainly because the wet market in our neighbour is closed on Mondays.  But it's also one-pot dinners for us whenever I feel lazy too. :P

So, anyway, we had seafood last night.  I bought some marinated Dory Fillet and got that oven grilled and served it on rice with broccoli and carrot.  You can have a look at that HERE.

I added a little bonus (bcos I was a little less lazy than usual. :P).  I wanted to clear the little bits and pieces of seafood that I had in the freezer.  I bought some really small squids (the are more tender than bigger ones) from the supermarket to add on to make this seafood platter.

I'm using the same recipe I shared earlier but I tweaked a little since there are also 'fresh' (as in uncooked) seafood here.

Ingredients:
  • 6 frozen mussels, thawed and cleaned
  • 6 Prawns, remove shell, leaving on the head and tall intact
  • 3 small Squids, head and innards removed, cleaned and cut into thick rings
  • 6 Scallops
Sauce:
  • 20g Butter
  • 3 - 4 Garlic, minced or grated (you can use a garlic press)
  • 200g Cooking Cream
  • 1/2 teaspoon Dried Thyme or a small handful Fresh Thyme
  • 1 to 2 teaspoon Lemon Juice or to your taste
  • Salt and Ground Black Pepper to taste
  • Zest of half a lemon (optional)

How to to it:
  1. Melt butter in a pan.
  2. Add garlic and saute till soften and fragrant but not browned.
  3. Add cream and Thyme.
  4. Cook in medium low heat till the sauce bubbles.
  5. Continue cooking till the sauce starts to thicken.
  6. Add in the remaining ingredients for the sauce.
  7. While the sauce is cooking, prepare the seafood. 
  8. Make sure the mussels are thawed, cleaned and dabbed dry and set aside.
  9. Season the remaining seafood with a pinch of salt and arrange them in a dish.
  10. Steam on high heat for 2 mins.
  11. Remove and dab dry.
  12. Arrange all seafood together in a oven proof dish.
  13. Once the  sauce is ready, pour it over the mussels.
  14. Bake in preheated oven at 230C for 7 mins.
  15. Serve immediately.

Notes:
  • I pre-cook the fresh seafood before baking them because these seafood will have liquid when they are cooked.  Hence, pre-cooking them help to reduced it during the baking which will make the sauce too watery.


Monday, February 2, 2015

{ Little Lunch Box #85 }
小饭盒


The last sheep that I tried making was not very convincing and I told myself, I shall try again.

So here it is but I'm not quite happy with how it turned out.  Mostly the ears.  I think I got the ears wrong and I doubt the little one would recognise that I was trying to shape a sheep out of her lunch.

But surprisingly, she could tell from first look!  What a consolation!

What's here are ...
  • Ham & Cheese Sandwich, which was slightly toasted so the bread was the warm enough to melt the cheese a little but not tough when it's cooled.
  • Lava Egg, which I don't recommend you making it for lunch boxes as it's not completely cooked.  I bring the lunch box straight to my daughter after making it so the egg wasn't kept long out in our weather.
  • Milk, which you can hardly see in the background.

Sunday, February 1, 2015

Mussels in Buttery Lemon Garlic Sauce


This is just one of the dishes that I loved and won't mind having it often. 

I wished that I had prepared some toasted bread to clean up the sauce.  The sauce was cleared up anyway, because I mixed my rice with it and ate it all up.  Burp!

Ingredients:
  • 8 to 10 frozen mussels, thawed and cleaned

Sauce:
  • 20g Butter
  • 3 - 4 Garlic, minced or grated (you can use a garlic press)
  • 200g Cooking Cream
  • 1/2 teaspoon Dried Thyme or a small handful Fresh Thyme
  • 1 to 2 teaspoon Lemon Juice or to your taste
  • Salt and Ground Black Pepper to taste
  • Zest of half a lemon (optional)

How to to it:
  1. Melt butter in a pan.
  2. Add garlic and saute till soften and fragrant but not browned.
  3. Add cream and Thyme.
  4. Cook in medium low heat till the sauce bubbles.
  5. Continue cooking till the sauce starts to thicken.
  6. Add in the remaining ingredients for the sauce.
  7. While the sauce is cooking, prepare the mussels. 
  8. Make sure the mussels are thawed, cleaned and dabbed dry.
  9. Arrange mussels in a oven proof dish.
  10. Once the  sauce is ready, pour it over the mussels.
  11. Bake in preheated oven at 230C for 7 mins.
  12. Serve immediately.

Notes:
  • If you do not have a oven, you can also cook.
  • Place the mussels down on the pot; shell facing up.
  • Simmer for about 10mins till mussels are completely heated thru.
  • I preferred oven baking as it will brown the surface a little and has a more even cooking for the mussel.


Thursday, January 29, 2015

{ Little Lunch Box #84 }
小饭盒


The little one ask if I could make one of her favourites burger for her lunch.  How could I reject her?

It's actually THIS burger but I topped it with homemade Mentaiko sauce.   She actually reminded me to torch the sauce.  =_=||

I don't have a lunch box that is big enough to hold burgers.   So, I always either wrapped it up with pretty printed foil or use a take away container.


I shared how I did one HERE before.  The one I did today is a little different as the take away container is a little shorter and the bun is actually touching the bottom (in this case, the top).  So I had to use another method. 

You should be able to see clearly what was done.  Just 2 holes close to one another on opposite sides. 

Now, you may ask why not just one hole?  Well, you may recalled me saying the bun was touching the top.  If I had only made one hole, the string/ribbon will have to run past the 2 holes.  I don't want the bun to be touching the string.  :)

And so, a carrying case for my kitty bun is done.  And off we go to school.


Tuesday, January 27, 2015

{ Little Lunch Box #83 }
小饭盒


The little one's ASP ends later today so I decided to pack her with a more filling lunch box.

I'm planning to make Seafood Noodle Soup today, so I bought some prawns.  I picked the smallest prawns and decided to use them to play a bit the little one's lunch. 

The idea was to make a lamb.  Alas, it wasn't a very convincing one.  Well, at least I know the little one will enjoy her lunch as it packed with all her favourite food.

It has rice ball with, button mushroom, broccoli, meatballs and of course 2 little prawns.


Monday, January 26, 2015

{ Little Lunch Box #82 } 小饭盒


It's a brand new week!

I had a great weekend cos I was able to catch up on an extra couple of hours of sleep!  Yay!  (God I'm looking a lot like a panda now.)

I hope you had a great weekend too!  I'm already looking forward to the coming weekend!  Time for me now, passes by at light speed.  So yeah, the weekend will be here without me realising.

So, are you feeling a little crabby today because of the Monday Blues?  This little crab is not feeling crabby at all.  She's all  ready to get eaten, along with her little fishy friend. :P

The crab's body is a "bread bun".  You can see how it's done HERE.  The claws are sausages secured using spaghetti. The 8 legs are from the bread crust.

So there you go. Hope you have a good week ahead!

Thursday, January 22, 2015

{ Little Lunch Box #81 }
小饭盒


The third After School Programme for the week.  And no.  My brain still doesn't want to wake up.

Since I had some left over rice still warming in the rice cooker, I used them to make Egg Crepe Kani Maki.

I sprinkled on both sides of the individual pieces of maki with Nori Flakes for added fragrance.  Sides are Edamame.

Tuesday, January 20, 2015

{ Little Lunch Box #80 }
小饭盒


What? It's Lunch Box day again?  But I haven't have enough time to warm up my brain.

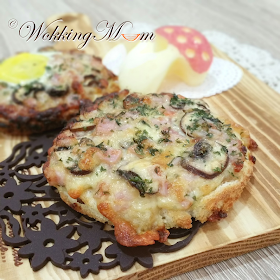
Never mind, the little one wouldn't mind have toast for lunch break, especially if I have added her favourite cremini mushrooms in there.

I shaped the bread into a round one to make it more fun.  Well, actually, so it could fit in the lunch box I'm using. :P  I included edible "toadstool" apples too. (Can you see them in the background?)

Toasts were "rested" before I pack them.  Don't have them to get soggy.  I added a quail egg to one of the toasts too.

By the way, I'm using THIS RECIPE.  Except, I added 4 cremini mushrooms, sliced, to the original recipe and instead of having that many steps, I only had 2 steps. Mix ALL the ingredients together before spreading on the bread.  After which, you toast it. 

Works fine! :)

Monday, January 19, 2015

{ Little Lunch Box #79 }
小饭盒


School reopened not too long ago. 

It's a lot more tiring for me now that I have one child in the secondary school and the other in the the primary school. This means, for sure, lesser beauty sleep for me (and I don't have the habit of napping in the afternoon. Neither do I have the chance to do it).

The elder one returns home "as and when",  making cooking so difficult.  More on that if I have the chance to rant.

Anyways, after school programme (extra lessons) has started for the little one. For some reasons, she only has about 15 to 20 mins break time for the first few lessons.  So, lunch in school need to be really simple, knowing she takes forever to finish her food.  (And also I need time to warm up. :P )

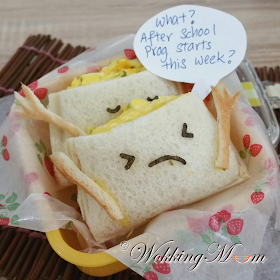
So, it's just her favourite, Egg Mayo Sandwiches. :)